Hello all again.
Today (actually yesterday) I got to work on my shin guards for my titan. The original ones followed an older titan and didn't look very impressive. So I went into max and tinkered around until I found something that was pretty cool. Printed it out and tested it... WRONG.... so I made some changes... WRONG.. then some more.... WRONG.... OMG I wasted paper on this.
So to make a long story short, I finally got the concept working and everything seemed to be working fine. As I was doing tests I realized that there wasn't any connection between the two sides, so I also included a connection between them, so that as it set, it would hold a bit better. (the first ones where very skewed) With the amount of gluing and waiting time it takes to make this, I had to add marks and tabs to help with alignment.
Pics of the process: (again, kind of an instructional about how to assemble this)

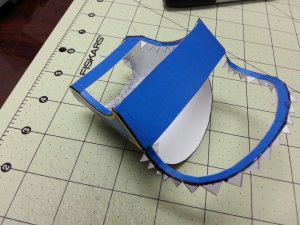
First, I glued the braceed side for the farthest point on my sides and glued the brace together. This way, I could see the shape as I was working on it. (Do remember, that I bent all of the teeth in this and black lined it so I wouldn't be too messy later. I also wrapped the whole guard, so I got a predictable shape. To do this, I simply used the curved part of my desk and pulled it back and forth across it. This warped the paper and gave it shape.)

Next, I glued the next tab section into place while curving the part that goes up to it. I also glued that brace to set the shape. I then proceeded to glue the curve between them, then started on the upper section. You can see in the picture that the front teeth and parts are pushed into the model. This is so that the teeth quit grabbing the front. It is very hard to glue stuff when it is pushing against what you are trying to glue. It is important to note that the front vertical piece (the one that leads to the front) is not glued. This is so that I can maneuver the front into place for gluing. If I glued it, the next part would be next to impossible.

Now, I glued the front center and matched the mark for alignment. I actually only glued the first 2 teeth. This way It gets the center but I don't have to mess with trying to keep everything level at this point. 2 teeth at a time, I glue and level them until I have them all done. With the last teeth on each side, I also glue the upper piece that I did not glue earlier. (You can see excessive glue on the model. It is white glue that dries clear.) The problem I encountered on this was that the pieces were very hard to keep edge to edge. In the end, that was not hugely important. Black marker fixes anything... LOL)

OK, the next part is the bottom side of the guard. I glued the two ends onto the bottom teeth of the other, then glued the center mark. (4 teeth glued)

Next, 2-3 teeth at a time, I glued and leveled it until I reached the back part. Again, if the back part is not perfect, that is ok. we can hide it. It should be very close though.
So with all of this, now I let it sit for about 10 minutes so that the glue can become hard. The next step will start to remove the braces. I also take the time to use a marker to black line the back since now it is much sturdier than when it was all apart.

Now, onto the back. I warp it so that it fits into the area. and remove the upper brace. (I cut it with some scissors.) Now, I glue all the top teeth in the front and push the back plate into the braced bottom aligning the marks, top and trying to not get it hung up in the bottom teeth. When you press this, the sides should line up as well. Keep lots of pressure on this until that glue sets. (Remember, I am using quick drying white glue, so that is about 20-30 seconds. I hold it longer. (If this comes unglued for any reason, it is going to be a pain to fix.)

Next. making sure that the bottom teeth are all set in place, I glue about 4 of them and center the bottom mark. I now have the top and a few of the bottom in place

Now, I start gluing until I am an inch or so away from the bottom brace on all 4 parts. Again, I wait 10 minutes before I cut that brace so the glue has time to set. I cut the brace at an angle so that it folds correctly into the bottom part. Fold it, black line it and I glue the last of them together. At this point, I pay attention to any skewing that happens as I glue this. Try to make them straight with the rest of the model.

Tada... finished. You will see this on the model in later pics. When I put it on it and glued it I got a warm fuzzy feeling, then realized that I forgot to pee during all of this....


")


 )
)


")


