By the looks of the ad, you're getting three different tips and needles (#1 is the finest, #3 is a general purpose type, and the #5 is for broader coverage and/or heavier paints). Mine came only with a number 3, and that's all that I've ever used. That price of $59.99 is excellent - mine cost twice that 30 years ago.

Extra bottles are very useful, but, unless they're really cheap, wait until you get the airbrush to see if some manufacturers' paint bottles will also fit the siphon cap that comes with the set. As I mentioned, my VL will take many types of bottles, but I recently had to buy a new siphon cap and could get it only as a set, with an attached bottle - both the cap and the bottle were larger than the original, which meant that they'd fit none of the 30 or so bottles which I have. I solved that problem by installing the new siphon in the old cap - I've used mine so much that the chrome plating on the part of the siphon that fits into the airbrush was worn away, resulting in a loose fit and eventually, dropped paint bottles while airbrushing.
The paintshop floor was already "well used", but now it's even moreso.


:-D The bottle that came with my airbrush was a 5/8 oz. capacity, and the inside diameter of the siphon cap is 1.024", which is the same as Floquil, PollyScale, etc. However, the parts sheet that came with mine doesn't list such a bottle size

, so I can't even give you a part number. If you get a bottle and cap that is not the same size as whatever brand of paint you use the most, it's fairly easy to install the siphon assembly onto a lid from one of the paint jars, then use that as part of the airbrush set instead of the factory-supplied one. As you finish each bottle of paint, thoroughly clean the bottle, and store it for use when you need to mix up thinned colours for spraying: you'll have a good supply in no time.
")
For cleaning, I use an appropriate solvent for the type of paint being used - I usually use lacquer-based paints like Floquil, so I keep a gallon of lacquer thinner on hand at all times - it's also useful as a cement for styrene. The other useful cleaning tool is pipe cleaners - when you disassemble your airbrush for cleaning, dip the tip of one in your solvent, then push it, from the rear, through the air passage, and then, from below, through the paint passage. Also, pass the pipe cleaner through the needle support tube. That's usually all the internal cleaning required. I toss the tip, air cap and air cap body into some lacquer thinner in the paint cup, then fish them out and dry them with a clean cloth. Done immediately after painting, that's all you need to do to keep it looking and performing like new.
The other item that should be a must for airbrushing is a paint booth which can be ventilated to the outdoors. These can be pretty expensive, but you can also make your own. These keep most of the fumes from stinking up the house (and your lungs) and also prevent dried airborne overspray from collecting on the model being painted. If you're spraying only water-based paints, a dust mask is still a good idea even with a spray booth, and for paints with organic solvents, a two-stage respirator should be mandatory, spray booth or not.
Your airbrush should come with instructions and a parts list, along with some tips for practising airbrushing. Save all of the literature for future reference, and, by all means, try out those practice exercises on some cardboard - it's a good way to learn proper techniques and see the various results before screwing-up a perfectly good model, and it will help you become competent much more quickly. Have fun.
:-D
Wayne


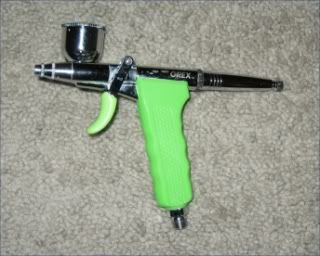
") anyway I have been totally happy with it :thumb::thumb:. Here is their website link
anyway I have been totally happy with it :thumb::thumb:. Here is their website link