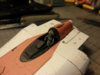
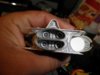
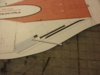
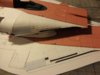
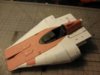
As I promised in my E-wing thread I will now ducument my process of increasing detail to a model. The model I will be using is Shunichi Makino's A-wing. Here is the main hull of the model build and ready for greebling as you can see I have added a cockpit that i extracted from the X-Wing Alliance Upgrade A-wing 3D model. I have an extra copy of the model printed out to cut the detail parts from and my next posts will detail this process.
A-Wing in 1:72
- Thread starter sidewinder81777
- Start date
You are using an out of date browser. It may not display this or other websites correctly.
You should upgrade or use an alternative browser.
You should upgrade or use an alternative browser.
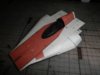
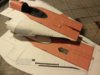
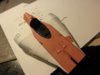
I use the extra printout to take any parts that are part of the texture that I want to be a physical object, or any panels I want to emphasize, I cut them out of the extra part and layer them on.
Attachments
Yes an A wing..
looks great....are you going to scribe the panel lines?..or glue the panels on the ship?
i'm thinking about glueing my snowspeeder with all the panels...and make all the screw-holes where they need to be. (thinking about)
i'm wondering how you going to make the cockpit windows......plastic bottle?
looks great....are you going to scribe the panel lines?..or glue the panels on the ship?
i'm thinking about glueing my snowspeeder with all the panels...and make all the screw-holes where they need to be. (thinking about)
i'm wondering how you going to make the cockpit windows......plastic bottle?
Yes an A wing..
looks great....are you going to scribe the panel lines?..or glue the panels on the ship?
i'm thinking about glueing my snowspeeder with all the panels...and make all the screw-holes where they need to be. (thinking about)
i'm wondering how you going to make the cockpit windows......plastic bottle?
I'm not doing all panels, just raising a few here and there, as for the canopy ill link up a thread by getter1 where he details the canopy making process
http://www.papermodelers.com/forum/figurines-anime/5946-vf-1d-valkyrie-trainer-8.html
")
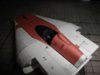
The raised detail really makes a difference, definitely worth the price of printing those parts twice. Lookin good... nay... GREAT so far SW!

The extra detail that you are adding really makes the models come to life.
KEEP UP THE GREAT WORK!!!
KEEP UP THE GREAT WORK!!!
2nd!
Absolutely! That's something I'll try on my next models. It really adds a lot of life and takes the model to a new level of "reality".
GREAT JOB!!!
The extra detail that you are adding really makes the models come to life.
KEEP UP THE GREAT WORK!!!
Absolutely! That's something I'll try on my next models. It really adds a lot of life and takes the model to a new level of "reality".
GREAT JOB!!!

yes, i go into A-wing picture and click it it I have some pictures of the model finished and no links to download, somebody can see it?
thanks