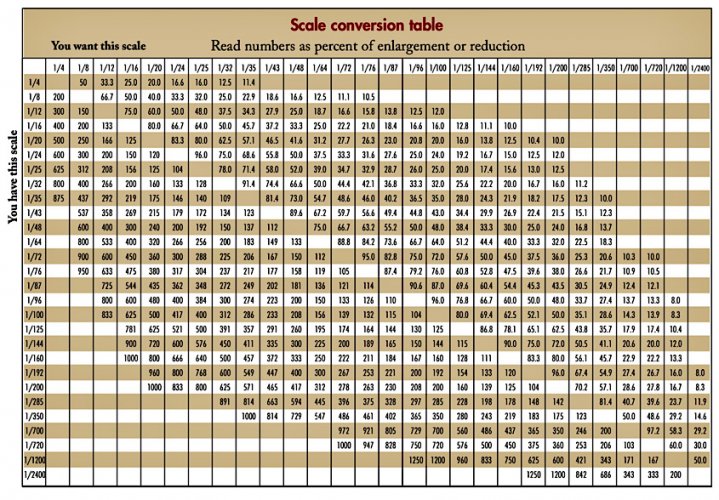
I have been resizing Zio Prudenzio’s models to 1/32 scale and have found the following the easiest method for me.
I’ve noticed that when the original files are opened in Foxit reader (the simplest to use free pdf reader that I’ve found), they vary in print size when set to 100% zoom.
Using GIMP, PAINT.NET and MS WORD, I can re-size the parts at 600dpi, to any scale that I want and print them on A4 sheets at 100%.
If you don’t already have them, download GIMP and PAINT.NET. (You do not need to know how to use GIMP but PAINT.Net is easy to learn if you have used MSPAINT before.).
PLEASE NOTE!
After publishing this article, I received some very helpful advice from Revell-Fan. Instead of using the BMP format in the following article, you can substitute the PNG format wherever it says BMP.
One of the Export screens in GIMP may differ slightly but Export anyway using the default options.
Download the relevant model pdf file/files and save in your Downloads folder.
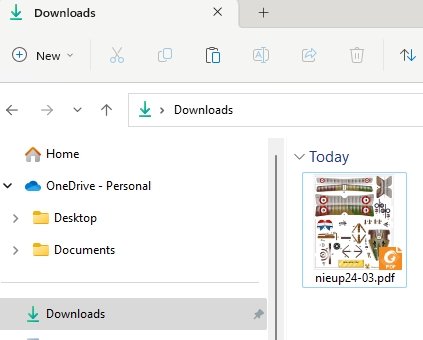
Right click and open the file in GIMP.
You should get the following screen.
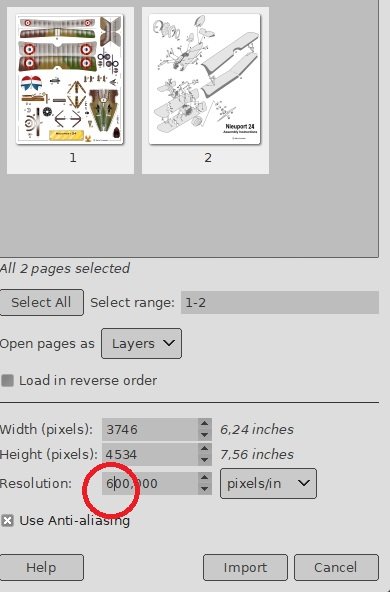
Change the resolution to 600 pixels/in and click Import.
If there is more than 1 page, select the page you want to edit.
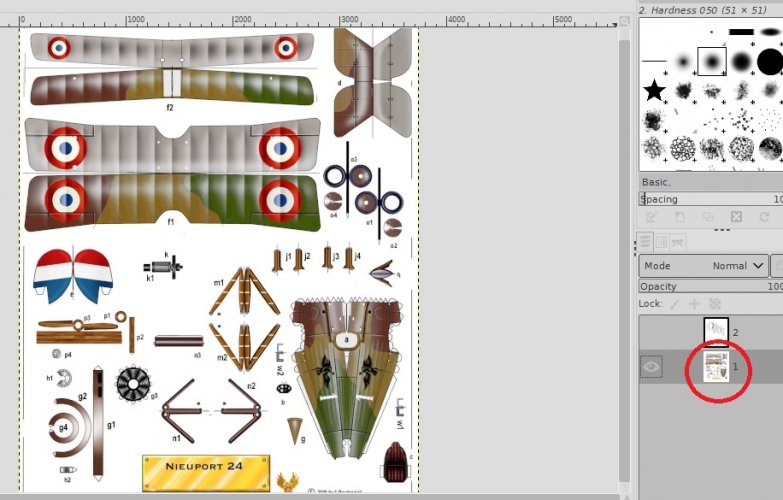
Select File/Export As…
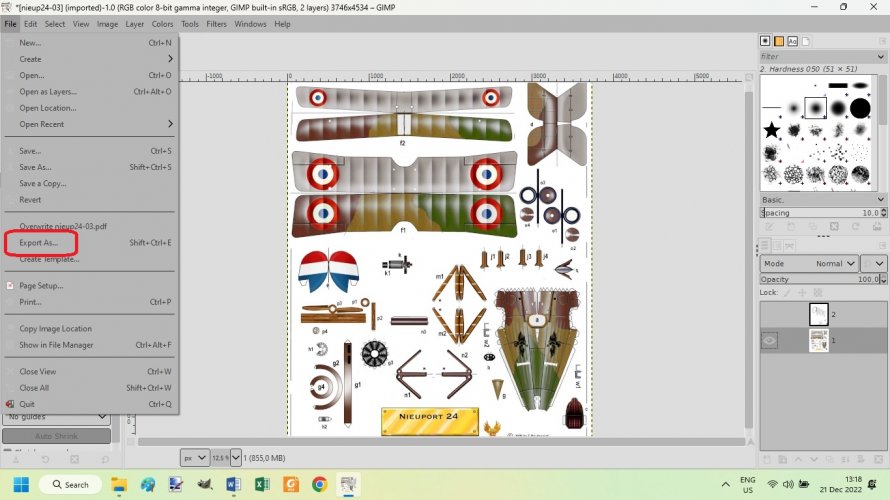
Change the file extension from pdf to bmp and click Export.
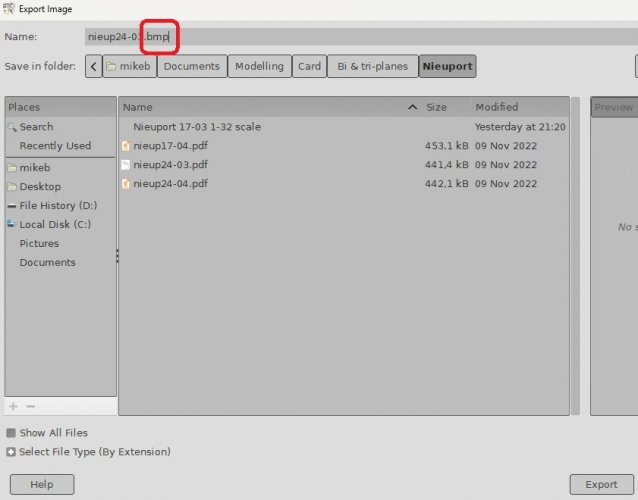
Click Export again.
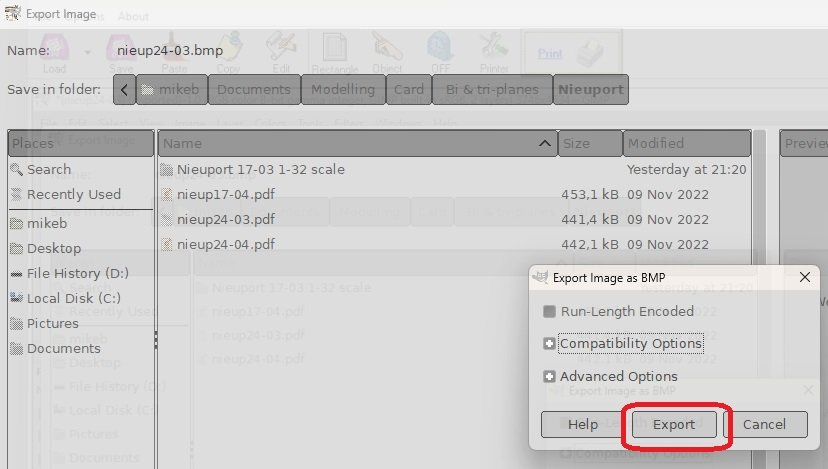
The file is now saved as a BMP.
Close GIMP and this screen will appear.
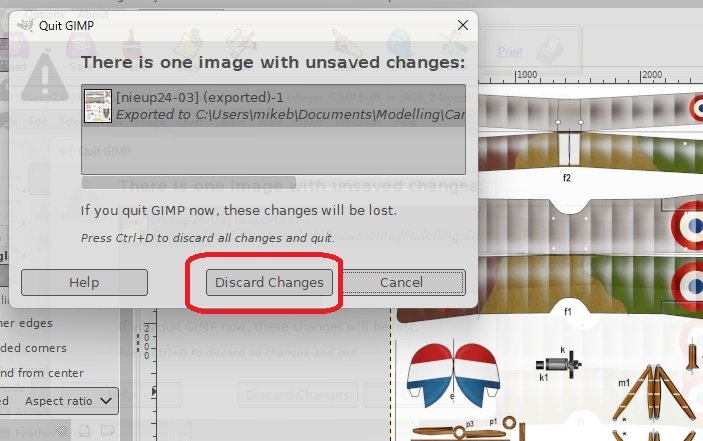
Click Discard Changes.
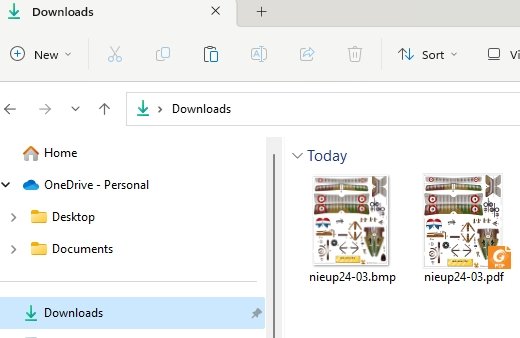
You should now have these files.
Now, open PAINT.NET.
It will open on a blank page.
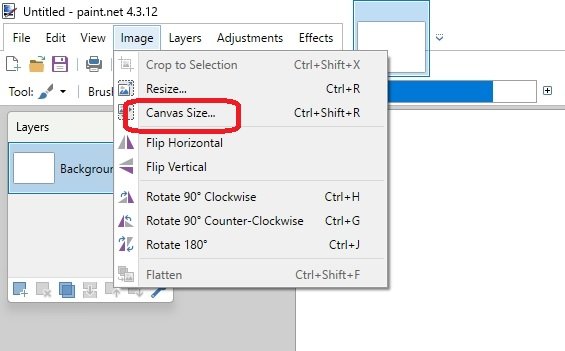
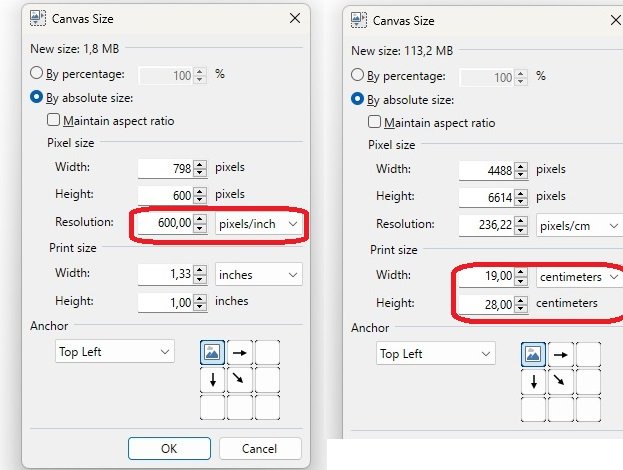
Select Image/Canvas size and then select pixels/inch in the resolution box and change the value to 600.Select the Print size boxes, select centimeters and change the Width to 19 and Height to 28. (The Resolution will automatically convert to 236.22 pixels/cm)
Press OK and save this picture as “A4 Portrait 600dpi.bmp”.
You now have these 3 files.
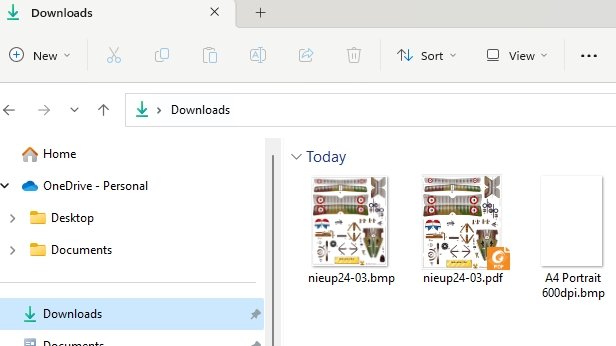
This will now be your template for saving your newly sized parts at whatever scale you wish.
In the following example, I will convert the Nieuport pdf to 1/32 scale.
Once saved in this scale, if you want 1/48 or 1/72, you can simply change the scale when you print your pdf’s by printing at the relevant percentage.
This will enable anyone who wants to model in 1/48 scale to print the pdf at 66%, and if they want 1/72 scale, then print at 44%.
Now search Google for Nieuport wingspan.

This returned a wingspan of 8200mm
Now, open up the Nieuport BMP file in PAINT.NET and measure the wingspan. In this case it is approximately 117mm.
Here is the simple math.
The real plane’s actual wingspan is 8200mm. A = 8200mm.
A ÷ 32 = 256mm (1/32 scale) B = 256mm.
The wingspan on the original BMP from GIMP = 117mm. C = 117mm.
The % decrease or increase of the original BMP = B ÷ C B ÷ C = 2.18
Therefore, percentage increase of 218%
If B ÷ C is less than 1 then the percentage is a decrease (The Se5a worked out to 0.544 therefore the percentage was set to 54%).
Select the whole image (CTL-A) in PAINT.NET and select “Move Selected Pixels”.
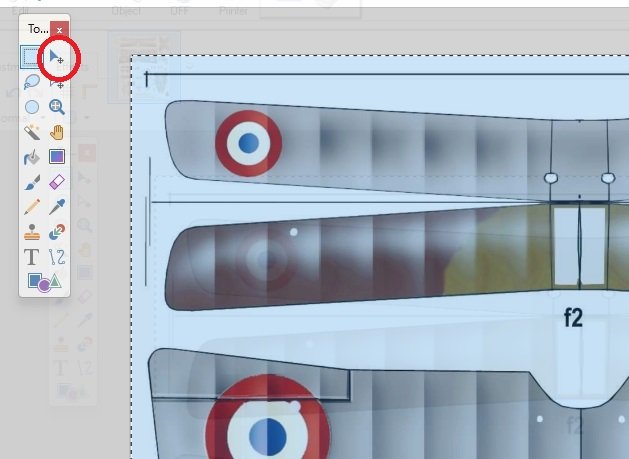
Select Image/Resize… and change percentage to 218 and click OK.
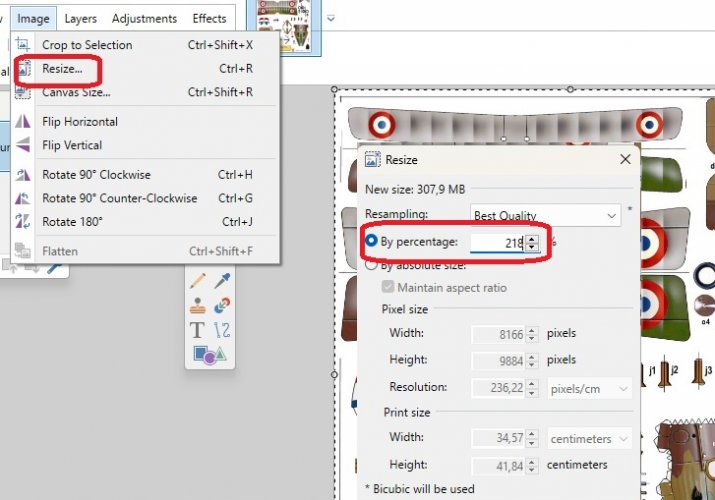
The parts on this BMP file are now resized to 1/32nd scale. (Wingspan = 256mm).

The wingspan is now 256mm.

This file is now saved as “Nieuport 1-32 scale.bmp. This is now our master file of parts.
We can now transfer all the parts at 1/32 scale to the template A4 page/s that we created earlier.
Keep this Master file open in PAINT.NET and open the A4 template page that we created earlier and save it as “Nieuport 1-32 scale Page 1.bmp”
(The one original bmp will now become 3 x A4 pages of 1/32 scale parts).
Select and copy the parts, one by one from the original and place them on the new A4 template pages, rearranging them to fit without changing the size of the page. As each page is filled, save it and open up a new template page alongside the others and save it as page 2 etc.
It sounds complicated at first but after a few goes you will realise how easy it is.
When you have all the parts copied to your satisfaction, you will have 3 pages of parts in A4 format at 100% zoom. Don't be afraid to use more pages if you can't fit them to 3 pages.
We now convert the BMP files back into pdf format.
Open each file in GIMP, select Export as…, and change the file extension to pdf and Export.
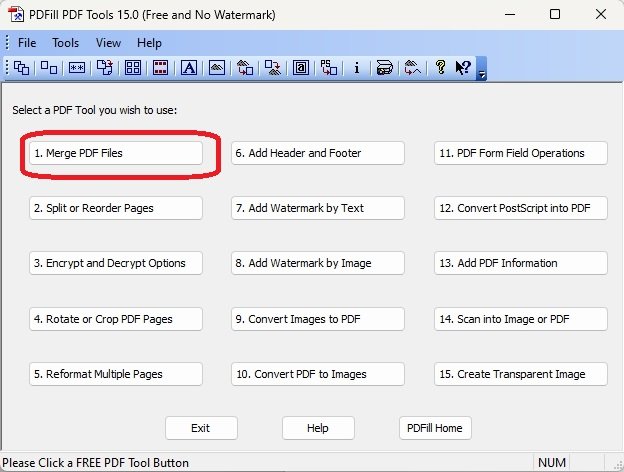
You can keep the files separate or combine them into one pdf document with a new file name. I used the free Software PDFill.
REDUCING THE PDF FILE SIZE.
Open up each pdf in MS WORD and then save it as a pdf with a new file name (you can rename it later). When saved, close the WORD document and do not save the original pdf file. This file can then be deleted from your Downloads.
My combined Nieuport pdf of 5 pages started out as 44.6Mb but after saving it from WORD, it reduced to 1.04Mb.
Hope this is of assistance to anyone who wants to rescale a file and doesn’t know the original scale.
I’ve noticed that when the original files are opened in Foxit reader (the simplest to use free pdf reader that I’ve found), they vary in print size when set to 100% zoom.
Using GIMP, PAINT.NET and MS WORD, I can re-size the parts at 600dpi, to any scale that I want and print them on A4 sheets at 100%.
If you don’t already have them, download GIMP and PAINT.NET. (You do not need to know how to use GIMP but PAINT.Net is easy to learn if you have used MSPAINT before.).
PLEASE NOTE!
After publishing this article, I received some very helpful advice from Revell-Fan. Instead of using the BMP format in the following article, you can substitute the PNG format wherever it says BMP.
One of the Export screens in GIMP may differ slightly but Export anyway using the default options.
Download the relevant model pdf file/files and save in your Downloads folder.

Right click and open the file in GIMP.
You should get the following screen.

Change the resolution to 600 pixels/in and click Import.
If there is more than 1 page, select the page you want to edit.

Select File/Export As…

Change the file extension from pdf to bmp and click Export.

Click Export again.

The file is now saved as a BMP.
Close GIMP and this screen will appear.

Click Discard Changes.
You should now have these files.

Now, open PAINT.NET.
It will open on a blank page.
Select Image/Canvas size and then select pixels/inch in the resolution box and change the value to 600.Select the Print size boxes, select centimeters and change the Width to 19 and Height to 28. (The Resolution will automatically convert to 236.22 pixels/cm)


Press OK and save this picture as “A4 Portrait 600dpi.bmp”.
You now have these 3 files.

This will now be your template for saving your newly sized parts at whatever scale you wish.
In the following example, I will convert the Nieuport pdf to 1/32 scale.
Once saved in this scale, if you want 1/48 or 1/72, you can simply change the scale when you print your pdf’s by printing at the relevant percentage.
This will enable anyone who wants to model in 1/48 scale to print the pdf at 66%, and if they want 1/72 scale, then print at 44%.
Now search Google for Nieuport wingspan.

This returned a wingspan of 8200mm
Now, open up the Nieuport BMP file in PAINT.NET and measure the wingspan. In this case it is approximately 117mm.
Here is the simple math.
The real plane’s actual wingspan is 8200mm. A = 8200mm.
A ÷ 32 = 256mm (1/32 scale) B = 256mm.
The wingspan on the original BMP from GIMP = 117mm. C = 117mm.
The % decrease or increase of the original BMP = B ÷ C B ÷ C = 2.18
Therefore, percentage increase of 218%
If B ÷ C is less than 1 then the percentage is a decrease (The Se5a worked out to 0.544 therefore the percentage was set to 54%).
Select the whole image (CTL-A) in PAINT.NET and select “Move Selected Pixels”.

Select Image/Resize… and change percentage to 218 and click OK.

The parts on this BMP file are now resized to 1/32nd scale. (Wingspan = 256mm).

The wingspan is now 256mm.

This file is now saved as “Nieuport 1-32 scale.bmp. This is now our master file of parts.
We can now transfer all the parts at 1/32 scale to the template A4 page/s that we created earlier.
Keep this Master file open in PAINT.NET and open the A4 template page that we created earlier and save it as “Nieuport 1-32 scale Page 1.bmp”
(The one original bmp will now become 3 x A4 pages of 1/32 scale parts).
Select and copy the parts, one by one from the original and place them on the new A4 template pages, rearranging them to fit without changing the size of the page. As each page is filled, save it and open up a new template page alongside the others and save it as page 2 etc.
It sounds complicated at first but after a few goes you will realise how easy it is.
When you have all the parts copied to your satisfaction, you will have 3 pages of parts in A4 format at 100% zoom. Don't be afraid to use more pages if you can't fit them to 3 pages.
We now convert the BMP files back into pdf format.
Open each file in GIMP, select Export as…, and change the file extension to pdf and Export.
You can keep the files separate or combine them into one pdf document with a new file name. I used the free Software PDFill.

REDUCING THE PDF FILE SIZE.
Open up each pdf in MS WORD and then save it as a pdf with a new file name (you can rename it later). When saved, close the WORD document and do not save the original pdf file. This file can then be deleted from your Downloads.
My combined Nieuport pdf of 5 pages started out as 44.6Mb but after saving it from WORD, it reduced to 1.04Mb.
Hope this is of assistance to anyone who wants to rescale a file and doesn’t know the original scale.
Last edited:


