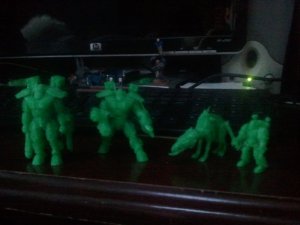
3D Hound titan

Leibolmai

New Member
We have a Replicator 2 at work which is the same price, 6x6x11in build envelope and the PVA comes out great, and we have another ABS machine a Dimension BST. I could easily print the 3D parts I made in CATIA for the warhound if I wanted to, I did make them solids and fully buildable just because that's just the cleaniest way to make a model. But since the machines are work assets, I'll have to refrain. Only paper for me for the foreseeable future :mrgreen:

Quick update with no pictures, I went back and redid the head on Sunday, figured out my scaling errors in pepakura finally, and re-textured the head to something I'm happier with. I printed out the head and cut the first page, yet to do the second page.

Also played around with getting PDF into Cameo, so far need to convert to TIFF's and then do the trace function. Biggest stumbling block, all the stuff I downloaded is in A4 size, and I don't have any A4 paper.:eek:

Cheers,

Leibolmai
 

Kjev

Active Member
But since the machines are work assets, I'll have to refrain. Only paper for me for the foreseeable future :mrgreen:
/QUOTE]

What about, "Hey, Boss, could I print something off after work if I paid for the materials?"

Of course, if your boss is like mine, you just want to get in, do the job, and get the H&$$ out without running into her.
 

Leibolmai

New Member
So I have very little to update. Last weekend during the blizzard I was allowed to take the Makerbot Replicator 2 home to do a couple long builds for work instead of driving in during the craziness. Was allowed to do some test quality models of my choosing. So I was suitably distracted....and no I can not share the 3d models I used or explain the process for creating them.

All I got done on the paper titan is all the pdo's are complete and correct to scale. The second test build of the head with cardstock is going OK, but not as easy or terrific in quality as I had hoped. Basically, the normal version of Pepakura isn't allowing the texture quality to come through. i am thinking I may do a few more clean-ups of where the joint holes will go, and finish the test build with no textures.

Cheers,

Leibolmai
 

Attachments

  • 2013-02-14 06.57.51.jpg
    2013-02-14 06.57.51.jpg
    101.8 KB · Views: 45

Leibolmai

New Member
Looks like a Space Marine and a Kroot....not able to discern what the others are.

Two Tau battlesuits. Same character, different weapon and arm position.

Worked a bit on the head last night, continued to be disappointed by the quality. I think I am going to start over with a straight white build. Will try and edit this post tonight with a pic of what I got so far.

Cheers,
Leibolmai
 

Attachments

  • 2013-02-09 17.09.35.jpg
    2013-02-09 17.09.35.jpg
    136.9 KB · Views: 36

Leibolmai

New Member
So here's where I am. I'm not happy with the titan head so far. The build and the quality of the texture is very poor. Part of this is how I choose to split up the faces on the part, and how I built the part in pepakura. My plan now is to go redesign the part by splitting the cockpit section from the head as a separate part, and re-design the cut in the nose so its not so blunt and carries smoothing all the way aft.

Rather then relying on texture for the nostrils, I am going to redesign that part to have holes and grating. I my do the same with the cockpit windows as well.

My attack on the texture is not to use pepakura, and just make it other means.

Cheers,
Leibolmai
 

Attachments

  • 2013-02-19 21.46.20.jpg
    2013-02-19 21.46.20.jpg
    132.4 KB · Views: 23
  • 2013-02-19 21.46.39.jpg
    2013-02-19 21.46.39.jpg
    142.6 KB · Views: 29

Leibolmai

New Member
Midst of re-design. Going off Forgeworld pictures instead of the original paper model build which is on the right in picture for size reference.

Cheers,
Leibolmai
 

Attachments

  • redesign.jpg
    redesign.jpg
    102 KB · Views: 39

Leibolmai

New Member
Got most of the head textured in powerpoint, and printed out the first piece over the weekend. Print quality was 100 times better then from pepakura. Hand cutting this one out, I still have issues figuring out my silhoulette cutter as far as alginment.

Cheers,
Leibolmai
 

Attachments

  • texturing.jpg
    texturing.jpg
    145.1 KB · Views: 28

NobodyUknow

New Member
You just said the magic words, I love my Silhouette cutter(s)...


The trick to alignment is to finish the photo-editing in whatever program you like (photoshop, GIMP, etc) then open it up in Silhouette Studio, where you will then put on all your lines and so forth, and the final printing will also be from Silhouette Studio so you can get your registration marks on the print.

The most important thing is to always always always go to the upper right of the program screen and the next to last icon is for the "Registration Marks" menu and in there be sure to select "show Reg marks", which are the three registration points the sensor can use to triangulate every cut line on the actual printed product. You can also widen your margins out to the maximum cutting area so you can fit a little more into one page of cutting. By default the cutting area is fairly lean when it doesn't need to be.

Without those three "L" shaped marks, the machine is forced into "guessing" where you want it to cut, and that's simply not good enough for this kind of work, leaving out the registration marks is typically used if you're just going to cut white paper for making parts used in layering or something like that, so the precision isn't that important as to where it starts cutting in the field of paper.


Also, when choosing to start the cutting process, I always choose to "detect registration marks", because obviously if you don't tell it to look for them, it won't and then again it won't cut exactly how/where you want it to.


I hope that helps with your cutter :mrgreen:
 

Kjev

Active Member
Two Tau battlesuits. Same character, different weapon and arm position.

Worked a bit on the head last night, continued to be disappointed by the quality. I think I am going to start over with a straight white build. Will try and edit this post tonight with a pic of what I got so far.

Cheers,
Leibolmai

That's enough to make me want to invest in a 3D printer!
 

Solidcrash

New Member
Cool, now I know what I need do. Good thing I am level 4 CAD and 3d modeller and games artist. I believe I can do this myself! I never thought of that until now. Thank for tutorial, keep it up and looking forward to your finished model! :)
 

zathros

*****SENIOR ADMINISTRATOR*****
Staff member
Administrator
Moderator
Lebomai, the Silohouette printes a pattern on the printer, which you cannot see. This is the machines "0,0" location, and even if that paper is slightly off, the paper will align it's coordinates based on this markings. This is why you cannot use a "Full Page", as the printer must make room for these location rference points. it is a good system, as the paper would otherwise have to be within .001" of an inch to be of any use.

I just saw a Makerbot today. Nice machine, but you still can make one and make it a lot bigger if you have the skills, and they don't have to be gret. People bolt these together but in reality, they would benefit from welded together. They use all kinds of mediums. I am interested in the sintered metal ones. You can make gears for Human Powered Vehicles, and a strong light weight differential has bee something I have wanted to make for a lonf time. :)
 
Top