2ND Gauge Layout party

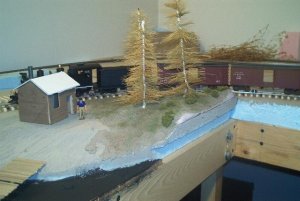
Well, I tried a trio of "bottle-brush" type trees, following this article here.

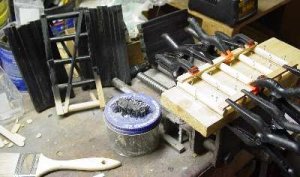
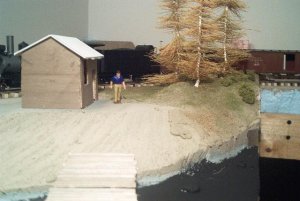
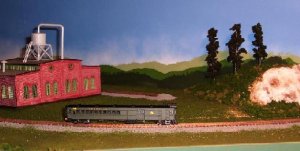
I think my wire was a little too thin, and I haven't the spray paint or 3M type photomount spray glue to continue, but here are a few of the "step one" stage trees. They are quite fiddly to do alone, but an extra pair of hands would make really short work of this project.

Here is a picture...Keep in mind that the highly visible masking tape "trunks" in these pictures are eliminated with painting and additional foliage.
 

Attachments

  • trees and bank overview.jpg
    trees and bank overview.jpg
    43.8 KB · Views: 63
Well I did do a little work on the diorama base. I added some more foam pieces to help shape the embankment. Next I am hoping to make the forms for the abutment and wing wall for the trolley line and roadway bridges. Here a few photos of my latest progress.

anv.jpg


anu.jpg


I am thinking of making the highway bridge a thru girder bridge. Many of the longer span bridges in this area that were built in the early part of the 20th century were thru girders. This is especially true of bridges that were built by the railroads. Another aspect of these bridges is many were constructed with stone masonry abutments and wing walls. I will most likely have to scratchbuild the girders for this bridge. One question that I have is how do I make rivets?
 
Weekly Progress Report.

The track is weathered and ballasted on one of the FoamRail Modules. Backdrops have been scenicked a bit. Stuck in a few trees for effect, and it looks like this....
 

Attachments

  • n mod 5.jpg
    n mod 5.jpg
    30.8 KB · Views: 56
Steve and Jack you are making nice progress!

I just had a diaster. I was puring the PoP for the abutment when suddenly one of the forms shifted. Now there is PoP all over the place. I fixed what I could, turned out the light and came upstairs to look over the forums and whistle a happy tune. We will see what a few hours bring.
 
Well as I posted before, I had some troubles with the abutment. As I was pouring the PoP one of the forms shifted and PoP spilled out in several locations. I quickly tried to fix the situation. I had PoP everywhere. After a few hours I finished the pour. The next I removed the forms and relieved a not perfect wall but a useable one. I did have to remove quite bit of extra PoP in places. I then went over the wall with a soupy PoP mix and added texture to the PoP. Next I carved the wall. I am not sure yet how I am going to do the cap. I have seen some that use stone and others that have a concrete cap poured.

Here are some pictures that show the abutment wall.

aob.jpg


A couple of close-ups

aoc.jpg


aod.jpg


Next is the wing wall. You can see some of the area where one of the spills occured. Sorry about the lighting but that was the best I could do for it.

aoe.jpg


Now a few of the top:

aof.jpg


aog.jpg


And lastly here is one with the creek wall in the foreground.

aoh.jpg
 
You carve a good looking wall Tom! Glad you were able to save it despite the PoP incident.

Here's a picture of my new Allied Bulk Commodaties Transfer Co. (ABCT) which is based roughly on the equipment at Duquesne Warf (see my post on the first page of this thread for the link).
The scheme is tat a barge full of sand, gravel, etc. is off-loaded by a conveyor/auger system and then materials are dropped in a hopper straddling the tracks for a waiting gondola. The bin the conveyor sits in provides storage.
 

Attachments

  • abct1.jpg
    abct1.jpg
    54.8 KB · Views: 60
...and passes under the old reliable Model Power traveling crane that will unload a barge of coal once empty hoppers are dropped off.
Ralph
 

Attachments

  • abct4.jpg
    abct4.jpg
    63.7 KB · Views: 50
Wow! Quick reply Tom! The load in the gondola is removable..its the factory load but it does come out. I plan to make other loads for more cars.

Here's a picture of the operation with the tug spotting the barge.
 

Attachments

  • abct5.jpg
    abct5.jpg
    44.2 KB · Views: 47
The other thing I wanted to do for the Layout Party was to repaint and relocate the old ABCT structure that was too big for the front of the layout. I ended up making it part of my Hudson Cement Co. as shown below. Participating in this thread really helped motivate me to get these projects finished. Great idea!
Ralph
 

Attachments

  • hudson1.jpg
    hudson1.jpg
    57.7 KB · Views: 51
It looks like Jack,Ralph, and Tom have been busy since I left. Good work guys. dash
 
A very interesting group of photos Ralph. I sure like the way you did the pilings along the warf and the water looks great.
A bad week for me as I didn't do much at all other than cleaning up my workshop for a change.:rolleyes: :rolleyes: :rolleyes: