MCRN Donnager

seraphim

Well-Known Member
Sep 1, 2023
251
552
75
48
So with the help of some very very helpful guys here, I managed to match up the Donnager version with the right set of instructions i have :biggrin: And so it begins....
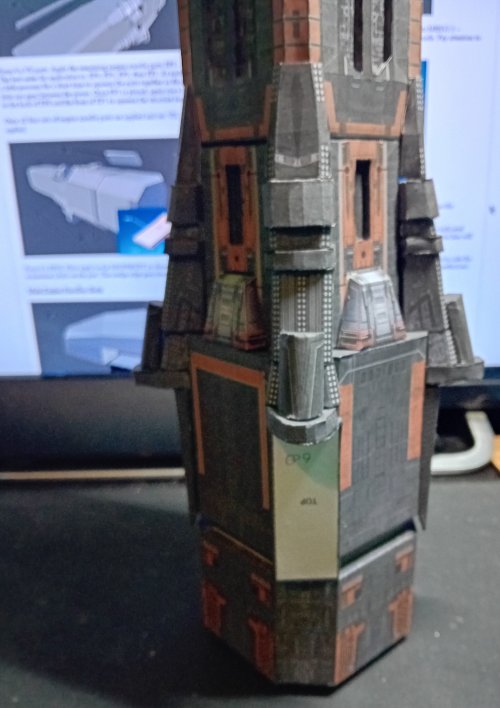
MCRN Donnager V.1 (i believe) (now i just need the V3 instructions lol) By one Mr Cheesy Wotsit. This version seems (so far) relatively straight forward to build, as with the Rocinante its a process of building an internal support structure and then forming the outer shell around it. The main body of the ship is made up of 5 sections, with the 4 engines, C&C and 2 railguns added after. So heres where im up to so far: Sections 1 thru 3 are done - so far these are basically cubeish/oblong boxes with some minor greeblies. They go together pretty straight forwardly and Mr Wotsit has provided a clear kit (and instructions) to follow. Im sure there are alot of parts the could be detailed up but so far its looking good.
20240205_001151.jpg20240131_201350.jpg20240205_234837.jpg20240205_234900.jpg20240205_234845.jpg20240205_234822.jpg20240205_234814.jpg20240206_004713.jpg20240206_004657.jpg20240206_202729.jpg20240206_203538.jpg
so thats it for now....keep em peeled for more to come
:toast:
 

Chuffy70

Well-Known Member
Jun 5, 2022
842
1,708
75
Norwich UK
Every now and then we get Amazon Prime trials, and I catch up with The Expanse, but a few years back I would not have a clue what this was!

Up to season three so far... you'll have finished all the fleet by the time I finish the tv show

Nice and easy start so far, I await more
;)
 
  • Love
Reactions: seraphim

Rhaven Blaack

!!!THE MAN BEHIND THE CURTAIN!!!
Staff member
Administrator
Moderator
Jun 12, 2009
12,524
9,907
228
Oregon
www.deviantart.com
You are off to a great start with this project. I am looking forward to seeing how this project turns out!
The only suggestion that I would make (if I may be ever so bold), is to paint the edges prior to assembly. This will give a more "finished" look to the model.
 
  • Love
Reactions: seraphim

seraphim

Well-Known Member
Sep 1, 2023
251
552
75
48
You are off to a great start with this project. I am looking forward to seeing how this project turns out!
The only suggestion that I would make (if I may be ever so bold), is to paint the edges prior to assembly. This will give a more "finished" look to the model.
yep all in hand lol, i have my markers at the ready :cool::biggrin:
 
  • Like
Reactions: Rhaven Blaack

zathros

*****SENIOR ADMINISTRATOR*****
Staff member
Administrator
Moderator
Apr 5, 2013
13,498
9,549
228
Make sure you dry fit everything. Don't be afraid to cut off the tabs, and make your own. You'll get a better fit that way. Looking forward to seeing this build. ;)
 
  • Love
Reactions: seraphim

seraphim

Well-Known Member
Sep 1, 2023
251
552
75
48
Make sure you dry fit everything. Don't be afraid to cut off the tabs, and make your own. You'll get a better fit that way. Looking forward to seeing this build. ;)
oh definitely lol im making sure to test fit it all as i go - so far it seems pretty 'modular' and is going together fine. Im catching up on edging those parts id forgotten about as well :biggrin: but if there are any fit issues ill remember your 'tab' tip for sure
 
  • Like
Reactions: zathros

skyman00

Member
Oct 23, 2012
52
45
23
Az,
Remember, CW inadvertently put the "MCRN" text upside-down on both the the main body section (MB2) and the 4 docks. Should be easy enough to correct.
Since then he's corrected it on his latest version.
Looks great! -J
 
  • Love
Reactions: seraphim

seraphim

Well-Known Member
Sep 1, 2023
251
552
75
48
So the daily evening update on project Donnager:
The five main 'blocks' for the main hull of the ship are done and together. As i said these were pretty straight forward builds, a core frame with the hull skin wrapped around the outside. CW's instructions are very clear and straightforward to follow. Big thanks to @skyman00 for the email :toast: and allowing me to graciously use his detailed up parts for the second hull 'block' - this is where four 'dock' wedges are attached to the third 'block' before we get onto building the engines. His version of these 'dock/wedges are much more detailed, along with the second hull block version he had done. I happily swapped out the 'wedges' but had already built the CW version of the hull block :sadno: As Skyman pointed out, the MCRN logo in CW's version (ver.1.0) is the wrong way round, and so I used Skymans - cutting it to fit over the original. (hopefully the right way round now) lol
As you should be able to see in the pics - the core hull once together is pretty big, and there are four engines, railguns and the bridge/nose section to add yet! Anyway, onto the engines - watch this space Earthers :noteeth:
(also - excuse my crappy pics - although you cant tell, i did take your advice RB and get all the edging done lol)
20240206_214902.jpg20240207_202242.jpg20240207_202304.jpg20240207_204131.jpg20240207_204147.jpg
 

seraphim

Well-Known Member
Sep 1, 2023
251
552
75
48
right, little bit of an update lol, had a cpl days out of action due to my health deciding it had other plans, but ive been back at it working away on the 4 engine nacelles to the rear of the ship. These come in two halves, 4 front sections and 4 rear sections. The front sections are made up of 36 (in total) parts that extend from the front edges (4 white areas marked VS) to the front end of section 3 (behind those awesome dock wedges from Skyman). These parts are basically repeat steps - once youve done the first 'forward nacelle parts' the rest are the same for the other 3 engines. Having caught up with my edging from when i began, i sensibly remembered to pre edge these parts with markers, including the white areas the fix to. So heres the progress (crappy) shots so far:
20240211_172725.jpg
20240210_225445.jpg

20240211_172737.jpg20240211_171033.jpg20240211_171114.jpg20240211_171105.jpg
I would say that if you have this version of the kit (V1) this is a great learner if you ever plan to do the later version (i think V3) of the model. Even though some of the parts are different in the V3 version you get a good feel for where parts should go/belong. This is one ship i may do again in the future.
Next: rear engine sections lol :biggrin:
 

mijob

Tie designer
Staff member
Moderator
Jul 5, 2020
3,179
5,380
95
54
Netherlands
Nice progress and Im glad that your engines are oke. In some build threads some had some trouble with there engines. :skull
 
  • Love
Reactions: seraphim

seraphim

Well-Known Member
Sep 1, 2023
251
552
75
48
so...quick update for the moment - as you know, ive just completed the forward half of the engines (parts VS + parts EP1 through 8 (x4)) and the next part is a 'riser' numbered 'EP10' in the instructions - i think this might be an error - having cut and prepared part EP10 i noticed it did not look right for the space, so skipping ahead through the instructions EP10 is a smaller part for the rear of the engines that is placed later. When you look on the parts sheets you will need (4 x) EP9, a wider flatter 'wedge' - i thought id mention this in case anyone wants to give this build a go at some point. Anyway, back to it.......keep watching :noteeth:
20240211_201853.jpg

the correct part added above.....vs the image on the instructions (circled green) (correct shape, wrong number)
20240211_203003.jpg
and where EP10 actually goes later....(green circled)
20240211_203027.jpg
 

Attachments

  • 20240211_201909.jpg
    20240211_201909.jpg
    1.5 MB · Views: 0

seraphim

Well-Known Member
Sep 1, 2023
251
552
75
48
Nice progress and Im glad that your engines are oke. In some build threads some had some trouble with there engines. :skull
thankyou :toast: i can see where that would be possible, but i think its a matter of placing pressure on the parts to get them to sit well and possibly trimming here and there where needed - but then this is the V1 version of the kit and either way its still pretty good. lol if i can build it then my cat probably could lol :laughrolling:
 

zathros

*****SENIOR ADMINISTRATOR*****
Staff member
Administrator
Moderator
Apr 5, 2013
13,498
9,549
228
In models like this, when you cut off the tabs, and start making strips, you will be able to put the sections together without gluing them, and obtain perfect almost seamless joining of the sections. Then, when they are glued, you will have the seamless connection that is called for. The Tabs are giving you the negative accrued intolerance that you try to compensate for afterwards. Take the leap on the next section, or model, cut off the tabs, and make your own, so that all edges will be on the same plane, which is impossible with tabs, as the tab, being on the plane that the next section needs to attach to will not allow for a seamless connection. It's just physics, "no objects can occupy the same time and space at the same time and place".

If I am not making myself clear, let me know, and I will post a very clear drawing for you. If the model wasn't coming out wonderful, I would not bother commenting. ;)
 

seraphim

Well-Known Member
Sep 1, 2023
251
552
75
48
well after a few days laid up due to my health its back to it. Im onto the rear engine sections - there are 4 'nacelles' and 4 engine 'bells' that attach at the very rear. The nacelles are made up of several sections that have internal structures for extra strength.
20240216_154045.jpgI pre cut, edged, scored and folded each section so as to help streamline the process, as its the same for all four. Firstly it was building the core parts (white, top right) then forming the main nacelle cover around it. As this part is heavily curved there are some join strips to help hold it together (orange tabs on the right). Once this is formed, place the core part inside (it should fit snugly) and then add some glue round the edges to help keep it in place. The next bit is the bottom part of the nacelle (those black rectangles on the left and U shaped white strips in the top centre) Essentially this part is a simple repeat process as before. Building one outer box you then form and add the internal white core for strength. Then it is adding the smaller 'insert' and buttoning it all up. Once all these are dry and tidy the two main parts are fixed together (as you can see on the left of the screen) While these parts dry there are two final parts to add to the rectangular 'box' fitted at the bottom of the nacelle. Parts EP10 & EP11 slot into the box - EP11 needs to line up with the end of the 'box' - flush to the edge (this helps placing the engine bells later)

20240211_203027.jpg
the final step is 'capping' each end of the nacelles before moving onto the engine bells. Again, this is a rinse and repeat process for all 4 nacelles as shown in the image on the screenshot below.
20240218_141743a.jpg

20240217_194629.jpg
After these parts are all done, its the turn of the four engine bells. These are made up of 3 parts each, again, rinse and repeat for all four bells - one outer part (EBO) one inner ring (EBI) and the disk for the engine nozzle (EBT) These are cut, edged, formed and glued together and fixed in place after the nacelles are glued on to rear hull - that fit onto the blank wedges (EP9) and need to fit snug and aligned otherwise they will sit poorly and throw the back of the model out. Once all is done you should have the main hull of the Donnager done. The last parts are rail guns and bridge sections, but as you can see in the below pics, shes a monster already lol.
20240218_005555.jpg
20240218_005645.jpg
20240218_005631.jpg
so next up are rail guns and bridge :cool::toast:
 

Attachments

  • 20240218_141743.jpg
    20240218_141743.jpg
    1 MB · Views: 2