X-Wing Fighter build
- Thread starter starbuck
- Start date
You are using an out of date browser. It may not display this or other websites correctly.
You should upgrade or use an alternative browser.
You should upgrade or use an alternative browser.
thanks to all for the positive response
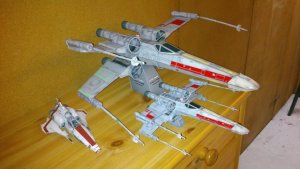
@ dnalor - the x wing is that big - biggest ship in my fleet
it is rather oversized - maybe it makes sense to print the sheets half the size
- maybe I will try next time
@ dnalor - the x wing is that big - biggest ship in my fleet
it is rather oversized - maybe it makes sense to print the sheets half the size
- maybe I will try next time
You should put a Penny beside the model. Then it will look MUCH, MUCH smaller. Take a look at this:

My UHU02 Viper in 1:32. And a Penny.
:mrgreen::mrgreen::mrgreen:
My UHU02 Viper in 1:32. And a Penny.
:mrgreen::mrgreen::mrgreen:
@ Revell-Fan
funny picture the comparison of the viper with the penny ;-))
The x-wing model approximately: 41cm long and 32cm wide vs UHU02 Viper 17cm long and 10cm wide.
As mentioned - big fighter - and this is why I thougt half the size would be perfect.
I assume the the x-wing of UHU02 would be approximately the size of the viper.
Don´t know yet what comes first - we´ll see.
BR
starbuck
Ah it's a normal size xwing ")
I thought you went my size :-D
A viper of 17cm is a little to small for me...( i have big thumbs )
I thought you went my size :-D
A viper of 17cm is a little to small for me...( i have big thumbs
)I think I have read that UHU's Viper and his X-Wing are about the same scale (1:50); this would actually make the X-Wing a bit longer than the Viper.
....News.....
Did the same build again 1/2 the size - meaning: printed two sides on one - this one suits better to my fleet ;-)) - picture to follow....
Edit wing assambling: The boxes must not be in same direction when adding the wings and upper left and lower right have to be on the same box glued. Then it also works with wings open and closed....
BR
Wow, great build starbuck.
I found the X-Wing a little intimidating, but I might give it a go sometime.
I like the Viper to.
I found the X-Wing a little intimidating, but I might give it a go sometime.
I like the Viper to.
Hi again,
@Itzealot: yeah x-wing is intimidating - should be, espesciallly with wings open in battle mode.
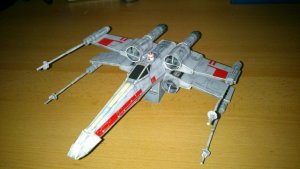
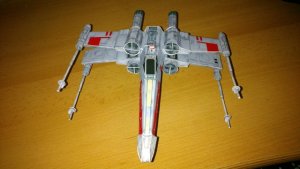
As promised some pics to see the size again. Not totally finalized - I will take some colour to eliminate the white spots.
@Itzealot: yeah x-wing is intimidating - should be, espesciallly with wings open in battle mode.
As promised some pics to see the size again. Not totally finalized - I will take some colour to eliminate the white spots.
.....unable to post pictures.......
will try again later on.....
You should be able now.
I was just able to post pics earlier.
If you have any problems, please let me know.
i am actually building the same model, doing fine up until i got to the engines. Parts 3 and 4 dont seem to match in sise with 1 (4 is too big and 3 is too small). Had the same problem with the rear engines parts 47 and 48. part 48 is too small and can´t paste it well.
how did you solve those problems??
how did you solve those problems??
Hi frontkammerater,
part 4: it will be glued on the backside where the lower part of piece 1 is hidden in the wing. I used only the main part (without the yellow surrounding), and glued it the way that the upper part of piece one is covered, as the lower side is hidden - it is also not perfect but it works. (This is one of the reasons why I wrote I will colour it afterwards.)
Part 3: is a little bit too small, but when assembling with part 2 and 1 you might not really see the a white part. If you do a black marker might solve the problem. Please use it before assambeling with part 1.
Part 49: fits well, it is conical. this means that only on the end it fits perfect. But this is enough to get a stable result.
Part 48: also here only the main part used without the blue frame.
Hope it helped a litte bit.
I think this is a quite good model with might not be perfect, but it is an fast build with a result which can be shown.
If you are not satisfied with the result try to find colours to perfect it. sign1
BR starbuck