

The UHU02 Colonial Viper appreciation thread
- Thread starter Revell-Fan
- Start date
You are using an out of date browser. It may not display this or other websites correctly.
You should upgrade or use an alternative browser.
You should upgrade or use an alternative browser.
...... I just happen to do things my way and use the models as a base in which to further work up the details. UHU's design are perfect, but once the Viper is enlarged, it cries out for more detailing.:thumb:
Too right you are. It does indeed CRY OUT for MORE detail! You are more then answering those cries (and doing so in an AMAZING way)!!!:thumb::thumb:
Once I am able to build it in 1:32 scale, I intend to add as much detail as I can. I will be using your build as a guild for such.
Awed.
I have been popping in and out of this thread whenever I get a chance, and am still constantly blown away by what I see, every time.
AgO2: I am running out of vocabulary for complimenting you on your detailing. Bloody amazing.:thumb:
I too, even at the standard 1/50th scale, am thinking of building ONE loaded projectile tray with 3D projectiles. I will see though. Dunno whether my sanity would last for that...
You are on a very similar path to me, when it comes to the skinning, as I am also going to use the open panel approach. I will be following your progress, and maybe 'steal' an idea, or two....:twisted:
R-F: Well, I have a similar vocabulary famine for you too!!!!!!
I can say one thing, your build at the larger scale, has certainly given me a beautiful benchmark of cleanliness, sharpness, and perfectly executed forms, that I am trying to achieve in the standard scale.
If mine comes only close to yours, I will be a very happy man. :thumb::thumb:
Rogério: Glad your move went ok. See you back when you can!
Life has been hectic lately, as I think it will stay for a while, and available modelling time has been drastically reduced. I have put all projects on hold for now. Except this one .....!:mrgreen:
I am in no way working at a fast pace on my Viper though. But, I am keeping a photographic record of the bits that I do...
I have a string of photos to sort and I will post my progress a little later tonight.
Laters!
P.S: We could have another two rows of available smilies on the smiley window, if it wasn't for that exploding head..........:cry:
I miss my
Lets get some air.......
The Dunglish update, which seems an age since the last one!!!
I built up the canopy sides and back, following the instructions.


For the next module, I deviated from the instructions slightly.
The cross member that the intakes and engines attaches to, can be removed and replaced on the main frame, even when the intakes and engines are attached to it.
I want to use this to my advantage, to make sure the intakes and engines line up true when I attach them to the cross member. It will be a lot easier without the rest of the plane attached to it!!!.
I put the cross member in place without glue and attached the two side plates to part 132 and the cross member, but not glued to the main frame yet.
I made triple sure that everything was square and lined up properly while the glue set. Part 132 was also not glued to wall behind the cockpit yet.
Once the glue had set, I removed the assembly again ready for the intakes.
Actually, once the assembly is in place on the main frame and the landing gear mounting bar is slid in place, you don't actually need glue, as everything fits beautiful and snug.


So, time for the intakes. I made up the intake compressors as per the intructions. I made up the inner ring parts by winding them around an old pen, that turned out to be exactly the correct diameter.
I decided to use two rings per intake to strengthen the rear bond to the cross member and also keep the circular shape true. I glued on the outer skin while the rings were still on the pen, making sure everything stayed perfectly round while the glue dried.


Also, in the photo above of the pen jig, you can see that the pen steps up in diameter to the one I needed. That is in front of the first ring and it tapers to the correct diameter. This turned out to be a perfect way of aligning the rings to the front of the intakes while gluing.
I cut out the rings using 11mm and 12mm hole punches. It took a few attempts at getting the alignment right.
Using the pen jig I then glued them in place. Once dry, the fan assembly was inserted and glued in place.


Back in a sec ...... :mrgreen:
The Dunglish update, which seems an age since the last one!!!
I built up the canopy sides and back, following the instructions.
For the next module, I deviated from the instructions slightly.
The cross member that the intakes and engines attaches to, can be removed and replaced on the main frame, even when the intakes and engines are attached to it.
I want to use this to my advantage, to make sure the intakes and engines line up true when I attach them to the cross member. It will be a lot easier without the rest of the plane attached to it!!!.
I put the cross member in place without glue and attached the two side plates to part 132 and the cross member, but not glued to the main frame yet.
I made triple sure that everything was square and lined up properly while the glue set. Part 132 was also not glued to wall behind the cockpit yet.
Once the glue had set, I removed the assembly again ready for the intakes.
Actually, once the assembly is in place on the main frame and the landing gear mounting bar is slid in place, you don't actually need glue, as everything fits beautiful and snug.
So, time for the intakes. I made up the intake compressors as per the intructions. I made up the inner ring parts by winding them around an old pen, that turned out to be exactly the correct diameter.
I decided to use two rings per intake to strengthen the rear bond to the cross member and also keep the circular shape true. I glued on the outer skin while the rings were still on the pen, making sure everything stayed perfectly round while the glue dried.
Also, in the photo above of the pen jig, you can see that the pen steps up in diameter to the one I needed. That is in front of the first ring and it tapers to the correct diameter. This turned out to be a perfect way of aligning the rings to the front of the intakes while gluing.
I cut out the rings using 11mm and 12mm hole punches. It took a few attempts at getting the alignment right.
Using the pen jig I then glued them in place. Once dry, the fan assembly was inserted and glued in place.
Back in a sec ...... :mrgreen:
.....!
Once all three of the intakes were complete, I attached them to the cross member.


You can see here how it looks with the assembly attached to the main frame (still without glue.) I am pleased with the look of the intakes


I am now working on the engines. And I think they may take a while.
But, I will be back when I can.
Take care everybody!!
Once all three of the intakes were complete, I attached them to the cross member.
You can see here how it looks with the assembly attached to the main frame (still without glue.) I am pleased with the look of the intakes
I am now working on the engines. And I think they may take a while.
But, I will be back when I can.
Take care everybody!!
Dan, this is looking great! I too would like to show more updates, but my job is cutting my build time, and the work on the two Viper dioramas I'm preparing slows everything down. I do have made some progress on the guns and the wings but I'd like to complete them first before presenting them here.
AgO2: I am running out of vocabulary for complimenting you on your detailing. Bloody amazing.:thumb:
I too, even at the standard 1/50th scale, am thinking of building ONE loaded projectile tray with 3D projectiles. I will see though. Dunno whether my sanity would last for that...
You are on a very similar path to me, when it comes to the skinning, as I am also going to use the open panel approach. I will be following your progress, and maybe 'steal' an idea, or two....:twisted: I miss my
Thanks for your kind words, But I still got more to go. If it were not for the details, I would be working on the diorama about now. For my scale, the tooth picks came out about the right size to simulate 20mm rounds. If you cannot find dowels that thin, You may have to place the toothpick into a dremel and sand it down to the right circumference or close to it as you can.
Too right you are. It does indeed CRY OUT for MORE detail! You are more then answering those cries (and doing so in an AMAZING way)!!!:thumb::thumb:
Once I am able to build it in 1:32 scale, I intend to add as much detail as I can. I will be using your build as a guild for such.
It is just that when you see the avionics in a larger scale, you can make out the details that can be added. You are more than welcome to borrow any of my techniques and ideas.
Amazing how you find ways to improve an already perfect model!
UHU has made a fantastic design and he probably was not aware of how good it is, especially in the extra details. His designs have the information needed to enhance his models, you just have to look at his works to make out the embellishments.
That is beautiful work Silver
Thanks Mica. there is still more to come, enjoy and have fun.
I am assuming this quote is for all of the builders, so on my behalf, thanks for your kind words and keep looking, more is to come from the other modelers who have started and those who will start.That is stunning!
MAYBE, maybe NOT... :mrgreen:UHU has made a fantastic design and he probably was not aware of how good it is, especially in the extra details. His designs have the information needed to enhance his models, you just have to look at his works to make out the embellishments.
I agree, the design is perfect, but I'd rather think UHU didn't greeble out the whole thing because of time constraints (it was a very challenging project and he had to take a break more than once). Greebling it out completely would have required much more time and when he learned that so many people were interested in the kit he decided to release it asap without further delay. angel
However, as you said correctly, the kit was left with a HUGE potential. A potential you (and the other builders here) are exploring and exploiting. :thumb:
You are welcome here, walid009.
You dont need to ask, feel free to join in!!!!
Looking forward to seeing your build!!
You dont need to ask, feel free to join in!!!!
Looking forward to seeing your build!!
OH NO not another one :-D
at this moment i page up en down to look at those awesome building pictures to compare builds...
Now another builder wants to join....now it will be page forward and backwards to look and compare those fantastic building pictures.
The fun part of a late builder is that you can pick the great add-ones everybody made..
and learn of the mistakes.
This is a awesome thread ....with great builders!
OH NO not another one :-D
at this moment i page up en down to look at those awesome building pictures to compare builds...
Now another builder wants to join....now it will be page forward and backwards to look and compare those fantastic building pictures.
The fun part of a late builder is that you can pick the great add-ones everybody made..
and learn of the mistakes.
This is a awesome thread ....with great builders!
as a newbee i guess those pic. will help me a lot....and thanks Dan.
silveroxides Viper
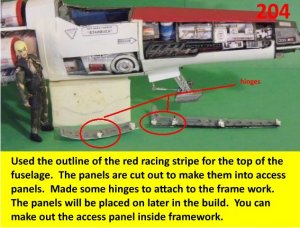
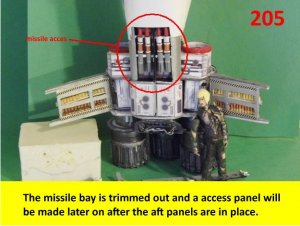
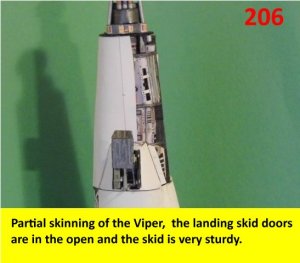
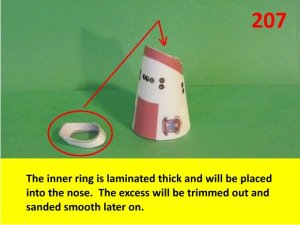
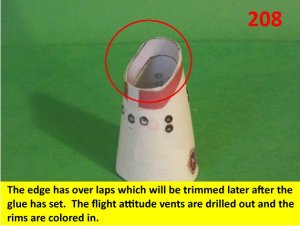
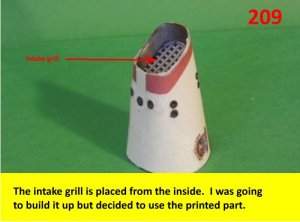
Keeping the postings alive, here are a few updates on my build. I am still working up my diorama idea and how the different parts will be placed in it. That nose is a bit tricky, but it will not be attached to the viper. It will be placed to the side in the diorama. Not shown here but the vents will have exhaust smudges added to it later on. Enjoy and see you all next posting.:thumb:
Keeping the postings alive, here are a few updates on my build. I am still working up my diorama idea and how the different parts will be placed in it. That nose is a bit tricky, but it will not be attached to the viper. It will be placed to the side in the diorama. Not shown here but the vents will have exhaust smudges added to it later on. Enjoy and see you all next posting.:thumb:
Attachments
the level of detail you are bringin to this is amazing Silver. Uhu02 did an amazing job with the model, and you are taking it to the finest level.
:thumb:
:thumb:
@Silveroxide: The detail that you are putting into this model (which in its own right is a SPECTACULAR MODEL already) is taking it to a WHOLE NEW LEVEL!!!
wow...you are taking this to whole new level....
just a quick tip for me...can anyone help me with Part 8? i am actually studying the viper.once i figure out all the parts i will start building it.I guess it will help me to avoid any error and misplacement.
just a quick tip for me...can anyone help me with Part 8? i am actually studying the viper.once i figure out all the parts i will start building it.I guess it will help me to avoid any error and misplacement.