

Here We Go Loop De Loop!
- Thread starter Cannonball
- Start date
You are using an out of date browser. It may not display this or other websites correctly.
You should upgrade or use an alternative browser.
You should upgrade or use an alternative browser.
Cannonball,
You're trying to build a Lionel layout in N-scale.
You've got so much more flexibility now, and so much more that you can do in the space - why not get adventurous and try for a model railroad instead of a train set?
Oops! My prejudices are showing!
")

You're trying to build a Lionel layout in N-scale.
You've got so much more flexibility now, and so much more that you can do in the space - why not get adventurous and try for a model railroad instead of a train set?
Oops! My prejudices are showing!
Cannonball,
You're trying to build a Lionel layout in N-scale.
You've got so much more flexibility now, and so much more that you can do in the space - why not get adventurous and try for a model railroad instead of a train set?
Oops! My prejudices are showing!
OK, I'm open to suggestions.
3x6 area. Gotta run two trains continuous
Can't cost more than the birth of my only child to build.
No Dcc.... Not ready for that yet.
I would like at least one tunnel.
Other than that, I'm easy.
Because I want to run two trains at once and I don't want to be constantly running switches to do it.OK, lemme work on it a bit.
Just curious, but why "GOTTA" run 2 trains continuously?
This is actually pretty interesting.Kato makes double track: Kato USA
A bit pricey... but interesting.
I might explore this a bit.
I could do that too but I still need to come up with a design.Why not use flex track?
I have to get out of sectional track mode to think in flex track as well.
I having a hard time giving you two parallel routes in that space that doesn't look like a slot-car track. I could put two separate routes on two different levels, but then you run out of room for scenery/switching.
What are you looking for in this layout? Just 2 trains running around? Do you want to do any switching? How important is scenery? How ambitious are you willing to get with benchwork?
What are you looking for in this layout? Just 2 trains running around? Do you want to do any switching? How important is scenery? How ambitious are you willing to get with benchwork?
I having a hard time giving you two parallel routes in that space that doesn't look like a slot-car track. I could put two separate routes on two different levels, but then you run out of room for scenery/switching.
What are you looking for in this layout? Just 2 trains running around? Do you want to do any switching? How important is scenery? How ambitious are you willing to get with benchwork?
A very minor ammount of switching.
I really just like to kick back and watch the trains run.
Although, I wouldn't mind a small yard for setting extra rolling stock.
Scenery is give and take.
I would like a few buildings and whatnots but it doesn't have to be over done either.
How ambitious do I need to get with benchwork?
I'm seriously wondering if I should give up on the two trains idea and just go with the Senic Ridge layout. Just about every layout I do in RTS ends up looking like that or the "slot car track" as you described it.
I think in the end, in the space you've got, you'll be more satisfied with a scenic-ridge type layout than a 2-track mainline. You could do it (2 trains), but in that space, it's going to be a) awfully crowded, and b) have pretty sharp curves... if you wanted to run passenger equipment or modern freight cars, they'd be straining around those curves.
Here's a plan based (loosely) on John Allen's original Gorre & Daphetid. I've built a slightly smaller version for my nephews, and we've had a blast running trains and doing a little switching. It's a fairly simple twice-around, with a passing siding, a small yard, and a branchline. Three levels, but easy to build either cookie-cutter, or with Woodland Scenics foam risers.

Here's a plan based (loosely) on John Allen's original Gorre & Daphetid. I've built a slightly smaller version for my nephews, and we've had a blast running trains and doing a little switching. It's a fairly simple twice-around, with a passing siding, a small yard, and a branchline. Three levels, but easy to build either cookie-cutter, or with Woodland Scenics foam risers.
Here's a plan based (loosely) on John Allen's original Gorre & Daphetid. I've built a slightly smaller version for my nephews, and we've had a blast running trains and doing a little switching. It's a fairly simple twice-around, with a passing siding, a small yard, and a branchline. Three levels, but easy to build either cookie-cutter, or with Woodland Scenics foam risers.
That's basicly the layout Terrain for Trains uses on their High Sierra model as well. Thought about getting one of those as well but the cost is almost double the Scenic Ridge layout by the time you buy the layout, track and scenery. They are also almost impossible to find in stock anywhere.
OK.Here's a plan based (loosely) on John Allen's original Gorre & Daphetid. I've built a slightly smaller version for my nephews, and we've had a blast running trains and doing a little switching. It's a fairly simple twice-around, with a passing siding, a small yard, and a branchline. Three levels, but easy to build either cookie-cutter, or with Woodland Scenics foam risers.
I give up.
Do you have an RTS file for this?
I've been figthing with it all night and it's still not right.
I hate to admit it, but I had to resist posting my 36"x48" folded dog bone (with 3 industries) because the scenic ridge is actually a better option for your situation. But don't forget, the track plan is still negotiable even if you go with WS's kit.
OK.
I give up.
Do you have an RTS file for this?
I've been figthing with it all night and it's still not right.
You don'tneed track planning software if you have your plywood for your benchwork cut to size already. Make a jig to draw your curves from a wooden yardstick. Drill a hole at the end. You can put it at the 1 inch mark or you could put it 1/2 inch from the end, just remember to keep the same off set at all of your measurements. Locate the center of your curves on the benchwork and use a drywall screw to fasten the yardstick to the curve center. Drill holes for your radius' at the appropriate marks on your yardstick that a pencil or felt marker will fit through. If you use "Sharpie" pens in different colors for the two levels, you can keep track of which level is which.
On a 36 inch board the max radius you could use would be 16 inches without having the track hang over the edge. It looks like you are probably going to have a 9-12 inch minimum radius to fit that track plan on your available bench. The scenic curves on the top level branch and the center level main could be drawn freehand to a radius that looks best to you. I should mention that you will want to use flex track, at least for the 2 scenic curves mentioned, and I would reccomend flex track all the way around because you will have less electrical connections.
I think the turnouts are all #4's on that plan. You will need to get 2 #4 turnouts a left and a right. After you have drawn in your curves on the ends of the benchwork, you can set up your turnouts and trace around them. You may need to locate the turnout for the lower right corner and the one on the center left of the layout first since your curves on both ends will either begin, terminate or have the turnout in the middle of the curve, so the turnout will determine to some extent the placement of those curves. For the crossover, place the right and left turnouts together facing each other as they will be mounted in the benchwork and put them in the middle of the straight where they will go. Turnouts can go on a grade if necessary, jus make sure that any changes in grade occur in the section of track on either side of the turnouts, not in the turnout. If a turnout is bent or twisted in any way, it will cause derailments everytime through.
Regarding cost. I think your biggest cost for this plan will be a plywood board, the Woodland Scenics risers, if you use that method, and the track & switches. You don't need all of the turnouts before you start. You will want to have 4 left turnouts and a right turnout before you start because those turnouts all fall on the mainline. The 2 turnouts on the ends of the branches could be purchased later as you build the layout. For bridges, Atlas makes some nice inexpensive bridges that you could use anywhere one track crosses another, or you could cross inside a tunnel. Just remember to leave access holes in any long tunnel in case of a derailment in the tunnel.
Scenery materials are cheap. You can make "stand in" buildings out of cardboard for places where you want buildings. I would reccomend that you take some time to go to "The Academy" here on the Gauge and read through "Robin At His Best." Robin made some extrordinary structures out of old cereal boxes and various bits he could buy cheap at Wal-Mart or other discount store. The advantage of trying out Robin's method of scratch building is if you mess up a structure made out of a cereal box, you throw it away and get another cereal box to start over.
Actually, I'd like to see that too.I hate to admit it, but I had to resist posting my 36"x48" folded dog bone (with 3 industries) because the scenic ridge is actually a better option for your situation. But don't forget, the track plan is still negotiable even if you go with WS's kit.
I messed around with a couple of dogbones earlier and kind of like the looks of 'em when their done right.
I think flex track in my hands would be a bad bad thing. Connections on curves, kinked track, bad cuts.... massive derailments and pandimonium would insue. I have enough trouble with snap track.I should mention that you will want to use flex track, at least for the 2 scenic curves mentioned, and I would reccomend flex track all the way around because you will have less electrical connections.
I'm less concerned with scenery right now than I am with getting a working track plan running. This little 1-1/2 by 2 ft loop of track that came with my trainset is getting boring really quickly. I already know where my scenery is coming from when I get ready to buy it but I've read quite a few of Robin's articles as well. The man did some amazing stuff with a cereal box.Russ Bellinis said:Scenery materials are cheap. You can make "stand in" buildings out of cardboard for places where you want buildings. I would reccomend that you take some time to go to "The Academy" here on the Gauge and read through "Robin At His Best." Robin made some extrordinary structures out of old cereal boxes and various bits he could buy cheap at Wal-Mart or other discount store. The advantage of trying out Robin's method of scratch building is if you mess up a structure made out of a cereal box, you throw it away and get another cereal box to start over.
This design was based on a 30" x 60" layout. I wanted to see if I could squeeze it down to 30" x 48". The 'pointed' section of the inner-most loop on the left side has a 1 3/4" section that dips down to 7 7/8" radius. All other curves are 9 3/4" minimum, just like the original layout.

I don't know if the photos of the original layout are copyrighted, so I'll simply link to a post showing them. Scroll down to the last post on this page: ScaleRailsOnline.Com - Small N Scale Layouts (Under 4X8 Feet)
This layout doesn't really allow 2 trains running simultaneously, but properly done, is a great layout to just let 'em roll. You also get just enough switching to keep it interesting.
On the page linked, there is also a picture of my version including 2 rows of hidden staging.
Canonball,
I drew that plan in Xtrkcad. I don't have RTS, but I think you could re-draw it in that (with a little patience ).
I used Atlas code 55 #5 turnouts for that plan, I think they're a good compromise between the snap turnout and the #6's that are available in code 80... you could use Peco medium turnouts if you wanted to use (ugh!) code 80 track... but I think if you're starting from scratch, the code 55 is better track (better looking, anyways).
The grades on the layout are 2%, so your locos wouldn't be working too hard to pull trains around, the grade is 2.5% on the branch. The curves are all 11" radius, so you could run longer equipment like modern boxcars, 6-axle diesels, and passenger cars... although it's still a bit tight for full-size pass. cars.
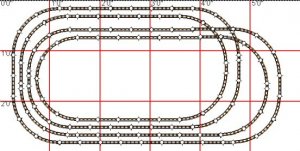
I think you're overestimating how difficult flex track is to work with. With the right tools (rail nips and a small file), and a little patience (measure twice, cut once), I think you'll find it's not as bad as you think it is. It's certainly worth the effort. The smooth-flowing curves that you make will let your equipment operate much more reliably, and look better than going from a fixed radius into a straight track... you notice on your oval how the train seems to slam into the curve, or snap out of it? With easements, the train flows into the curves.
I drew that plan in Xtrkcad. I don't have RTS, but I think you could re-draw it in that (with a little patience
).I used Atlas code 55 #5 turnouts for that plan, I think they're a good compromise between the snap turnout and the #6's that are available in code 80... you could use Peco medium turnouts if you wanted to use (ugh!) code 80 track... but I think if you're starting from scratch, the code 55 is better track (better looking, anyways).
The grades on the layout are 2%, so your locos wouldn't be working too hard to pull trains around, the grade is 2.5% on the branch. The curves are all 11" radius, so you could run longer equipment like modern boxcars, 6-axle diesels, and passenger cars... although it's still a bit tight for full-size pass. cars.
I think you're overestimating how difficult flex track is to work with. With the right tools (rail nips and a small file), and a little patience (measure twice, cut once), I think you'll find it's not as bad as you think it is. It's certainly worth the effort. The smooth-flowing curves that you make will let your equipment operate much more reliably, and look better than going from a fixed radius into a straight track... you notice on your oval how the train seems to slam into the curve, or snap out of it? With easements, the train flows into the curves.