Back after a long time.

zathros

*****SENIOR ADMINISTRATOR*****
Staff member
Administrator
Moderator
Welcome to Zealot. UHU really screwed us, after supporting his antics for 10 years, enough is enough. There are so many other designers doing fine work, and enough of UHU's models to keep people busy for years. Welcome to Zealot, great to have you aboard. :)
 

DanBKing

Dan the Man
I think I am going to do the 2001 space station and I am going to illuminate it with LED's. S

Welcome back, Cecil.

How far are you going to go with the lighting of the Station?????
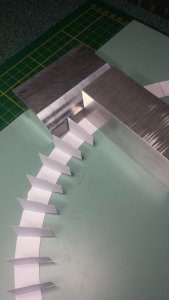
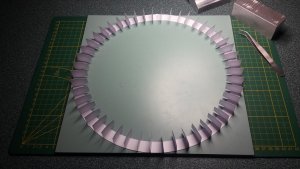
If you are planning on cutting out and lighting the windows in the ring, you are going to find that extremely difficult, because of the internal formers.....

13528506_1613700105587171_634943979565610898_o_1613700105587171.jpg 13558850_1613700108920504_1511942031113042043_o_1613700108920504.jpg

UHU's Station 5 is a very complex model with very tight tolerances.
I will be posting my build thread of the model very soon...... Maybe you might want to check that out first, to see what you are up against....... ;)

But, whatever you choose to build, post a thread and show us how you get on.

Good luck, and again, welcome back!
 

Awry_Chaos

OKB-4155
Welcome back, Cecil.

How far are you going to go with the lighting of the Station?????
If you are planning on cutting out and lighting the windows in the ring, you are going to find that extremely difficult, because of the internal formers.....

View attachment 191273 View attachment 191274

UHU's Station 5 is a very complex model with very tight tolerances.
I will be posting my build thread of the model very soon...... Maybe you might want to check that out first, to see what you are up against....... ;)

But, whatever you choose to build, post a thread and show us how you get on.

Good luck, and again, welcome back!
What would happen if he cut holes in the formers?
 

cecilmeyer

New Member
Welcome back, Cecil.

How far are you going to go with the lighting of the Station?????
If you are planning on cutting out and lighting the windows in the ring, you are going to find that extremely difficult, because of the internal formers.....

View attachment 191273 View attachment 191274

UHU's Station 5 is a very complex model with very tight tolerances.
I will be posting my build thread of the model very soon...... Maybe you might want to check that out first, to see what you are up against....... ;)

But, whatever you choose to build, post a thread and show us how you get on.

Good luck, and again, welcome back!
I am thinking about using multiple layers of 130 stock and maybe even using a wood restore coated layers so I should not have to use too many formers. I am using a square hole punch for the windows that I will make smaller by putting paper behind them. Kind of window framing them and using milky white plastic for the actual windows. For the lighting I am going to use LED's with the wiring going through the center support shaft. believe or not I am going to try to make it rotating in a display. The LEDs will be powered by a separate battery pack that will be attached to the hollow center support rod so that way the station can rotate freely.I will use a small motor with a belt or gear to rotate the station. I am still in the design stage so I will post pics if I am successful.I was going to use uh2s pattern but decided to go my own way . We will see! I forgot to add my 2001 station will be a little different. I am going to build the model with all sections completed no open girder sections. Not an exact rendering but hey it's my space station!
 
Last edited:

cecilmeyer

New Member
Welcome to Zealot. UHU really screwed us, after supporting his antics for 10 years, enough is enough. There are so many other designers doing fine work, and enough of UHU's models to keep people busy for years. Welcome to Zealot, great to have you aboard. :)
Thank you!
 

zathros

*****SENIOR ADMINISTRATOR*****
Staff member
Administrator
Moderator
Surface mount LED's require hair like wire to run them. Theire is a tendency to use wire way too thick. If you can't find really thin wire, take lamp cord wire, strip it, which is really cheap, and all hardware stores carry it, and make twisted pairs (2) of the necessary length. Twist them kind of tight, the spray paint them with clear paint so they won't short out. Make sure the ends aren't sprayed, and use Adhesive Conductive Silver paste to attach them. This makes for a very clean build, and you can snake that wire through pin holes. When I did T.V. and Audio repair in my shop, you would not believe how small some of the traces were for components that carried a few amps. You can also make circuit board like traces with conductive Silver Epoxy, and use no wire at all. A bit expensive, but it has come down in price lately. Any conductive paste, glue, whatever they call it will work. This conductive paste makes for great on/off switches that can be hidden in the model and turn the model on by pushing some obscure part to make contact and turn the model on. :)
 

Kolokolnikov

Well-Known Member
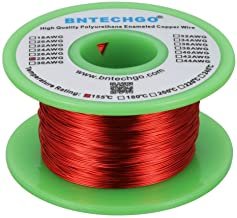
To connect smd LEDs, I use awg35 (~ 0.14mm) or awg38 (0.1mm) magnet wires (enameled wire). There are even thinner wires, but they break easily. These wires are easy to buy with a small spool or you can get it from an electromagnetic relay. A big plus of these wires is that they already have insulation, but tinning is a little more difficult.

If you find wires with different colors of insulation, it will be even better and more convenient in the assembly process, you don't have to look for a cathode and anode.

Also, to solder SMD LEDs, you need to have a good magnifying glass and a thin soldering iron tip.

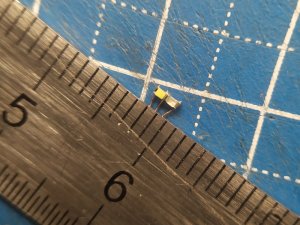
An example of my soldering of paired 0402 LEDs for the wing navigation lights and strobe of a 144 scale airplane plastic model.

IMG_20200915_220322.jpg
 

micahrogers

Moderator "Where am I, and how did I get here?"
Staff member
Moderator
That is some shill there. I'm a master Plumber, soldering pipe, Brazing pies, are no problem for me, but soldering small electrical wires is the bane of my existence. I need a much better soldering rig.
 

Awry_Chaos

OKB-4155
That is some shill there. I'm a master Plumber, soldering pipe, Brazing pies, are no problem for me, but soldering small electrical wires is the bane of my existence. I need a much better soldering rig.
Being a Master Plumber is a good thing! And now your transferring those masterful skills into painting and modeling!
 

micahrogers

Moderator "Where am I, and how did I get here?"
Staff member
Moderator
Being a Master Plumber is a good thing! And now your transferring those masterful skills into painting and modeling!
I've been modeling one way or another off and on since Pine Wood Derby cars in Cub Scouts. was kind of a late start in plumbing, US Navy first carrier ended early medically, so I started plumbing...
Right now to solder wires, all I have is my butane micro torch, with a solder tip attachment.
 

cecilmeyer

New Member
Surface mount LED's require hair like wire to run them. Theire is a tendency to use wire way too thick. If you can't find really thin wire, take lamp cord wire, strip it, which is really cheap, and all hardware stores carry it, and make twisted pairs (2) of the necessary length. Twist them kind of tight, the spray paint them with clear paint so they won't short out. Make sure the ends aren't sprayed, and use Adhesive Conductive Silver paste to attach them. This makes for a very clean build, and you can snake that wire through pin holes. When I did T.V. and Audio repair in my shop, you would not believe how small some of the traces were for components that carried a few amps. You can also make circuit board like traces with conductive Silver Epoxy, and use no wire at all. A bit expensive, but it has come down in price lately. Any conductive paste, glue, whatever they call it will work. This conductive paste makes for great on/off switches that can be hidden in the model and turn the model on by pushing some obscure part to make contact and turn the model on. :)
Thanks. The LEDs I bought off of Amazon came pre wired. The wires are pretty thin. My last hurdle is those little windows in the station. I might file down a small screwdriver to get the right size. Thanks for that other info it will come in handy!
 

zathros

*****SENIOR ADMINISTRATOR*****
Staff member
Administrator
Moderator
You can polish LED's as long as you don expose the cathode or anode. You can also paint them with Black Finger Nail paint, to get just the amount of light you want. I suggest punching any how you make with either an X-acto Blade, or something sharp, to minimize the fuzzies, which can be tamed with a toothpick and some Crazy Glue. ;)
 

Kolokolnikov

Well-Known Member
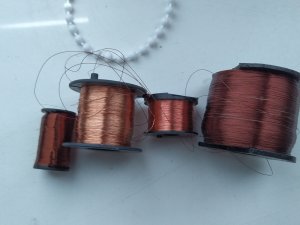
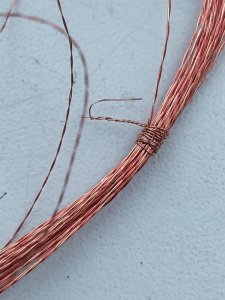
I have 3 colors of enamel, transparent, red and dark brown. This helps to determine which wire to connect to where, without resorting to determining the cathode and anode after laying the wires in the model. when the model is almost assembled and a huge number of wires come to one place, it is very difficult to understand them.

IMG_20210131_120932.jpg

This is how the wires look in which the cathode and anode are clearly visible.
IMG_20210131_120958_1.jpg
 

cecilmeyer

New Member
You can polish LED's as long as you don expose the cathode or anode. You can also paint them with Black Finger Nail paint, to get just the amount of light you want. I suggest punching any how you make with either an X-acto Blade, or something sharp, to minimize the fuzzies, which can be tamed with a toothpick and some Crazy Glue. ;)
I’m trying a sharpened small screwdriver. Which seems to do well. Just getting them all straight is a chore!
 
Top