Would be Better than you think
That's cool and simple. But those option don't show in the LE version.
I guess my only option is to loads of vertical lines in the cube and then cut a circle with a knife.
A bit long winded and I don't think my circle will will be very round.
Cheers JTF
EDIT: It turns out Jay and I were both replying at the same time - I posted my reply and found Jay had snuck in there ahead of me. I'm leaving my reply instead of deleting it just to show that theres different ways to skin model, and that Jays brain works better than mine.
Jaybats - I'll keep my mouth shut from now on. You are The Master!
JT Fox -
Believe it or not, I have used the very method you describe , and the results are much better than you would expect. Don't forget that your eyes are one of your most valuable tools in modelling. You
know when it looks "right". Your brain is the second most valuable tool.
In the sample I posted above I used a "cylinder" with 16 sides. That's "only" 16 points you have to manipulate into position.
You can accomplish the same thing easily with the LE version:
If you insert a Plane primitive, you can set it's corners to very precise positions that result in easy math. Select two points on the same side and use "Selected/Align Vertices" to align them on the appropriate axis, and align the other sides so you get a perfectly square plane. For example, it might be from (-50,-50,0) to (50,50,0) which is a square, 100 by 100 units in the XY plane. The exact center will then be at (0,0,0). Use the wire tools or knife to split the plane vertically, then horizontally. Now align those cuts to be at X=0 and Y=0. A circle 25 units in diameter will have points at (-25,0,0), (25,0,0), (0,25,0) and (0,-25,0). So, you can make a few more cuts and align them at X=25, X=-25, Y=25 and Y=-25. Very quickly you've got the center point, and four points exactly on the edge of your circle.
Working from this point, you can now "cut" lines from a corner point to another point on one of the horizontal or vertical lines, then move them into position. Points can be moved quite precisely with the controls in the edit panel (Panel/Edit Panel), or by entering values in the Move tool.
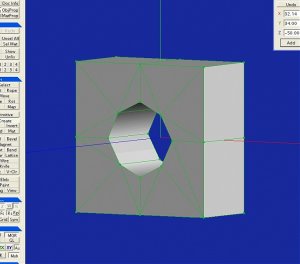
Once you have a circle drawn in the middle, you delete the faces of the circle, move the plane off the XY plane to say Z=50, mirror it (Select All, then Selected/Mirror), then create faces to connect all the corners. Now you have a cube, 100X100X100, with a hole in two opposing faces. Connect up the points of the holes to make your inner cylinder.
I did the sample below to illustrate. The circle has 8 sides. Each of the 8 "circle" points were aligned by selecting the appropriate points, then using Selected/Align Vertices, and then adjusting locations so it looked about right. Adding another 8 points wouldn't take much longer.
I started the sample, made some mistakes, deleted the whole thing and started over, then did it again. Total time from start to finish was 13 minutes.
It's taken me much longer than that to compose this reply. It may be more work, and it may not be the fastest, but as Jay is trying to stress in this tutorial, you can do a GREAT deal with the LE version of Meta, IF you take the time to learn the tools it provides AND practice with them. It's just work, and in the end your work pays off with a paper model that YOU created. I say it's worth it!
Now, get this! You can cut the work in half by creating a half circle, then mirroring it to create the full circle. You can cut it in half again, by creating a quarter circle, mirror that to create a half circle, then mirror the result to create the full circle. Eyes. Brain. Meta. Keep at it everyone. It really is worth it.
SJ
PS - Don't forget that the registered version of meta is about the price of an ink cartridge.


")


