

Water poured, it's a river
- Thread starter Gary Pfeil
- Start date
You are using an out of date browser. It may not display this or other websites correctly.
You should upgrade or use an alternative browser.
You should upgrade or use an alternative browser.
- Status
- Not open for further replies.

WOW
Gary I can say nothing that has not already been said,it looks terrific.Down by the fall did you use some cotton to simulate the spray?I'm also assuming that you blew on the surface to make the ripples in the pour? What did you use for the water?
Gary I can say nothing that has not already been said,it looks terrific.Down by the fall did you use some cotton to simulate the spray?I'm also assuming that you blew on the surface to make the ripples in the pour?
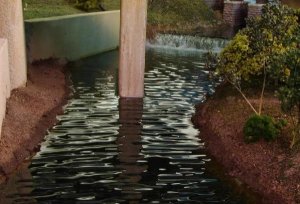
What did you use for the water?The water itself is Envirotex. The color beneath it is Permanent Hooker green. The ripples are made by waiting till the Envirotex is nearly set, anywhere between 4 and 6 hours. I spent 1 1/2 hours creating the ripples, because I started too soon. Better too soon than too late! All that happens when you start too soon is the water levels itself again. To create the ripples you simply use a pallette knife (or a piece of styrene like I did, because I couldn't find the knife) to dip and dig into the Envirotex, then pull up. Many many times! The Envirotex pulls up when you pull up on the knife and slowly returns to level. At some point it sets up enough that the leveling takes longer. After you've done it a couple times, you'll know if you're way to early (yeah right, that's why I was downstairs for almost two hours!) You;ll get some beautiful ripples toward the end, but be vigilant, 15 minutes later they'll be much lower. Keep working it. After a while it will harden to the point you can no longer easily lift it, it's time to stop. Practice on a mockup first. The falls: I had a one inch drop between levels, I used a piece of quarterround as the damn. I painted it concrete, then applied some Woodland Scenics water effect. I applied beads of it vertically. It takes 24 hours to turn clear, so with the many layers I wound up using, you must have patience. This is one thing I have in spades, which is why very little gets done! I painted some thinned Hooker Green on the water effect. Then more water effect. Then i dry brushed white on the water effect. Then more water effect. A cotten ball was patted onto the Envirotex after the ripples were done, the Envirotex was still tacky, it will be all night probably. The cotton ball leaves some material which can be controlled pretty easily.
Gary
Gary
WATER/BRIDGES/SCENE
Gary:
After posting, I noticed your description on the ENvirotex.
On your girder bridge, how did you lay it out and what did you build it with (curved bridge). Also, how about the piers and abutments? Would like to know what technique you utilized.
Thanks.
Gary:
After posting, I noticed your description on the ENvirotex.
On your girder bridge, how did you lay it out and what did you build it with (curved bridge). Also, how about the piers and abutments? Would like to know what technique you utilized.
Thanks.
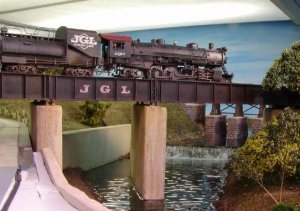
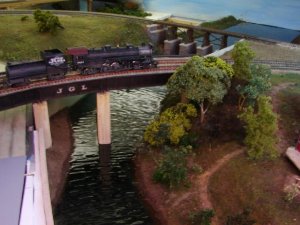
Chapmon, the bridge is almost embarrassingly simple and non prototypical. Meant to be a ballasted deck girder, it was made by using a piece of 3/4" plywood. I drew the track centers on it, then drew straight lines along its edges to clear the curve. I cut along those straight lines and glued Atlas girders to it. I simply bought those Atlas snap track girders and cut the girders off, discarding the track section. I cut the ribs off on the backs, and cut sections out from the middle as required to make the length I needed. The piers were made from 1" blue insulation foam. I simply cut the width and height needed from a sheet. Sanded the corners a bit and painted. I think they represent concrete really well. That's all there was to it!
One thing I wish I had done: Use the girders to determine the length of the straight portions prior to cutting. I had to recut mine to avoid having partial panels of the girder. Also, I wish I had made the short section of the rear girder (as seen in the photos) a panel or two longer so the pier would have been facing more upstream than it is. Again, while this method looks fine to me, it is not an accurate model of a ballasted deck girder. It was cheap and easy however. And being 3' away from the aisle on either side keeps it from being scrutinized too well.
Gary
- Status
- Not open for further replies.