While I shoulda been weathering my Northern as I had promised Miles, I got distracted when I glanced over my scrap box and saw the makings for a tunnel clearance car.
>>>> http://www.toytrains1.com/images/trains/bo-2002-47.jpg
>>>> http://en.wikipedia.org/wiki/Image:Primitive_clearance_car.jpg
>>>> http://www.prrths.com/Phila_Misc_Clearence Car Story.html
>>>> http://www.northeast.railfan.net/images/cn_laser_clearance.jpg
I chose to model the rod type. When the rods were extended they made for quite a sight going down the rails. Slowly pushed ahead of a locomotive, the rods would make contact with any obstruction that wasn't properly removed in the construction of the tunnel. Sadly, truck mounted lazers have take over, making for a less than impressive (but still interesting future 'bash with an old Bachmann Tackster step van:thumb") show.
show.
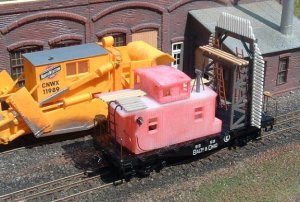
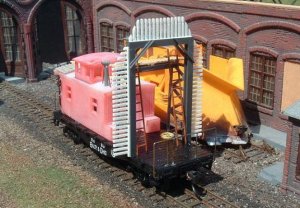
I started with a short heavy steel flatcar and a super cheapie boom tender cabin lurking in the scrap box. Rather than do a How-to, I just photographed it unpainted to show the different kibbles and bits that went into it, hoping to show newcomers that there's always a project in the wings, regardless of cash on hand.
The rods were picket fencing placed on a Plast-Struct frame and clipped to follow the NMRA Standards guage for tunnel and bridge clearances. The rest of the structure came from bits and pieces cobbled together from a Volmer pedestrian bridge and walkways made from Atlas lumber loads. Bits of .015" brass wire, more Atlas lumber and two scrap marker lamps round out the cabin. More brass wire and two brake wheel castings made up the front and rear railings.
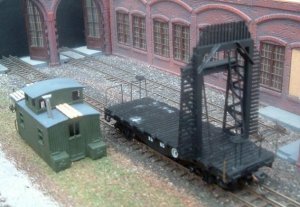
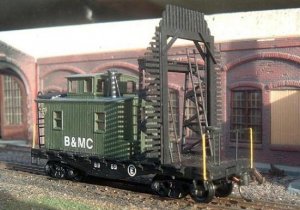
Once painted, I plan to wreak havoc on the club layout tunnels and cuts with it, as my Bachmann tri-level auto racks just don't like one particular cornerfence1
>>>> http://www.toytrains1.com/images/trains/bo-2002-47.jpg
>>>> http://en.wikipedia.org/wiki/Image:Primitive_clearance_car.jpg
>>>> http://www.prrths.com/Phila_Misc_Clearence Car Story.html
>>>> http://www.northeast.railfan.net/images/cn_laser_clearance.jpg
I chose to model the rod type. When the rods were extended they made for quite a sight going down the rails. Slowly pushed ahead of a locomotive, the rods would make contact with any obstruction that wasn't properly removed in the construction of the tunnel. Sadly, truck mounted lazers have take over, making for a less than impressive (but still interesting future 'bash with an old Bachmann Tackster step van:thumb
show.I started with a short heavy steel flatcar and a super cheapie boom tender cabin lurking in the scrap box. Rather than do a How-to, I just photographed it unpainted to show the different kibbles and bits that went into it, hoping to show newcomers that there's always a project in the wings, regardless of cash on hand.
The rods were picket fencing placed on a Plast-Struct frame and clipped to follow the NMRA Standards guage for tunnel and bridge clearances. The rest of the structure came from bits and pieces cobbled together from a Volmer pedestrian bridge and walkways made from Atlas lumber loads. Bits of .015" brass wire, more Atlas lumber and two scrap marker lamps round out the cabin. More brass wire and two brake wheel castings made up the front and rear railings.
Once painted, I plan to wreak havoc on the club layout tunnels and cuts with it, as my Bachmann tri-level auto racks just don't like one particular cornerfence1