Staining and Weathering Stripwood

Status
Not open for further replies.

Cascade Man

New Member
Once again I want to say thank you to all the helpful modelers whom have helped me out over the past few months in my quest for model railroad understanding :thumb:. As a new modeler, the world of model railroading seems huge and confusing. I have spent countless hours searching the internet on techniques, ideas and tutorials for an assortment of things. I have also ruined my fair share of kits (not very cheap I might add :curse:) to figure out which methods work and which don't. The main thing I have learned is to not just jump into a kit not knowing how to do it. Well, I have all these ideas on kits I want to scratchbuild but one things still stands in the way of them: staining and weathering wood. Everything that I have tried has either failed or is just grey. In Sierra West Scake Models HO scale Tool Shed (http://www.sierrawestscalemodels.com/ckits/3005/3005.html) kit the weathering and coloring of the wood is fantastic shown in the photos. It's like a faded (the siding on the shed) red-brown. How do you achieve this? I can't find out how anywhere! I only hear about india ink washes but that only gives me grey, not a color to the wood. I would love to have wood that is weathered AND colored at the same time if that makes since. Also, does it make a difference if the wood is balsa or stripwood? Or is there a difference? Your help would be GREATLY appreciated!

Cascade Man :p
 

twilight

New Member
I would stay with the stripwood or basswood. As far as the weathering, painting the wood whatever woodtone you might be looking for and then adding the india ink wash may be a way to go. Or, head to Home Depot and pick up some minwax stains. Remember washes don't always have to be made out of India ink, only. Some water, rubbing alcohol, dish detergent and some paint(light or dark, alot or a little) have made some convincing looking weathering.

Mark
 

Bill Nelson

Well-Known Member
painting/ staining strip wood

The first rule is to test your techniques on scraps, and not on your intricate model.


://www.zealot.com/forum/showthread.php?t=164383&page=23


on page 23 of the main thread on my home layout, I'm in the middle of a scratchbuilt engine house, and I show one of the techniques I use. you can check the pages before and after. If you spray paint the gray weathered wood color on the model you can dust the wall with the intended paint color, dusting it lightly with the same gray color fades the paint. check out that process, and ask me some questions if there is anything I did not cover well there.


Bill Nelson
 

Bill Nelson

Well-Known Member
photos of work in progress

I am kitbashing a Company Store for the J/ E. Patterson Coal and Lumber company. the walls are plastic, but the roof is a scratchbuild from some ceader lumber cut on my mini table saw.


The trim is green, and this wood which will eventually be trim was spray painted gray, and then was lightly dusted with green.


If you want more green, you add more paint. If you want less, you lightly sand the wood, exposing more gray paint. I have gotten very fancy at times spraying layers of gray, tan, brown and whatever the final paint color is. sanding with a varying amount of pressure with an Emory board cut down to the size of the board on an assembled model, lets me fake the board by board look

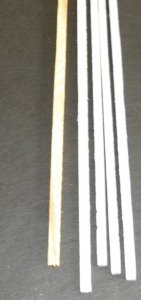
Here is a picture that has one unpainted board with several that have been painted gray,

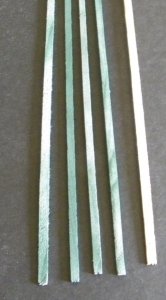
then there is a photo of the with a dusting of green.


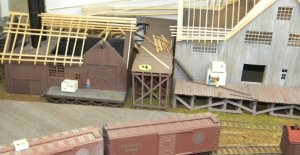
then ther is a photo showing the Boiler/ sawmill/ and loading docks of the Berghausen -Shoemaker Lumber Company on my DG, CC, & W RR. all of the wood in this photo has been done with spray paint, with the exception of the railroad ties which were done with an oil paint and turpentine stain.


I used to use turpentine and oil paint stain for all of my wood projects, but if I'm modeling wood that is or used to be painted I use this spray paint method which is, after some practice, quick easy, and yields very good results.

Bill Nelson
 

Attachments

  • SBL A  pntd cdr brds #1.jpg
    SBL A pntd cdr brds #1.jpg
    50.7 KB · Views: 35
  • SML A pntd brds #2 .jpg
    SML A pntd brds #2 .jpg
    68.2 KB · Views: 37
  • SML A pntd wd effts.jpg
    SML A pntd wd effts.jpg
    137.6 KB · Views: 34

pelletierrick

New Member
I love the being built lookbut I would keep the fronts rawer as most fronts are not painted until the roof are on unless they are being reroofed if so then awsome
 

Bill Nelson

Well-Known Member
The buildings are not intentionally being modeled as under construction. I'm planning to put tin roffing over the firring strips, and they will be painted the faded colors needed before that happens, I have just found other projects to work on in the last decade.


Bill Nelson
 

Bill Nelson

Well-Known Member
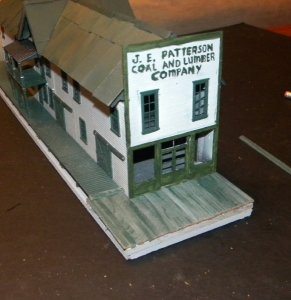
Here is a photo of the front porch on the Company store building I am building for the J. E Patterson Coal and Lumber Co. at the Clarksville Tn train club. (see Bill and Tom's excellent adventure in the logging mining, and Industrial RR section)

This porch is done with the spray paint method I have described.

In this case the wood is aromatic cedar, cut on my mini table saw, and spray painted with gray primer and the green color on individual boards before assembly.


My big sawmill is sheathed in balsa. It was assembled with unpainted balsa boards over a foam core structure. after assembly I spay painted the building heavily with flat black, so any nooks would show as shadows. Then I used light coats of gray, brown and tan spray paint followed bu a thicker coat of white.


after the paint had dried I cut an emory board so it was just as wide as a balsa board on the sawmill. that way I could sand each board on the sawmill separately. by applying different amounts of pressure, I was able to remove differing amounts of the white paint on each board, and depending on the amount of pressure applied, this exposed varying amounts of the brown, tan and gray paint underneath, giving the building the look of a building scratchbuilt with pre painted and weathered boards but with a lot less work.


Bill Nelson
 

Attachments

  • SML CS fr pch.jpg
    SML CS fr pch.jpg
    108 KB · Views: 30

jagiannovario

New Member
The same company that makes India ink makes inks in various colors which you can dilute with alcohol to make stains. I also dilute MinWax stains with thinner.
 

swampdaddy41

Active Member
Here's an interesting way to do strip wood staining. You should stick with basswood, balsa takes stain too unevenly. At any rate, being in a hurry as I assembled an open crated flatcar load that was laser cut. One edge was a nice medium brown looking wood where the laser did it's work. The other sides were very light color of the natural wood. I tried various combinations sharpie pens on the leftover parts and got interesting results. Surprisingly a coat of metallic silver, followed by an overcoat of orange produced a nice weathered look. Other colors over the silver did well too including green and red(dark). The brown sharpies are very dark like dark brown boot leather.

Worth a try if you are looking for something quick and different.

have fun, Swamp Daddy ;)
 
Status
Not open for further replies.
Top