The Problem
This little waffle is to share some thoughts and solutions on printing and scaling pixel-based card models. It is aimed at all levels of expertise so bear with me if most of this is not new to some of you (there's some discussion in an old thread here). But as we all had to start somewhere, I thought I'd go into it in a bit more detail here and with a real exampleI recently downloaded the entire set of aircraft card models from the Zioprudenzio archive site. Tedious (have to do it one by one) but so worth it for the artistry and detail. This left me with some head scratching as to scale, print size etc.
They are all in PDF format but vary in the page sizes shown when displayed in Adobe Acrobat. And none seem to fit 'naturally' on an A4 page. Okay, so I get that they're all 1:72 scale and, presumably, if Acrobat is told to print on an A4 page then they should come out at that scale. But this means Acrobat and <Insert-Your-Printer-Name-Here> are choosing what the print scaling is. With "Print to Fit" being the most prominent, what is the image actually being rescaled to? Surely it will depend on margins, etc? And If I choose "Actual Size" some blow out to a multi-page poster print at 74.075 cm x 79.613 cm! I could use the percentage scale option, but what value is correct for 1:72 scale?
Another problem is that I'm pretty crap modelling card at 1:72 and would like to rescale to 1:48 or 1:33 anyway. Those images will certainly not fit an A4 page after rescaling. I will have to move the parts around into two or more pages for my A4 printer (definitely not going to shell out on an A3 printer!). Which will involve copying the image out of the PDF file and editing it.
The Tools
You'll need some software to edit images and scale them. So here's the shopping list and a bit of an explanation if you haven't already got your own set of favourite tools. All these are free downloads (though a donation is always welcome for some). I'm using Windows, but all these are also available in MacOS and Linux flavours:Adobe Acrobat Reader - but uncheck the 'optional extras' unless you feel they will really enhance you life 

Inkscape - for editing vector graphics
GIMP - for editing raster graphics
Vector graphics and raster graphics? All images that you'll see in PDF files will either be vector or raster:
Vector: The image is described and embedded into the PDF using a vector graphics language. So for a very simplistic example, a circle would be embedded as something like "Circle 16 units diameter with its centre at 24 units across and 24 units down". The image is only drawn when the file is displayed on your screen or sent to your printer. The huge advantage with vector graphics is that they suffer little or no degradation when scaled up or down - the best quality graphics available. The huge disadvantage is that they require a greater level of skill and experience to create and edit.
Raster: The image is made up of discrete pixels (dots) which are embedded into the PDF file. This type of image is probably already familiar to you from JPG, BMP, GIF files etc. and every picture you've ever taken with your digital camera or smartphone. Their advantage is that they are easier to create and edit. The disadvantage is that those dots are harder to scale and will become obvious at high magnification.
How do you tell which type of image is in the PDF? Simply left-click on the image and either nothing will happen (it's a vector graphic) or the image will highlight and a right-click will throw up a pop up menu with Copy Image, Edit Image and Redact in it (it's a raster image).I'm not going to discuss vector image editing and rescaling here as it's a complex subject. And Inkscape has excellent help and tutorials online. The only thing I will mention is that for editing images in a PDF file with more than one page, you need to import them one page at a time.
The Solution
The images embedded in the Zioprudenzio PDF files are all raster-based. So we're dealing with pixels here instead of nice, infinitely scalable vector graphics. And scaling without acknowledging this fact usually involves pixel interpolation as there are no such things as 'fractional pixels'. If you've never come across the term pixel interpolation before, it's what happens when a pixel-based image is resized by a non-integer factor. For example, resizing a 200 x 300 pixel image by 1½ (150%) to 300 x 450 pixels. The algorithm that calculates the new image has to deal with converting each original pixel to one and a half new pixels. Which is obviously not possible as there is no such thing as a half pixel. So the algorithm examines the pixels surrounding each original pixel and interpolates this information to come up with new pixels. A bit like averaging the pixels (but I hasten to add 'not really' before I get stomped on by a herd of pedants!) This is something I've always hated as it can lead to some minor artefacts in the final image, especially on edges. Yes, I know the printer will also be interpolating when it finally lays the dots on the page. But a modern colour printer's print head resolution is so huge compared to the size of the image's pixels it's printing that I can happily live with that!Ideally, we want to preserve the original image's pixel size. As an example, the Albatross DIII is 2100 × 2257 pixels. We want to get that image to fit into our print area without any interpolation and at the exact scale we want. The key to getting this right is a property of the image called dots-per-inch (DPI). (When the world seems wedded to the metric system, it may appear strange that this setting still uses imperial measurements: dots-per-inch, not dots-per-cm. This is because the centuries-old printing industry originally based all its measurements (points, picas, ens, ems, font sizes, etc) on the imperial measures. And they've persisted as too much would have had to be changed in the industry to go metric. And the few attempts to make it metric never really caught on. But I digress...) The DPI setting is simply divided into the pixel width and height of the image to give the width and height in inches. So for the Albatross example, a setting of 100 DPI would give an image size of 21 inches x 22.57 inches. But what DPI setting do we need to get exactly 1:72 scale?
To find out, I extracted the images for a selection of the models and measured their wingspans in those images. Then compared them to the specs for the aircraft (Wikipedia). In Acrobat, the sample images turned out to have been embedded at 72 DPI. From the results (the table below) all the models use 300 DPI to give a scale of 1:72 when printed at that resolution. I also calculated the DPI setting needed for some other common scales:
aircraft | wingspan in mm | measured mm at 72dpi | scale at 72 dpi | dpi at 1:72 | dpi at 1:48 | dpi at 1:33 | dpi at 1:24 |
| Nieuport 17 | 9,050 | 520 | 1:17.40 | 298 | 199 | 137 | 99 |
| Albatross DV | 8,900 | 510 | 1:17.45 | 297 | 198 | 136 | 99 |
| Fokker VII | 8,100 | 470 | 1:17.23 | 301 | 201 | 138 | 100 |
| Gloster Gauntlet | 9,995 | 560 | 1:17.85 | 290 | 194 | 133 | 97 |
| ME 109E | 9,925 | 535 | 1:18.55 | 279 | 186 | 128 | 93 |
| Hawker Typhoon | 12,670 | 730 | 1:17.36 | 299 | 199 | 137 | 100 |
Averages: | 294 | 196 | 135 | 98 |
Allowing for a couple of percent error and a bit of artistic licence, the DPI results for the common scales work out to some convenient numbers: 300, 200, 137.5, 100
Yep, I know I'm being picky about this but it is leading to a solution. If we pull the image out of the PDF we can put it in an image editor. Personally, I use Corel's Paint Shop Pro but I downloaded GIMP to show how anyone reading this can do it in a free editor. The key is using the DPI to set the print size.
The following steps apply specifically to the Zioprudenzio files. I'll be using the file albatros3-01.pdf for this example. But you can easily adapt these steps for any other PDF model files that use raster images.
Getting The Image Out Of The PDF
This is real simple:- Open the albatros3-01.pdf file in Adobe Acrobat Reader.
- Select the image with a left mouse click. It will highlight when selected.
- Use a right mouse click to bring up the pop up menu and select Copy Image.
- Open GIMP.
- Select Edit/Paste as/New Image from the menu.
- Congratulations, you've now got the image into GIMP.
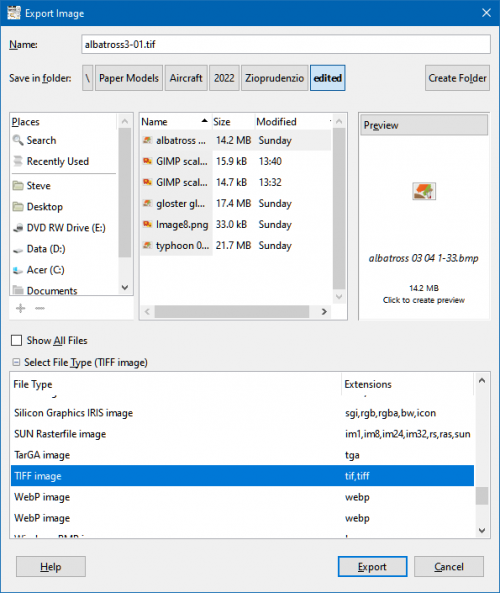
- Save it before we go any further. GIMP rather pedantically insists on saving in its own XCF format. So we have to use File/Export As... from the menu to save it in a more universal format. The file selector dialogue will open. Select the folder you want to save into and change the default Untitled.xcf name to something more meaningful like albatros3-01.tif. Click on the tiny [+] icon just above the [Help] button to open the file types list box and select TIFF image. I've used TIF (Tagged Image Format) as this doesn't compress the file. Other file types like JPG compress the image and lose some of the detail in the process. When we're making all this effort to preserve the detail that is not what we want!
- You'll now be presented with this little confirmation dialogue. All those check boxes just mean that a description of the image's properties will be saved with it, including the DPI setting. You can just click the Export button:

- Congrats again, you've now got a saved copy of the image.
For 1:72 Scale
- In the image we just saved, select Image/Scale Image... from the menu to bring up this dialogue:
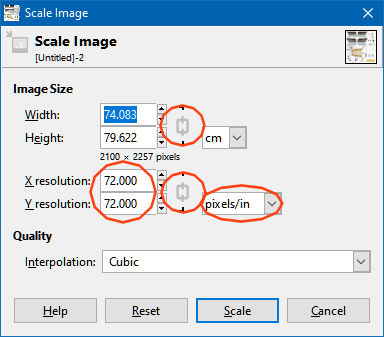
- I've ringed the areas we're interested in. Make sure that the drop down in the oval is showing pixels/in. The icons in the two small circles toggle lock and unlock for the aspect ratio of the settings to their left. We want them as shown here with the chain link locked. If the chain link is broken, just left-click on it to toggle it to locked. The largest circle is the setting we need to change. If it isn't showing 300, change it. As the aspect ratio is locked, you only need to change the X resolution field. The Y resolution, Width and Height fields will automatically follow with the correct new values as soon as you tab out of the field. It should now look like this:
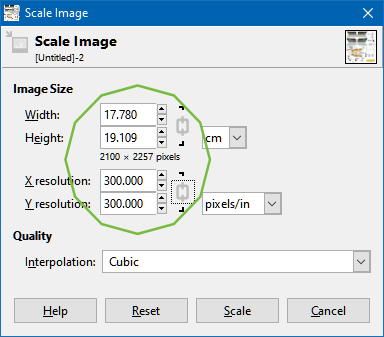
- If the Y resolution doesn't show 300, the aspect ratio isn't locked. Don't panic! Just click the Reset button and redo step 3 making sure the aspect ratio toggle is set to locked this time.
- Click on the Scale button to complete the operation.
- All of the above leaves the pixels in the image untouched. Which is just what we want.
- Save the changes. Note that File/Export has been replaced by File/Overwrite albatros3-01.tif in the menu, which is a nice touch.
- You might consider using a regression strategy for your saves to enable you to go back to a previous version if anything gets messy. Personally, I just append 001 to the file name for the first save, then 002, 003, etc. for subsequent saves. Believe me that strategy has saved me in the past from wrecking hours of work from a slip up.
- All done and ready to print.
- Select File/Print... from the menu and this dialogue pops up:
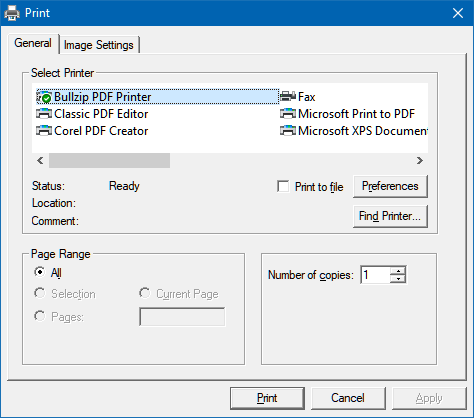
- The dialogue opens on the General tab which allows you to select the printer. I'm doing this on my laptop, so the Bullzip PDF Printer is selected. This is a free virtual printer driver for Windows that will print by saving a PDF file ready for a real printer when one's connected. Also outputs various graphics formats and allows merging of PDF files. Very useful and highly recommended. The Microsoft Print to PDF virtual printer does essentially the same job. And of course you can use your real colour printer if it's connected!
- Clicking on the Image Settings tab displays this:
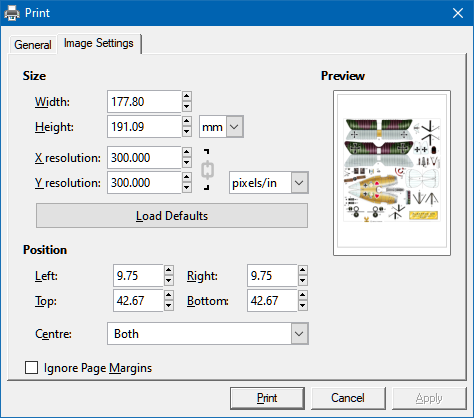
- Here you can see that the image is correctly scaled at 300 DPI and nicely centred on the page. All ready so just click the Print button.
For Other Scales
The process of rescaling using the DPI setting is exactly as above. We just use the DPI value for the scale we want. The formula to use for the Zioprudenzio aircraft is:<NewDPI> = (300 * <NewScale>) / 72
For any other images, the more general formula is:
<NewDPI> = (<OldDPI> * <NewScale>) / <OldScale>
The problem you may face is determining the <OldDPI> value if the original images are not already scaled. You may have to do some measuring and calculating to find out.
Returning to the Zioprudenzio aircraft, if you're shrinking the scale of to say 1:144 (not for me I'm afraid!) the new DPI will be (300 * 144) / 72 = 600. And as you're going smaller. there's no problem fitting it to an A4 sheet for printing. With a bit of fiddling, you may be able to get two on one page in landscape format
If you're enlarging to a scale of 1:33 (more my size!) the new DPI will be (300 * 33) / 72 = 137.5. The problem then is that the image will definitely not fit onto an A4 page. So you'll need to use GIMP to copy and paste chunks of the image into new pages to fit all the parts onto multiple A4 sheets. Easy to say but how to do it?
- Select File/New... from the menu and the following dialogue appears:
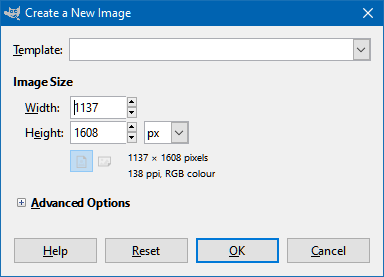
- Select A4 from the Template drop down.
- Click on Advanced Options to expand the dialogue and enter 137.5 in the X resolution field. Press [tab] and you should get this:
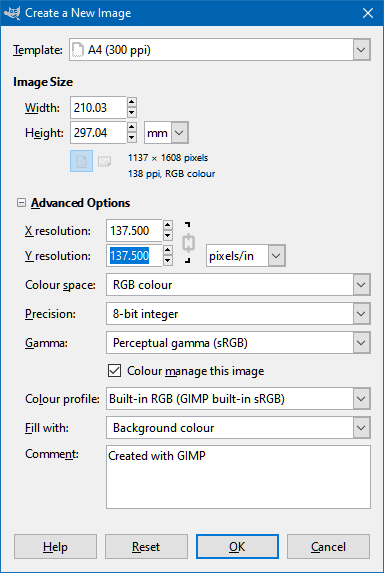
- Press the OK button and you've got a fresh canvas to work on that is A4 size and has the same DPI as our source image.
- Carefully copy model parts from the oversize image and paste them into the new image. You may need to paint out some unwanted bits if you just use rectangular selections for copying.
- When the new image is full, save it and create another one for the remaining parts.
- Repeat until you have all the model parts on two or more new pages.
Well, I've taken up enough of everybody's time so I'll leave it at that. Hope it's useful

Last edited:


 .
.