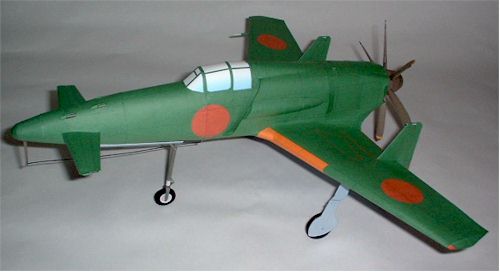
Orlik’s Kyushu J7W1 Shinden, 1/33 scale
Published 3/2005; designed by? (“Opracowanie modelu”): Lukasz Fuczek
Maly Modelarz released a 1/33-scale kit of the Japanese Shinden in the mid-1980s (I think). I bought a copy on E-Bay and built it a few years ago. Though short on detail, it was a nice kit that went together well, scaled out accurately, and looked pretty good. It is currently in the Paper Models exhibit at the EAA Museum in Oshkosh WI.
I’ve always been interested in this unusual airplane and I was excited when Orlik released it in paper, in 1/33 scale. Unfortunately, Orlik’s Shinden is a disappointment, plagued by inadequate instructions, poor fit, and (on my copy, at least) poor color match between parts.
Orlik’s Shinden comes in A4 book format with 4 pages of colored parts on cardstock, 2 pages of formers and other parts on paper, and two pages of assembly diagrams. The inside back cover shows four views of the aircraft: top, bottom, front, and port side. The inside front cover includes information about the airplane and written assembly instructions, in Polish. The covers are heavier card (about 0.5-0.75mm) and could be used as is or doubled for formers. (I used 1mm card from my scrap pile.) Assembly follows the usual cylinder-former-joiner strip method.
The assembly drawings are numbered 1 through 24. I don’t read Polish, so I followed the sequence in these drawings. Assembly begins with the cockpit, which is straightforward, except that a few parts are incorrectly numbered and one or two parts are not identified at all. Among these is the gimbal bracket at the base of the control column. While the drawing shows a part there, it’s not identified and it’s not clear what the part looks like. It took me a while to find it.
Assembly of the nose section is next. This is mostly taken up by the nose wheel well. The formers and bulkheads went together well but I had to do a lot of trimming of formers to get the fuselage skin sections to fit. The nose cone, built next, has four sections that went together well, but that assembly mated very poorly to the wheel well section. The circumference of the nose section is 2-3 mm smaller than the wheel well section it must mate to. The result, even after a lot of trimming and fitting, is a kind of “double chin” on the model, instead of the smooth profile it should have.
The fuselage section aft of the cockpit is the most complicated and least intuitive part of the assembly. It consists of an inner fuselage section and an outer section that forms the two huge air scoops that direct ram air to the aft-mounted radial engine. There is no diagram to show how this section is built. While the formers and bulkheads do appear on Diagram 24 (which shows all the formers), the drawings give no clue to how this section is assembled or what parts are used. I spent a good long time puzzling over the drawings before I worked it out. Here, again, the fit was poor, requiring a lot of trimming, especially of the longitudinal formers (Pts 39a-c). And the color of the outer fuselage section (Part 40) is a noticeably different shade of green from either of the outer panels adjacent to it.
I’ve assembled the formers for one wing and they fit well. I have no plans to finish the kit. I am already unhappy with the looks of the forward section. The rear of the plane will be time-consuming to build and I can see some other places where the diagrams are vague.
The Shinden is a fascinating aircraft and well deserving of a good quality kit in paper. This Orlik kit does not deliver. I can recommend this kit only to modelers with a lot of patience, a good working knowledge of Photoshop, and the wherewithal to make significant design changes to the kit parts.
This is the first Orlik kit I’ve attempted. This review is not intended to reflect in any way on any of Orlik’s other paper model kits. I have seen favorable reviews of other Orlik kits and I have a few other recent Orlik kits that I look forward to building.
--David Sakrison — sakrison@charter.net
Ripon, Wisconsin USA