

oops, try again
- Thread starter fishneb
- Start date
You are using an out of date browser. It may not display this or other websites correctly.
You should upgrade or use an alternative browser.
You should upgrade or use an alternative browser.

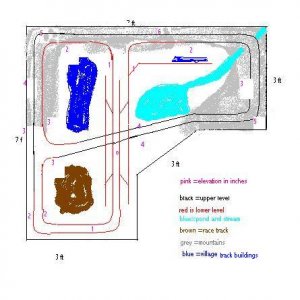

i am considering building a double track,scratch built out of balsa wood. i forgot to add that this track plan is for n scale.
i puchased a small water pump also a couple of years ago and am thinking of putting it in the corner then have a working steam and pond.
i enjoy the doing scenery and mountains.
have you ever made your mountains out of aluminum screen covered with sheet rock mud?
i puchased a small water pump also a couple of years ago and am thinking of putting it in the corner then have a working steam and pond.
i enjoy the doing scenery and mountains.
have you ever made your mountains out of aluminum screen covered with sheet rock mud?
I think a lot of people will try to talk you out of using real water on the layout. Usually, I say "there's a million ways to do it, and none of them more correct than the other", but in this case, I think you might want to reconsider. Especially since you will be able to roll the layout around. Nothing like a tidal wave to take out that balsa bridge you are planning.
Other than that, I say it looks interesting. What kind of industries are you going to serve? What is the locale, and the era for your layout?
For my scenery, I use blue foam covered with a variety of stuff, but it will probably be mostly plaster when it's done! I have tried "glueshell" with some success too.
Oh, and welcome to The Gauge!")
Andrew
Other than that, I say it looks interesting. What kind of industries are you going to serve? What is the locale, and the era for your layout?
For my scenery, I use blue foam covered with a variety of stuff, but it will probably be mostly plaster when it's done! I have tried "glueshell" with some success too.
Oh, and welcome to The Gauge!
Andrew
Well Howdy fishneb
I like your layout plan. It shows prommise.
I do have a couple of concerns I will share with you though.
Have you worked out the grade yet? Grade = hight in inches for 100 inches of track length. So a 2% grade would raise the track 2" over 100" of track length. What is yours? Should be 2.5% to 3% to look realistic. Lots of guys go as high as 5%, but those logging nuts are dare devils. Hard core rail heads go for the real thing, 1%.
The track that comes around the outside to the left and then loops around up yhe center of the layout, in my opinion, should run around the top curve to the right directly instead of jogging into the yard through that switch. I think that will be a weak spot if you want the train to run continuously, as you may find the train derails there when it is at speed. I think the service track should come off the siding directly.
I think your turnouts are up side down. If they were the other way then you could drive the train right into or right out of the siding.
Go and check out this web page
http://www.housatonicrr.com/yard_des.html
there you will find alot of good information about planning a yard.
If you like the idea of using real water, then I wouldn't try and discurage you. Yes, it is difficult, but I feel with a good setup and carefull planning you could do it. First off, all sceanery comming in contact with water would have to be water-proof. This would be best done if you were to use fiber glass, and I don't mean the type of fiber glass that uses rezin and mat, but rather a unique stuff that is made for body work. I do not mean ordinary bondo type of fiber glass filler. I refer to the short strand fiberglass. It is much stronger than bondo type filler and is made to patch rust holes in cars. You can get it at auto suply outfits like Part Source.
It has a working time of ten to twenty minutes depending on how much hardener you mix in. Mix it on a piece of scrap tin or an old piece of glass with a 3" plaster trowle. It spreads like Cheeze Whiz and you can get quite a few different textures. Latex gloves keep your hands clean. Paint with enamils. Drop sand in the wet paint for a sandy bottom.
If you want to add a second layer to add texture or re-enforce a part, then the surface has to be sanded off to get the next layer to bond properly. Here is a tip. I use a wire brush wheel in my drill to knock off the shiney surface.
Now because your layout is on wheels and you don't want it to dump the water when moved, then here is what I would do.
I would put a resivore under the table and run the pump from there. Then I would build the pond like a bathroom sink, with a drain at the bottom of the sink and an over flow hole near the top of the sink. The drain at the bottom would have 2 or 3 little holes, not big enough to just let the water flow out, but will still drain the pond when the flow from the pump is turned off. The over flow hole on the side would be big enough to handle all the flow from the pump and would establish the level of the pond. The pond would drain back into the resevore.
By building your pond in this way it would only hold water while the pump was running and would soon drain when the pump was turned off. This way, once the pond drained, you could move the table with no fear of spilling the pond.
Another idea is to use those stainless steel bowles to build the basic pond. You could get 2 bowles that nested and drill holes in the inner one to establish the drain and the over flow and put a master drain in the outer bowle to keep it water tight. Then once mounted you could add sceanery around the pond and the stream with the short strand fiberglass.
I hope this gives you food for thought
Hi Fishneb, welcome to the Gauge.
Before you lay a piece of track or worry about your bridge I would get some design software. You can download it for free at http://www.atlasrr.com/ and it will tell you just how well your layout will work. I admit that the program is a little tempermental, but it's free and if you play with it a bit you will figure it out. I started out like you did and then found just how and why my first design wouldn't work and what I could do to fix it. It is also good for determining easements. You think a dozen turnouts will easily fit there and then find you'll be lucky to get four. It's always better to find things like that out before you cut up $20 or $30 dollars worh of lumber and then have to throw it all away.
Before you lay a piece of track or worry about your bridge I would get some design software. You can download it for free at http://www.atlasrr.com/ and it will tell you just how well your layout will work. I admit that the program is a little tempermental, but it's free and if you play with it a bit you will figure it out. I started out like you did and then found just how and why my first design wouldn't work and what I could do to fix it. It is also good for determining easements. You think a dozen turnouts will easily fit there and then find you'll be lucky to get four.
It's always better to find things like that out before you cut up $20 or $30 dollars worh of lumber and then have to throw it all away. If you use real water, you will need to keep it well chlorinated or constantly fight algea growth.