Not-So Flexible Track

Steam Donkey

New Member
Hi Gaugers!

I have a wee problem. I just picked up a length of Pico code 55 to take home and play.....er........experiment with for future layout considerations (hand lay or flex track). Small problem; I can't flex that durn flex track! That stuff is trying it's darndest to stay straight. I can put small kinks in the length, and after about 5 minutes get a wacky-bumpy curve that even a Shay wouldn't negotiate.

It's not at all like the Atlas code 100 track I've used in the past. You know the stuff, if you held it out on edge it would softly droop towards the floor. This Pico track is so stiff, you could build bridges out of it! Seems I might as well hand lay my track if it takes so long to get a decent curve from the flex track.

Any ideas out there? Anybody out there have any experience with this track?

Stan
 

jon-monon

Active Member
Is the rail free to slide on one side? I know LL code 100 is 10X harder to bend than atlas code 100. At least the stuff I have. Must be the puppy chow :D :D :D
 

Vic

Active Member
Stan I think I can help you out. The hon3 flex track that I use is the same way. It is very stiff.

I have a set of metal gauges that fit between the rails and allow you to make smooth curves. The ones I have were made by a company called Ribbon Rail and are old. I can't recall who makes them now but they are in the Walthers catalog. You can get them in N and HO and Hon3. They come in various radi.

To use them you first generally shape the track by hand, working a short length at a time and then as you lay it you slide the gauge between the rails to form a smooth curve.

Hope this helped.
 

Gary Pfeil

Active Member
Stan, Your post is near and not so dear to my heart. I too have struggled with not so flexible flex track. I am not familiar with the Peco code 55, I assume this is N scale? I'm in HO, but Shinohara and other brands of code 70 flex track are stiff as you descibe. When I started in the hobby Atlas code 100 was the only flex track available, to my knowledge. When code 70 came out, I eagerly bought some but had the same problems you descibed. I then started handlaying. For many years now some beautiful track has been available, with an appearance that is much better than handlaid, but I find it harder to work with than handlaying! The only easy to use flex track I know of is Atlas code 83 and 100.
However, something I read in one of the mags some time ago may help, I am about to try this myself within the next couple days. Last night I turned over a piece of code 70 flex track and used an Exacto chisel blade to cut the piece of plastic between each tie. This allows you to spread the ties a bit if you want to, as I will due to the trackage in question being a branchline. It also allows some irregularity to the appearance. And, I hope, will make the track easier to work with. One of the problems I've had in the past was breaking the tiny cast on spike details when attempting to slide rail joiners on the end. This track is not at all forgiving about being bent vertically! I had to halt my work for the night after doing the above cutting, tonight I hope to butt the first piece up against the rails coming off a handlaid turnout, I'll need to take a couple inches of plastic ties off to spike on wooden ties already in place. I'll let you know how it works out.

Gary
 

shamus

Registered Member
Hi Stan,
The main reason why the Peco code 55 N-scale track is stiff is because the rail itself is embedded almost to the base of the ties (Sleepers). Also you will find that getting the ties cut off is quite tough going. I found that by soaking each length in warm water first makes it easier to bend.

Shamus
 

Steam Donkey

New Member
oh...jeez....can't flex my brain either

Well...this settles it........somebody send me to the rubber room. I didn't buy Pico code 55 flextrack, I bought HO standard gauge Rail Craft code 55 (and a piece of Micro Engineering code 70....it's no better).

Thanks for the tips guys. I too saw an article where a fellow snipped the plastic between the ties to space them at odd intervals (my logging line will look just ducky!:D )

Snipping ties, then soaking the track in hot water to soften the plastic, then using the Ribbon Rail gauges to set a smooth curve........sounds like a recipe for success! :cool:

Boy, I can't wait to actually start building something!!!!

Stan
 

Gary Pfeil

Active Member
Stan, An update on my efforts to lay Micro Engineering code 70 flex track. By the way, my local hobby store carries two brands, the ME and Shinohara. Prices: 10 lengths of Shinohara-$77.!!!
12 lengths ME=$44 Quite a difference! Anyway, it took me about 10-15 minutes to get a smooth curve in the track even after having cut all the ties apart. Now I know I'm slow, but that is a long time! If you try to manhandle it, you will break off the spikes holding the rail to the ties, then you can throw that piece away. I spent an hour bending and installing 4 lengths of track last night! I can almost handlay that fast. But the results will look better. i really don't want to resort to hot water soaks. And the fixtures of fixed radii don't appeal to me. So patience is called for. Nobody said this hobby is fun!

Gary
 

Steam Donkey

New Member
:confused:

Hi Gary,

Did you say that flex track looks better that hand laid? No kidding? :confused: I was under the impression that hand laid was the "professional" way to go. Mind you, I haven't seen either installed before (I don't get out much :) ), what do I know.

You wouldn't happen to have a photo or two of a side by side comparison of hand laid vs. flex track, would you? I feel all muddled up!:D
 

Gary Pfeil

Active Member
Stan, I don't know when, but at some point about 10 years ago (?) the appearance of flex track improved greatly. The problem was it was, and still is, difficult to work with compared to the Atlas track, which is a breeze to work with. Now, the Atlas track can be made to look fine, ballasting and painting the rails goes a lomg ways toward hiding the large cast on "spikes" which hold the rail. A long time ago the ties weren't so hot either. The currant Atlas code 83 is pretty nice, still has too large spikes and the rail, while .083, still has a too large profile. The base of the rail is the same as code 100. I found this out when I went to join the Atlas code 83 to handlaid code 83. They were quite different! there really is no mistaking the superior appearance of smaller rail, because it too can be painted and made to appear smaller still. The reason i say the better (hard to work with) flex track looks better than handlaid is the inclusion of tie plates and such. I had considered cutting strip styrene into little pieced and glueing them to my wood ties prior to laying rail to simulate these, but thought better of it. it would be ok for a diorama, but I'm building a fairly large layout. In the next few days I will post a photo of the ME code 70 flex track joined into handlaid code 83 for you.

Gary
 

Gary Pfeil

Active Member
Stan, I guess you wouldn't have wanted to hang for those "couple days". But here is the photo of the code 70 flex meeting the wood ties. See how much smaller the spikes on the flex track are? By comparison, the handlaid spikes are huge. But no bigger than the Atlas flex track.

Gary
 

Attachments

  • p1010123.jpg
    p1010123.jpg
    70.9 KB · Views: 234

Steam Donkey

New Member
Sweeeeet!

Gary, your track work is second to none! Beautiful stuff! You're right, the spikes and tie plates on the flex track do make quite a difference to the overall product. One of my concerns was how to make the plastic ties look like wood, looks like you've done it! :D

Another concern I've just encountered is finding ready to run code 55 turnouts complete with spikes and tie plates. I can find some pre assembled turnouts (rail only) from Railway Engineering, but I'll still need to "hand lay" the ties. Given that, your photo sure looks pretty nice with hand laid and flex track side-by-side!

Seems as there is no end to the options needing consideration in this wonderful world of model railroading!:D :D :D :D

Stan
 

lanejm

New Member
This may or may not be of help, but I've used Micro Engineering code 55 n scale flex trak without any problems and it looks great. The only problem I've had is buying the matching turnouts which, from time to time, seem to become unavailable. They also make bridge flex track which also works great. It even comes weathered if you want.
 

Gary Pfeil

Active Member
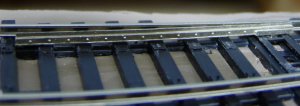
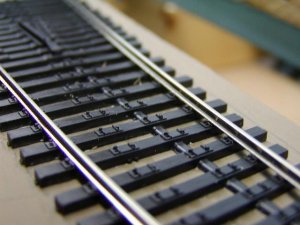
Stan, I saw an ad in MR for curvable turnout kits by Central Valley. I had my LHS get me a #6 right for a test install. It is available in codes 70 and 83. I got the 70. I know you want 55, you may be able to use it, although the base of the rail may noticably distant from the spike heads. The kit basically consists of a plastic tie strip, which may be cut on one side to make it slightly curvable (the frog area remains straight). It has nicely detailed point assemblies and a sprue of detail parts. I started installation just prior to going on vacation and have just returned. I just took some photos to show you what I am talking about. I will go downstairs shortly to get more done on it. You supply the rails for this BTW. Oh, and I'm sure my trackwork is second to many, but thanks for the compliment!
 

Attachments

  • p1010128.jpg
    p1010128.jpg
    99.5 KB · Views: 134

Gary Pfeil

Active Member
The above photo of one of the point rails shows its detail. It is just sitting in place for the moment, it is not installed yet. This photo is of the frog area. The only rails I have put in place so far are the stock rails. I used Pliobond to glue them down. A couple spots aren't seated firmly down, I figure I'll use an ACC here and there and if that doesn't work a couple spikes on the back side where they won't be visable. Once painted, the details will pop out.
 

Attachments

  • p1010129.jpg
    p1010129.jpg
    52 KB · Views: 132

Gary Pfeil

Active Member
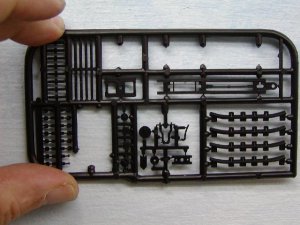
This last photo is of the sprue of parts. Check out the switch stand parts! It includes a cam to turn a target when the switch is thrown.
 

Attachments

  • p1010130.jpg
    p1010130.jpg
    59.6 KB · Views: 133

TrainJunkee

New Member
This last photo is of the sprue of parts. Check out the switch stand parts! It includes a cam to turn a target when the switch is thrown.

Can you tell us how well it curves, Show a zoomed out picture? I Have a need for Walthers 7.5 curved switches about 8... Walthers are 40 each. I saw Central valley code 83 #7 Curvable for 10 each. I would like to buy 8 at 10 then 8 at 40.:twisted:
 
Top