Karakuri

Sky Seeker

Well Established Member
Jun 1, 2015
1,178
1,083
95
Here's some models I've done with Karakuri (Japanese for Mechanism) a book by Keisuke Saka a high school physics teacher in Japan that is also an aficionado (ok MASTER) of the paper arts.
karakuri-make-paper-models.jpg

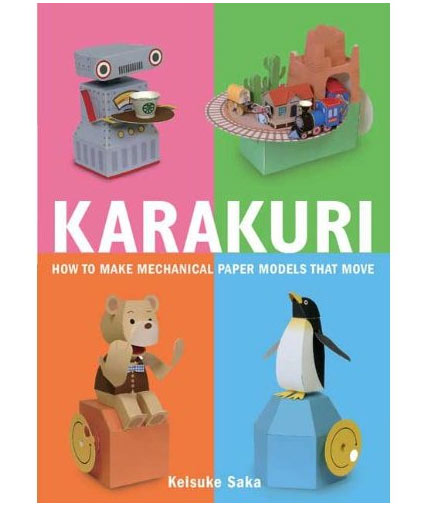
These models have mechanisms made out of paper. I've donated multiple copies of these books to a local physics program where I live for the students to learn about mechanisms, but also to introduce them to paper modeling.

This is the robot tea carrying model.
upload_2016-11-6_7-40-16.jpeg

Note the cam mechanism underneath in the center. As the robot is pushed along a surface the center cam cam rotates and pushes against a platform labeled "8". As the platform is pushed, the shaft joined to platform and the head causing the head to move up and down.
upload_2016-11-6_7-41-0.jpeg

That's it for now!

Sky Seeker
:tank:
 

Rhaven Blaack

!!!THE MAN BEHIND THE CURTAIN!!!
Staff member
Administrator
Moderator
Jun 12, 2009
12,492
9,854
228
Oregon
www.deviantart.com
That is very COOL! I hope that the students enjoyed making these projects as well as were able to get interested in paper model building.
Thank you for sharing this with us!
 
  • Like
Reactions: Sky Seeker

Sky Seeker

Well Established Member
Jun 1, 2015
1,178
1,083
95
Rhaven,

Thanks for stopping on by. Paper modeling is the cheapest way to get young people (or the young at heart) to get a 3d perspective on an item as well as design. Great way to unleash creativity.

Sky Seeker
:tank:
 

Sky Seeker

Well Established Member
Jun 1, 2015
1,178
1,083
95
Here's some more pics with the Penguin this time.

After cutting out each piece make sure you number them so you don't get confused later.

Base construction.
upload_2016-11-6_13-44-19.jpeg

upload_2016-11-6_13-44-25.jpeg

Note attachment of the front of the base to the main base. Starting from the edge working around to the other edge.
upload_2016-11-6_13-44-31.jpeg

upload_2016-11-6_13-44-37.jpeg

Penguin body.
upload_2016-11-6_13-46-20.jpeg

upload_2016-11-6_13-46-35.jpeg

upload_2016-11-6_13-46-40.jpeg

Note the bottom slot. The feet are just inserted through the slot and are NOT glued. They just flop around.
upload_2016-11-6_13-46-46.jpeg

upload_2016-11-6_13-47-40.jpeg

That's it for now.

Sky Seeker
:tank:
 

Attachments

  • upload_2016-11-6_13-47-33.jpeg
    upload_2016-11-6_13-47-33.jpeg
    162.3 KB · Views: 2
Last edited:

Sky Seeker

Well Established Member
Jun 1, 2015
1,178
1,083
95
More pics - Penguin.

This is the main shaft inserted through the penguin with the two tabs that are glued to the wings.

upload_2016-11-6_13-51-29.jpeg

Inside of the bottom with the bottom of the shaft above glued in place. Note the tabs at the top of the inside base.
upload_2016-11-6_13-49-58.jpeg

Shaft glued in place to base.
upload_2016-11-6_13-51-41.jpeg

Tabs glued to shaft.
upload_2016-11-6_13-52-12.jpeg

upload_2016-11-6_13-52-22.jpeg

That's it for now.

Sky Seeker
:tank:
 

Attachments

  • upload_2016-11-6_13-48-51.jpeg
    upload_2016-11-6_13-48-51.jpeg
    168.6 KB · Views: 2

Sky Seeker

Well Established Member
Jun 1, 2015
1,178
1,083
95
More pics - Penguin.

This is the main rotating shaft with the cams pre-positioned (before gluing). Note the penguin head. Note additionally the blue circle on the right with a yellow center with an "x". Cut along the "X", but NOT around the edges of the "X". This forms tabs which allow the circle to be glued to the shaft. The same applies also to cutting along the "X" for the cams.
upload_2016-11-6_13-53-58.jpeg

The moving shaft that extends though the other shaft joined to the base. The star indicates which direction the shaft has to face in relation to the front of the base.
upload_2016-11-6_13-55-59.jpeg

The cams were placed on a scrap piece of card stock traced, cut out, and glued in place on top of the original cams to strengthen the cams.
upload_2016-11-6_13-56-50.jpeg

Cams glued onto the shaft. Note the designer left white arrows to indicate where the cams are to be placed.
upload_2016-11-6_13-58-54.jpeg

Cam shaft mounted to the base. The shaft is just slid inside of the holes cut out earlier in the base. Also, the cams contact the bottom of the platform joined to the moving shaft.
upload_2016-11-6_13-59-51.jpeg

End attachment on the cam shaft.
upload_2016-11-6_14-0-49.jpeg

Bottom view. This also features the cuts made to the base so that the students can see the workings of the cam shaft in relation to the moving platform. The original design is covered all the way around the base.
upload_2016-11-6_14-1-16.jpeg

Base with stabilization covering - 21. The flanges of the stabilization covering just reinforce and strengthen the model.
upload_2016-11-6_14-4-0.jpeg

That's it for now.

Sky Seeker
:tank:
 

Attachments

  • upload_2016-11-6_13-54-40.jpeg
    upload_2016-11-6_13-54-40.jpeg
    175.1 KB · Views: 2
  • upload_2016-11-6_14-8-3.png
    upload_2016-11-6_14-8-3.png
    662 KB · Views: 2
Last edited:

Sky Seeker

Well Established Member
Jun 1, 2015
1,178
1,083
95
More pics - Penguin.

This is the top of the penguin body. Note the tabs of the top of the moving shaft glued to the top of penguin body.
upload_2016-11-6_14-11-30.png

Penguin head mounted on the body. Almost ready to fly!
upload_2016-11-6_14-13-14.jpeg

Crank wheel glued to the main actuating shaft. The cam wheel was reinforced with another layer of card-stock to give it additional rigidity.
upload_2016-11-6_14-14-56.jpeg

This features the wing. Unfortunately, you can't see the stripes added to the underside of the wing added with extra cardstock from the model.
upload_2016-11-6_14-16-22.jpeg

Penguin with the first wing added.
upload_2016-11-6_14-18-12.png

That's it for now.

Sky Seeker
:tank:
 

Attachments

  • upload_2016-11-6_14-12-37.jpeg
    upload_2016-11-6_14-12-37.jpeg
    153.1 KB · Views: 2
  • upload_2016-11-6_14-18-51.jpeg
    upload_2016-11-6_14-18-51.jpeg
    157.9 KB · Views: 4
  • upload_2016-11-6_14-19-15.jpeg
    upload_2016-11-6_14-19-15.jpeg
    128.6 KB · Views: 2
  • upload_2016-11-6_14-19-25.jpeg
    upload_2016-11-6_14-19-25.jpeg
    165.8 KB · Views: 1
  • upload_2016-11-6_14-20-56.jpeg
    upload_2016-11-6_14-20-56.jpeg
    166 KB · Views: 1

Revell-Fan

Co-Administrator
Staff member
Administrator
Moderator
Aug 1, 2009
11,595
12,337
228
Vreden
Oh, INDEED! I love these automata. They are a lot of fun to build - and to enjoy when finished. Brilliant! My dream is a naturally walking AT-AT, btw..! ;)
 
  • Like
Reactions: Sky Seeker

Sky Seeker

Well Established Member
Jun 1, 2015
1,178
1,083
95
Oh, INDEED! I love these automata. They are a lot of fun to build - and to enjoy when finished. Brilliant! My dream is a naturally walking AT-AT, btw..! ;)

RF,
Now that would be REALLY cool! Here's an example of a walking one:

and another one

A walker built with foam

Walking paper robot

Don't know if they were able to get this one to work - walking robot

Enjoy!

Sky Seeker
:tank:
 

zathros

*****SENIOR ADMINISTRATOR*****
Staff member
Administrator
Moderator
Apr 5, 2013
13,499
9,551
228
I love Automate models. I have neer seen one I didn't like. These are really cute. Thanks for posting them. Feel free to post a link to where you got the book!! ;)
 
  • Like
Reactions: Sky Seeker

zathros

*****SENIOR ADMINISTRATOR*****
Staff member
Administrator
Moderator
Apr 5, 2013
13,499
9,551
228
The video below should have won some kind of award. If AT-AT's moved like this, they would be a force to be reckoned with, to me they are just big targets. This clip below is unbelievable. ;)


Sky Seeker

Well Established Member
Jun 1, 2015
1,178
1,083
95
The video below should have won some kind of award. If AT-AT's moved like this, they would be a force to be reckoned with, to me they are just big targets. This clip below is unbelievable. ;)


Yes! I thought that this was hilarious, and at the same time quite inventive. Cute and clever.

Thanks for sharing Z!

Sky Seeker
 

Sky Seeker

Well Established Member
Jun 1, 2015
1,178
1,083
95
Cam 1 - Assembly and pics

This is a quick build that demonstrates a single cam / post actuation similar to the one used with the robot above.

Before assembly all parts should be numbered so that you know which part goes where.

Base _ note the striped areas and dashed areas. The striped areas are to be cut out and striped areas are to be creased.

upload_2016-11-13_11-21-8.jpeg


upload_2016-11-13_11-22-30.jpeg

Note the area on the right. A single cut is made with a knife then scissors can be used to cut the periphery. Alternatively, a knife can be used to cut the circle all the way around. Of course if you have the right sized hole punch that would leave the cleanest cut (if anyone out there has any ideas about how to make a better cut please feel free to comment!).
upload_2016-11-13_11-22-51.jpeg

upload_2016-11-13_11-27-33.jpeg

I guess Pac Man is hungry!
upload_2016-11-13_11-27-46.jpeg

Note the "X" portion within the center of the circle. Cut along the "X", but NOT the sides. Crease and fold along the sides.

upload_2016-11-13_11-29-52.jpeg

On both cams make sure to cut along the "X" as well. Crease and fold.
upload_2016-11-13_11-30-21.jpeg

This is the turning wheel / crank for turning the shaft. Make sure to cut out the striped areas. To make the wheel crank stronger you can choose to place the wheel crank on some extra cardstock. Trace the outer perimeter, cut out the shape, and glue to the existing wheel crank (the one you traced). Make sure to apply glue sparingly along the perimeter. Place something heavy on top of the wheel crank until the glue dries. After the glue is dried, cut out the circle and square. If the cut out areas are separating, apply glue to the separated areas with a paperclip tip. After application place a heavy object on top until dried. You now have a stronger wheel crank. upload_2016-11-13_11-31-49.jpeg

Fold creasing. Along the dotted lines position a ruler (or other stiff straight edge) on one side of the dotted (crease) line. Take a butter knife on the dull side and apply pressure onto the paper and run the knife along the edge of the ruler. Do this a couple of times. This allows for sharper creases and eases assembly. Alternatively, a pointed paper stylus can be used to form the creases instead of the butter knife.
upload_2016-11-13_11-39-26.jpeg

That's it for now.

Sky Seeker
:tank:
 
Last edited:
  • Like
Reactions: Revell-Fan

Sky Seeker

Well Established Member
Jun 1, 2015
1,178
1,083
95
Cam A - more pics

These are the shafts for the moving post.
upload_2016-11-13_11-48-20.jpeg

Apply glue on top of the tabs of the short shaft.
upload_2016-11-13_11-49-10.jpeg

Insert the shaft in the square hole at the top of the base. Press the tabs of the shaft flush with the top of the inside of the base.
upload_2016-11-13_11-49-42.jpeg

Apply glue to the tabs of the long shaft and attach to the base on the dotted areas (hard to see in the pic).
upload_2016-11-13_11-50-23.jpeg

Shaft assembled to the base.
upload_2016-11-13_11-52-1.jpeg

Cam shaft pre-assembly. Glue the cams together. Make sure that the square holes align. Also, place the cams underneath a heavy object until cured. If you don't the cams will have a warped appearance.
upload_2016-11-13_11-52-38.jpeg

Apply glue on to the shaft on the center arrow areas.
upload_2016-11-13_11-53-9.jpeg

Move the assembled cam into position on the shaft. Press the tabs down onto the shaft.
upload_2016-11-13_11-53-47.jpeg

Insert the shaft with the square base into the shaft shaft on the top of the base. Make sure that the shaft can move up and down within the short shaft.
upload_2016-11-13_11-59-17.jpeg

Shaft within the short shaft inside of the base. Note the number on the square base.
upload_2016-11-13_12-0-40.jpeg

That's it for now.

Sky Seeker
:tank:
 
  • Like
Reactions: Revell-Fan

Sky Seeker

Well Established Member
Jun 1, 2015
1,178
1,083
95
Cam A - more pics & final assembly

End portion on shaft. Circle positioned on one end of the cam shaft. GLues the tabs on the end of the shaft and fold down on top of the circle.
upload_2016-11-13_12-4-51.jpeg

Glue the other circle on the opposite end of the cam shaft. Apply glue first onto the arrow areas near the end of the cam shaft, then move the circle along the cam shaft until positioned on top of the glue areas. See below.
upload_2016-11-13_12-6-4.jpeg

Glue the big square in place onto the base.
upload_2016-11-13_12-9-55.jpeg

Apply glue onto the tabs of the cam shaft. Then attach the wheel crank onto the end of the cam shaft.
upload_2016-11-13_12-10-36.jpeg

Wheel crank attached. Assembly Complete!
upload_2016-11-13_12-11-36.jpeg

Side view. Note also the attached of the wheel crank with the cam shaft as well as the position of the cam to the base of the moving shaft.
upload_2016-11-13_12-12-11.jpeg

upload_2016-11-13_12-13-16.jpeg

I hope you've enjoy seeing the assembly of the cam.

Sky Seeker
:tank:
 
  • Like
Reactions: Revell-Fan

Sky Seeker

Well Established Member
Jun 1, 2015
1,178
1,083
95
For those that are curious or just need a little bit of help...

Here’s a link describing scoring and creasing.


Here’s a link describing gluing.


Here’s a link showing how to make a paper wheel from start to finish.


These links should help in construction of various paper models.

Sky Seeker
:tank:
 
  • Like
Reactions: Revell-Fan

zathros

*****SENIOR ADMINISTRATOR*****
Staff member
Administrator
Moderator
Apr 5, 2013
13,499
9,551
228
I would suggest wrapping clear smooth tape around the square shafts, and inside the holes, to act as bearings, and on the cogs and wheels. They will fray from the friction! :)
 
  • Like
Reactions: Sky Seeker

Sky Seeker

Well Established Member
Jun 1, 2015
1,178
1,083
95
I would suggest wrapping clear smooth tape around the square shafts, and inside the holes, to act as bearings, and on the cogs and wheels. They will fray from the friction! :)

Thanks Z! I sure will in future projects! I was also thinking of maybe using rubber cement on the outer periphery of the wheels to be able to move on smooth surfaces vs skidding like the robot currently does.

BTW This is being done for a high school physics class to study motion and the like with the added bonus of teaching the students about modeling and giving them a real world 3-D perspective vs the usual virtual environment.

Sky Seeker
:tank: