

BUILDING 34 & 44 kitbash
Novel hook & loop construction
Back in the 70s AHM, then IHC, Model Power, Tyco and others imported a number of buildings by Pola including the Storefront Apartment, Luigi’s Restaurant, Burlington warehouse, W.E. Snatchem funeral home & others. All were basically the same building except for the 1st floor front which varied from building to building. Colors of the walls varied from red to yellow-brown.
Each building was 3 windows wide by 4 windows deep (hence the name of this thread) and included a printed interior and place for a (included) light bulb for the first floor. Each came with the same set of roof accessories (vents, skylights, dogs, cats, streetlights, etc.) I stocked up on these versatile kits at cheap prices way back when and have used them in various kit-bash projects over the years.
In this project by mixing and matching parts from several such kits I have a building 3 windows wide by 4 deep and stacked two high; and, a second building 4 windows wide by 4 deep and stacked two high. Both are six stories high. Both are mostly done in shell construction; but, I used them to “test” a novel style of construction sort of based on the idea of Velcro. I used a form of hook and loop construction to hold the sides together as shown in some accompanying photos. It actually works out better than you might think; and, if you are a bit more careful than I was no one will realize the sides are not totally glued together. Each roof is screwed into the sides via small blocks of Evergreen material (I like to make ¼” cubed blocks for this) glued to the walls; this stabilizes the building

Photo 1 above: Building 34 full front showing some light leaks (walls not blacked out yet).
Photo 2 below: Building 34 showroom window which has some first floor details in place.

The left and rear walls are stacked, glued together in the normal fashion and glued to the base plate. The showroom window is glued to the left wall and base plate As you might guess, the absolutely critical part of this is the placement of the hooks and loops to provide a very slight tension to draw the sides together. But, not enough tension to break the hooks or pull them off the building. It takes a bit of trial and error to get it just right. I used large rubber bands to hold a building together and carefully marked where each hook & loop set would go with a pencil on the white reinforcing strip; taking the rubber band off I then moved the hook/loop sets to where they covered most, but not all, of the pencil marks -- maybe a 1/64" further apart. Then the hooks got a very small bevel at the tip to help start them in a loop. And if it is the wrong placement you can pry them off and adjust until it works. The front and right walls are glued together while upside down on the work bench to keep the roof line even. They are not glued to the base plate. Note they are also not glued to the front show room window. Spacing of the loops must allow for the hooks to slip in-between the loops and then be pressed down for the hook to engage.

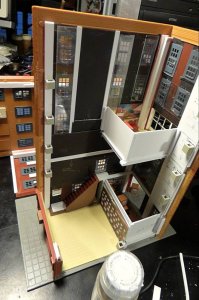
Photo 3 above: Note the loops glued to the walls; and, a loop at the bottom center near the white wall to stabilize that side with the base plate. Old style TV in the showroom window is paper; other details are plastic. Area to the right with the white walls and roof are a warehouse area which will have paper crates of arriving merchandise. White walls to the center right are a break room for employees on the 4th floor which was made to fit the “loading dock” space of that rear wall. The loops are square tubing by Plastruct cut into convenient lengths.
Photo 4 below: The front and right wall combo showing the “hooks” that will engage the loops. Any light leaks can be cured one way or the other; I used angle pieces of Evergreen plastic glued to the base plate. Note the “hook” at the bottom toward the left; this will engage the loop glued to the base plate near the warehouse area in Photo 3. This ensures the right wall won’t bulge away from the base plate.

More photos when the buildings are more complete with lights installed; neither building has been tested with lights yet and that may show problems that need solving. I’m not sure if this method will be utilized anymore. It is an interesting construction method; but, in a multi-story tall building extreme care must be used in “popping” the sections apart as damage could occur if your fingers slip in recoil. More comments when the project reaches completion and light testing.
Building 44 is constructed in a similar manner so I will not show the internals but point out the main differences in appearance between them. As the front and rear are “4 windows” wide they are made from the side walls of several of the 3x4 kits. This requires a custom made front showroom and a customized rear loading dock (first floor in the rear). Many variations are possible with this type of building if you have enough kits or spare parts to work with. A line of raised brick notes where the top cornice was cut off the lower parts of this kitbash. A very precise fit is absolutely necessary for appearances. I did lots of filing and scraping to accomplish this and the joints are reinforced with wide strips of plastic on the inside. In most cases black construction paper ($ store) was cut and glued to the inside of the walls to light proof them. Building 44 was done first and it is slightly taller than building 34 as I did not equalize the distance between windows on floor 3 & 4 to match the rest of the distance between windows on the walls. On catching this minor error, I did equalize the distance between windows on floor 3 & 4 In Building 34 to match the rest of the distance between windows on the walls. On catching this minor error, I did equalize this space on building 34.

Photo 5 above: building 44 in the early stages of construction showing the bottom floor made of parts of two similar kits; and, on the roof is an “office container” which was an accessory offered by AHM. The 4th floor door will be made into a balcony eventually. Gray strips at the sides were leftover from some large Walthers factory and used to give the building a distinctive appearance.
Photo 6 below: a right side view shows the multi-story fire escape (often neglected and left out in modeling). Parts from at least two kits were used to make it. The white stuff at the bottom is where a platform will be built up so a person stepping off the fire escape would not have a great distance to jump.

Certainly it is a different way to approach building kitbashing in HO scale with plastic parts. More complicated than screws and blocks I’ve used everywhere else. But, to the good there are only a few screws on the roof and you don’t have to take the building apart floor by floor. Will update this later on.
Have fun modeling, Swamp Daddy
Novel hook & loop construction
Back in the 70s AHM, then IHC, Model Power, Tyco and others imported a number of buildings by Pola including the Storefront Apartment, Luigi’s Restaurant, Burlington warehouse, W.E. Snatchem funeral home & others. All were basically the same building except for the 1st floor front which varied from building to building. Colors of the walls varied from red to yellow-brown.
Each building was 3 windows wide by 4 windows deep (hence the name of this thread) and included a printed interior and place for a (included) light bulb for the first floor. Each came with the same set of roof accessories (vents, skylights, dogs, cats, streetlights, etc.) I stocked up on these versatile kits at cheap prices way back when and have used them in various kit-bash projects over the years.
In this project by mixing and matching parts from several such kits I have a building 3 windows wide by 4 deep and stacked two high; and, a second building 4 windows wide by 4 deep and stacked two high. Both are six stories high. Both are mostly done in shell construction; but, I used them to “test” a novel style of construction sort of based on the idea of Velcro. I used a form of hook and loop construction to hold the sides together as shown in some accompanying photos. It actually works out better than you might think; and, if you are a bit more careful than I was no one will realize the sides are not totally glued together. Each roof is screwed into the sides via small blocks of Evergreen material (I like to make ¼” cubed blocks for this) glued to the walls; this stabilizes the building
Photo 1 above: Building 34 full front showing some light leaks (walls not blacked out yet).
Photo 2 below: Building 34 showroom window which has some first floor details in place.
The left and rear walls are stacked, glued together in the normal fashion and glued to the base plate. The showroom window is glued to the left wall and base plate As you might guess, the absolutely critical part of this is the placement of the hooks and loops to provide a very slight tension to draw the sides together. But, not enough tension to break the hooks or pull them off the building. It takes a bit of trial and error to get it just right. I used large rubber bands to hold a building together and carefully marked where each hook & loop set would go with a pencil on the white reinforcing strip; taking the rubber band off I then moved the hook/loop sets to where they covered most, but not all, of the pencil marks -- maybe a 1/64" further apart. Then the hooks got a very small bevel at the tip to help start them in a loop. And if it is the wrong placement you can pry them off and adjust until it works. The front and right walls are glued together while upside down on the work bench to keep the roof line even. They are not glued to the base plate. Note they are also not glued to the front show room window. Spacing of the loops must allow for the hooks to slip in-between the loops and then be pressed down for the hook to engage.
Photo 3 above: Note the loops glued to the walls; and, a loop at the bottom center near the white wall to stabilize that side with the base plate. Old style TV in the showroom window is paper; other details are plastic. Area to the right with the white walls and roof are a warehouse area which will have paper crates of arriving merchandise. White walls to the center right are a break room for employees on the 4th floor which was made to fit the “loading dock” space of that rear wall. The loops are square tubing by Plastruct cut into convenient lengths.
Photo 4 below: The front and right wall combo showing the “hooks” that will engage the loops. Any light leaks can be cured one way or the other; I used angle pieces of Evergreen plastic glued to the base plate. Note the “hook” at the bottom toward the left; this will engage the loop glued to the base plate near the warehouse area in Photo 3. This ensures the right wall won’t bulge away from the base plate.
More photos when the buildings are more complete with lights installed; neither building has been tested with lights yet and that may show problems that need solving. I’m not sure if this method will be utilized anymore. It is an interesting construction method; but, in a multi-story tall building extreme care must be used in “popping” the sections apart as damage could occur if your fingers slip in recoil. More comments when the project reaches completion and light testing.
Building 44 is constructed in a similar manner so I will not show the internals but point out the main differences in appearance between them. As the front and rear are “4 windows” wide they are made from the side walls of several of the 3x4 kits. This requires a custom made front showroom and a customized rear loading dock (first floor in the rear). Many variations are possible with this type of building if you have enough kits or spare parts to work with. A line of raised brick notes where the top cornice was cut off the lower parts of this kitbash. A very precise fit is absolutely necessary for appearances. I did lots of filing and scraping to accomplish this and the joints are reinforced with wide strips of plastic on the inside. In most cases black construction paper ($ store) was cut and glued to the inside of the walls to light proof them. Building 44 was done first and it is slightly taller than building 34 as I did not equalize the distance between windows on floor 3 & 4 to match the rest of the distance between windows on the walls. On catching this minor error, I did equalize the distance between windows on floor 3 & 4 In Building 34 to match the rest of the distance between windows on the walls. On catching this minor error, I did equalize this space on building 34.
Photo 5 above: building 44 in the early stages of construction showing the bottom floor made of parts of two similar kits; and, on the roof is an “office container” which was an accessory offered by AHM. The 4th floor door will be made into a balcony eventually. Gray strips at the sides were leftover from some large Walthers factory and used to give the building a distinctive appearance.
Photo 6 below: a right side view shows the multi-story fire escape (often neglected and left out in modeling). Parts from at least two kits were used to make it. The white stuff at the bottom is where a platform will be built up so a person stepping off the fire escape would not have a great distance to jump.
Certainly it is a different way to approach building kitbashing in HO scale with plastic parts. More complicated than screws and blocks I’ve used everywhere else. But, to the good there are only a few screws on the roof and you don’t have to take the building apart floor by floor. Will update this later on.
Have fun modeling, Swamp Daddy
Attachments
-
 Building 34-44 pix 001 cropped resized.jpg49.9 KB · Views: 1
 -
 Building 34-44 pix front b resized.jpg69.4 KB · Views: 1
 -
 Building 34-44 pix 34 loops resizeds.jpg74 KB · Views: 1
 -
 Building 34, movable walls 4 resized.jpg70.6 KB · Views: 1
 -
 Building 44 a 6-story square medium resized.jpg101.4 KB · Views: 1
 -
 Building 44 a 6-story square right side medium resized.jpg102 KB · Views: 1
 -
 Building 34, fixed walls 1 resized.jpg97.7 KB · Views: 1
Last edited:
