This'll have 'em slammin' their heads in a door....

Status
Not open for further replies.

shaygetz

Active Member
May 2, 2003
3,612
0
36
64
www.freewebs.com
A railbus for the Grateful Dead Tour...

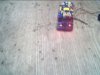
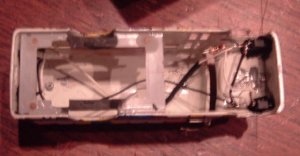
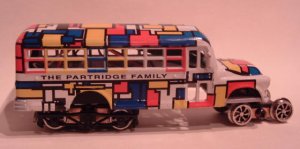
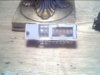
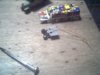
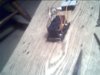
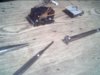
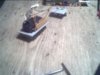
Just started my latest project, a standard gauge railbus, using a Johnny Lightning "Partridge Family" bus and a Bachmann 'Frisco cable car. If I'm not feelin' too ornory, I'll repaint it in a more subdued scheme...sometime...soon...maybe...not! Because of it's short wheelbase, I've already added wipers to the pilot truck (the cable car's front truck w/ frame removed) for added electrical pickup.
 

Attachments

  • bus.jpg
    bus.jpg
    34 KB · Views: 1,135

shaygetz

Active Member
May 2, 2003
3,612
0
36
64
www.freewebs.com
The pickups are now wired, using the very flexible wire leftover from DCC installs (I never throw nothing away). The body of the bus has had it's frame supports and clear windows removed, the latter set aside for final assembly.
 

Attachments

  • bus1.jpg
    bus1.jpg
    42.3 KB · Views: 1,115

shaygetz

Active Member
May 2, 2003
3,612
0
36
64
www.freewebs.com
Because the cable car's floor fit perfectly side to side, I saw no reason to go to the trouble of making another. I modified it with some light filing so that the motor truck slips more easily in and out for servicing.
 

Attachments

  • bus2.jpg
    bus2.jpg
    37.6 KB · Views: 1,160

shaygetz

Active Member
May 2, 2003
3,612
0
36
64
www.freewebs.com
I then cut it apart so that the power truck is centered over the rear wheel wells and the front truck is centered just behind the front bumper. By the way, this bus is currently available in Rock Island "Bancruptcy Blue" sporting the Cat in the Hat's mug on it.
 

Attachments

  • bus3.jpg
    bus3.jpg
    27.1 KB · Views: 1,097

shaygetz

Active Member
May 2, 2003
3,612
0
36
64
www.freewebs.com
The front truck requires the most tedious work. Adding wipers to the frame produced unwanted friction, making the wheels hard to roll. With patience, powdered graphite and some fine emery cloth, you'll have a free-rolling truck in about an hour.
 

Attachments

  • pilotbot.jpg
    pilotbot.jpg
    33.1 KB · Views: 1,040

shaygetz

Active Member
May 2, 2003
3,612
0
36
64
www.freewebs.com
The topside. Note the 1/4" holes for the wires to have freedom of movement on tight curves. I also modified the frame so that the truck is more centered on the bumper, thereby centering the rear axle in the front wheel well.
 

shaygetz

Active Member
May 2, 2003
3,612
0
36
64
www.freewebs.com
Wiring for DCC is almost a given nowadaze...this is the perfect powertruck for a beginning installer to modify. The motor is isolated from the frame, save for two contact wipers coming up from the wheels. Just bend them out sightly and wire per manufacturer's instructions. Finish up by insulating the brush points from the wipers with bits of electrical tape. For DC ops, just wire directly to the wipers, being careful to note proper polarity.
 

Attachments

  • wire.jpg
    wire.jpg
    22.7 KB · Views: 1,040

shaygetz

Active Member
May 2, 2003
3,612
0
36
64
www.freewebs.com
Modify the rear frame slightly by cutting off the seating as shown, being careful to retain the original motor mounts. You'll also have to do some filing to clears the wiring around the wipers. Using a liquid styrene cement reinforces the motor mounts by "welding" them more completely to the frame.
 

Attachments

  • frame.jpg
    frame.jpg
    24 KB · Views: 1,007

shaygetz

Active Member
May 2, 2003
3,612
0
36
64
www.freewebs.com
Thank you, Robin. I reeeeeally don't want to keep it this colorful for long. I'm still looking for an effective way to remove a powder coat paint job. Once that's done, I'll give my standard MOW grey w/ black markings.
 

shaygetz

Active Member
May 2, 2003
3,612
0
36
64
www.freewebs.com
Originally posted by dash10
Don't forget to put in some LED headlights and taillights. :D FRED

Already have the headlights ordered, some 2mm super bright LEDs from Loy's Toys. Gonna see if i can turn some red T1 1/2 LEDs down to 2mm in a drill press for the rears. With the remote functions on the chip, it would be a crime not to take advantage of them.

Tyson, I'm just about cantankerous enough to leave her as she sits, especially with a SoundTrax "Galloping Goose" module in it.

Neil, I consumed way too many medicinal herbs and spices in the 70s...when I think of what I could of done with that money hobby and education wise, I want to slam my own head in a door:eek:ops: Somehow managed to make it to 44 with most of my braincells reasonably intact :rolleyes:
 

shaygetz

Active Member
May 2, 2003
3,612
0
36
64
www.freewebs.com
Originally posted by jon-monon
[BHave you a LPShawncassidy to drive it? :D :D :D [/B]

Aye, 'tis David Cassidy who drove the bus. His little brother Shawn was one of the "Hardy Boys". Yuck, now I need a Rolaids...

Been working on filing down LEDs for the rear tailights. I'll try to come up with a pic.
 

shaygetz

Active Member
May 2, 2003
3,612
0
36
64
www.freewebs.com
Actually, it wasn't that hard to stay with the paint job, Johnny Lightning does them so well. It very crisp and clean, right down to the "Caution: Nervous Mother Driving" sign in three tone red, black and white.

The tail lights are done. Because LEDs smaller than T1 1/2 are hard to come by financially, I chose to make them by turning them on my ersatz lathe---read that, drill press. Piece of cake...carefully chucked and set to a low speed, using a new, clean file, they were done in a couple of minutes. A borrowed dial caliper helped to keep them uniform in size. It could just as easily be done in a hand drill clamped in a vise. The plastic of the LED is brittle but comes off cleanly without leaving any burrs.
 

Attachments

  • 1.jpg
    1.jpg
    21.8 KB · Views: 691

shaygetz

Active Member
May 2, 2003
3,612
0
36
64
www.freewebs.com
And lit... I use 3v LEDs that use a 470ohm 1/4 watt resistor wired into the circuit to avoid the magic blue smoke...
 

Attachments

  • 3.jpg
    3.jpg
    29.2 KB · Views: 351

shaygetz

Active Member
May 2, 2003
3,612
0
36
64
www.freewebs.com
You can do just about anything to them except touch the element. Just turn them down to the size you want, being careful to keep an eye on the element (those z shaped silver thingies entombed in the plastic). They are surprisingly resilient, able to take the most fumbling of solderers as well.
 
Status
Not open for further replies.