

Ted, the build is coming along nicely. Shrike, the idea of using toaster elements is intriguing. Keep us informed of how well it works....might be a good idea to include the rheostat in the circuit to keep from making your projects toast.:twisted:
Phabulous Phantom F4B in 1/33
- Thread starter cmdrted
- Start date
You are using an out of date browser. It may not display this or other websites correctly.
You should upgrade or use an alternative browser.
You should upgrade or use an alternative browser.
- Status
- Not open for further replies.
That is some superb work, Ted!
I was wondering, if you get to the point of building that vacuform device, if you might be willing to make a small tutorial on it's construction and use to be put in the tips and techniques thread. I have watched a few modelers make these canopies and would love to learn how to make them without reinventing the wheel, so to speak...having something like that in one place, with comments added from other members on how they make their canopies, would be wonderful, I think. Just a thought....
Cheers!
Jim
R
rickstef
Jim,
Ted did have something written up, it might have been a Knowledge Base article, and it might still be somewhere in the ether.
might do a search on it here on the site.
Rick
Ted did have something written up, it might have been a Knowledge Base article, and it might still be somewhere in the ether.
might do a search on it here on the site.
Rick
Right you are, Rick...thought it was a good idea.:grin:
Here is where I found it:
http://www.cardmodels.net/forum/showthread.php?t=3101&highlight=canopies
Cheers!
Jim
Here is where I found it:
http://www.cardmodels.net/forum/showthread.php?t=3101&highlight=canopies
Cheers!
Jim
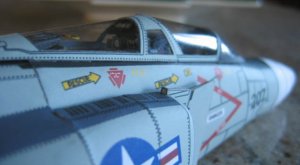
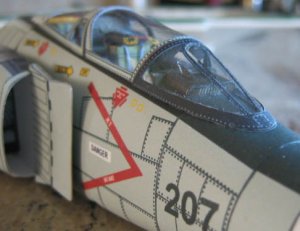
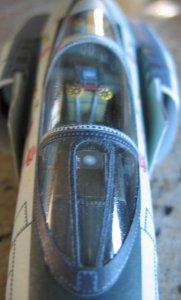
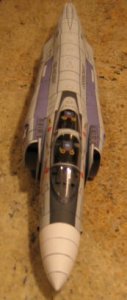
Glass in place
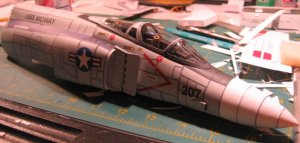
Jiim and Rick, I did a post on vacuforming a ways back, I do like the idea of doing one on the box itself and more importantly the frame/holding thing that holds the plastic to melt and form. Anyways, finally finished the glass pieces. They are in place, I think I did it right but GPMs cockpit parts, and the canopy parts clashed a bit on fitting to the fuselage. The rearview mirrors and some of the frames had to be HEAVILY trimmed to fit over the various panels and such. Now a break, some Earl Grey, and on to other parts of the aircraft.....
Jiim and Rick, I did a post on vacuforming a ways back, I do like the idea of doing one on the box itself and more importantly the frame/holding thing that holds the plastic to melt and form. Anyways, finally finished the glass pieces. They are in place, I think I did it right but GPMs cockpit parts, and the canopy parts clashed a bit on fitting to the fuselage. The rearview mirrors and some of the frames had to be HEAVILY trimmed to fit over the various panels and such. Now a break, some Earl Grey, and on to other parts of the aircraft.....
Attachments

Excellent, Ted, excellent!")
I found the vacuform thread, and enjoyed reading it...again...I thought it sounded familiar...tell you what, life is an adventure when you start losing your memory as you get older.:grin:
If you decide to update the thread with more details about building Le Machine, I for one would love it.
I just love your build!
Cheers!
Jim
Jim, look at the upside....each day you get to meet lots of new people, starting with the one you wake up next to.
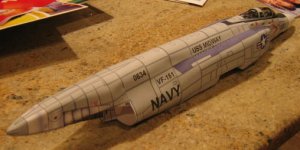
The last few days work
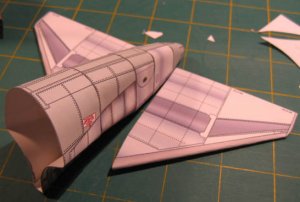
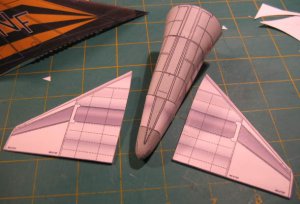
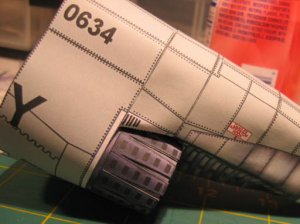
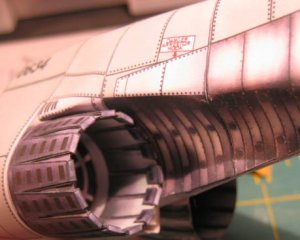
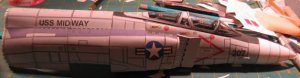
Having finished the front fuselage section, I decided to do the back end next for a change. The tail section is a little strangely shaped, it has to incorporate the transition from the twin engine exhausts to a roughly rectangular end piece. It went together nicely with only a few "redo-overs" at the tail hook section. The fin went together no problems, as did the stabilators. I debated about the metallized tail sections, either making them actually metallic, by masking and spraying a light dusting of silver spray, or just relying on the metallic like paint job from the paintshop pro repaint. I chose option B this time, maybe the Airforce E model or the IAF version will get option A. That's it for tonight......
Having finished the front fuselage section, I decided to do the back end next for a change. The tail section is a little strangely shaped, it has to incorporate the transition from the twin engine exhausts to a roughly rectangular end piece. It went together nicely with only a few "redo-overs" at the tail hook section. The fin went together no problems, as did the stabilators. I debated about the metallized tail sections, either making them actually metallic, by masking and spraying a light dusting of silver spray, or just relying on the metallic like paint job from the paintshop pro repaint. I chose option B this time, maybe the Airforce E model or the IAF version will get option A. That's it for tonight......
Attachments

Your canopy looks very good- blemish and all! Once you get the frame around it, no one will ever see it. Isn't "un- holely" plastic the same as "the damned" plastic? I'm just asking...
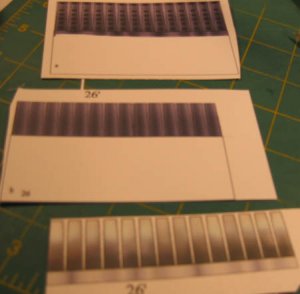
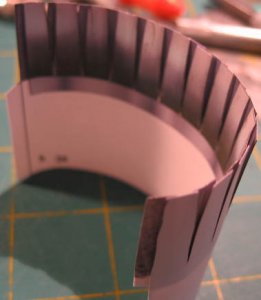
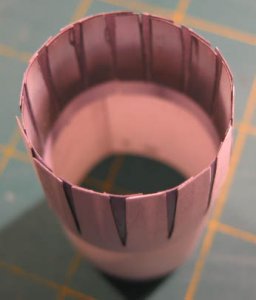
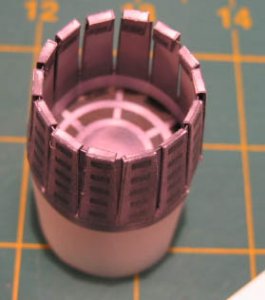
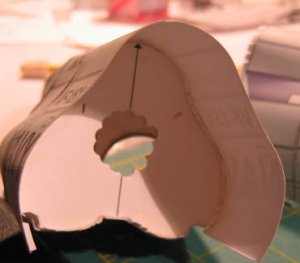
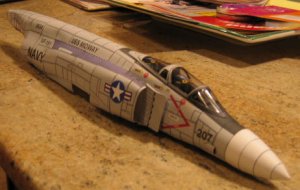
Jasco, thanks, Well I'm not a paper purist, if a part can be made of paper and it looks as good or better than anything else, I'll use it, Including the plastic for canopies! The little progress so far, the exhaust nozzles were a bit of a puzzle, but it was finally solved. The nozzles are made up from 3 differant rings of "fingers". What I figured was to cut out and glue 26 and 26 b as shown. Thier must be a little overlap as 26 a will be glued to the outside then have the little ends folded over and into the interior of the nozzle, best to see the pics.
Attachments
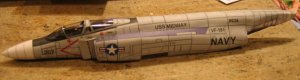
Ted.......... I tell you what......... this is one good looking model!:twisted:
Thanks for sharing! You are going to make me cut up one of my books yet!:-D
john
Thanks for sharing! You are going to make me cut up one of my books yet!:-D
john
Late last night
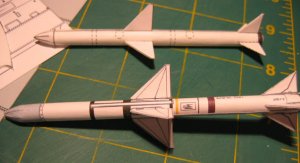
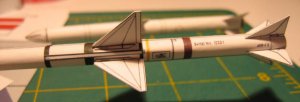
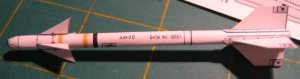
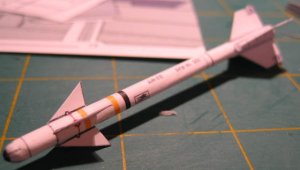
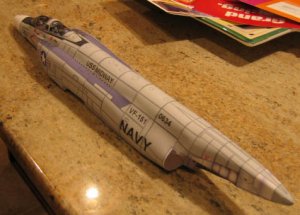
John, thanks for the encouragement. In answer to one of your earlier questions, I guess the model will be @21" long. Anyways, late last night, I was toying with the aircrafts armament. I've never been a fan of the stock weaponry given most card aircraft and decided to design my own. The GPMs Aim 7 Sparrow was rather basic and alittle short. Thier Aim 9 sidewinder didn't even make it to the build stage. After a little web surfing for details I completely designed new missiles for the Phantom. I came up with the Aim7E and Aim 9B missiles shown here. Sometimes you just have to do things yourself....The 1st pic shows the kits Sparrow and then the new missile. The other pics show the 9B Sidewinder.
John, thanks for the encouragement. In answer to one of your earlier questions, I guess the model will be @21" long. Anyways, late last night, I was toying with the aircrafts armament. I've never been a fan of the stock weaponry given most card aircraft and decided to design my own. The GPMs Aim 7 Sparrow was rather basic and alittle short. Thier Aim 9 sidewinder didn't even make it to the build stage. After a little web surfing for details I completely designed new missiles for the Phantom. I came up with the Aim7E and Aim 9B missiles shown here. Sometimes you just have to do things yourself....The 1st pic shows the kits Sparrow and then the new missile. The other pics show the 9B Sidewinder.
Attachments
Putting the long part together
Well, side steps aside work finally resumed on the fuselage. I had decided to make it from both ends so that I could fit in the bulkheads to reduce that framework look that such models can get. It was working reasonably well untill it came time to join the halves. After much forcing, yelling, praying and swearing the halves finally went together. The first series of pics are the 2 halves being built from the ends. The underside shot shows the long run of fuselage parts fit together Ala "PModel" style with minimun bulkheads. It does make for a much smoother run. I'll fit the bulkheads later to gently beef up the wing mounting parts, but I may just leave them out. One pic shows the rough cut finger hole that was neccessary to move the after engine mount bulkhead to fit properly. I left the nozzles out in the pics.
Well, side steps aside work finally resumed on the fuselage. I had decided to make it from both ends so that I could fit in the bulkheads to reduce that framework look that such models can get. It was working reasonably well untill it came time to join the halves. After much forcing, yelling, praying and swearing the halves finally went together. The first series of pics are the 2 halves being built from the ends. The underside shot shows the long run of fuselage parts fit together Ala "PModel" style with minimun bulkheads. It does make for a much smoother run. I'll fit the bulkheads later to gently beef up the wing mounting parts, but I may just leave them out. One pic shows the rough cut finger hole that was neccessary to move the after engine mount bulkhead to fit properly. I left the nozzles out in the pics.
Attachments

More of the fuselage assembly process
These pics and one of the last shows an ooopps to the after fuselage trying to bend paper in the wrong directions. I managed to salvage the sections but I'll just show the "good side" when she is finished. The other pic shows the fwd underside sans bulkheads.
These pics and one of the last shows an ooopps to the after fuselage trying to bend paper in the wrong directions. I managed to salvage the sections but I'll just show the "good side" when she is finished. The other pic shows the fwd underside sans bulkheads.
Attachments


Our Awesome Alien Fusing Technology !
After letting the parts dry and watching some Invader Zim on Nick cable with the kids I decided to "Fuse" the halves together. "Oh come on your just gluing the pieces" " Yes Earth specimen but behold our advanced technology", "right it's just glue". After some fiddling and bending and holding etc, They finally held in a reasonably good manner.
After letting the parts dry and watching some Invader Zim on Nick cable with the kids I decided to "Fuse" the halves together. "Oh come on your just gluing the pieces" " Yes Earth specimen but behold our advanced technology", "right it's just glue". After some fiddling and bending and holding etc, They finally held in a reasonably good manner.
Attachments
- Status
- Not open for further replies.