Panzer IF Tracks

Status
Not open for further replies.

charliec

Active Member
Jan 18, 2004
384
1
36
75
Brisbane, Australia
This is the start of the documentation on my technique of building tracks.

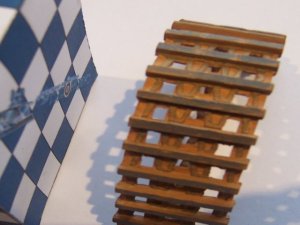
As an example I've picked the tracks for the WAK 1/25 Panzer IF. These are complicated enough to show some of the attributes of the method.

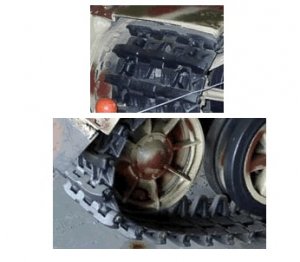
To start with I've included images of the original tracks - this will give a build target and hopefully the finished product will approximate the original. These images are from one of two surviving Pz IFs at Kubinka, Russia. The images are details taken from the www.jagdtiger.de site.

Charlie
 

Attachments

  • original.jpg
    original.jpg
    33 KB · Views: 526

charliec

Active Member
Jan 18, 2004
384
1
36
75
Brisbane, Australia
The WAK model gives a choice of flat strip or individual track elements. The individual track elements are quite small and look to be quite difficult to get right.

Starting with the flat strip sheet - print on 200gsm (I scanned it at 300dpi) laminate the inside of the track (where the guide plates go) with 160gsm. This is to get the track thickness approximately right. Don't cut the strips out of the sheet - we'll need as much support as possible later.

I've shown only a few track links in the images - the rest of the track is simply
repetition.

Charlie
 

Attachments

  • track_0.jpg
    track_0.jpg
    77.9 KB · Views: 461

charliec

Active Member
Jan 18, 2004
384
1
36
75
Brisbane, Australia
No pain so far - this is about to change.

Cut out the drive slots, etc on the inside of the track and once finished cut
across the track on the hinges lines. These are shown in red on the image.

On the outside of the track cut out the pieces noted - don't cut across the hinge lines yet on this side.

Charlie
 

Attachments

  • track_2.jpg
    track_2.jpg
    80.7 KB · Views: 459

charliec

Active Member
Jan 18, 2004
384
1
36
75
Brisbane, Australia
Back both sides with baking paper - make sure you get good surface coverage with the glue of choice. I used slightly thinned PVA glue and brushed it on.

When the glue's dry cut out the inside of the track and the hinge lines of the inside of the track. If you try to cut the hinge lines on the outside of the track without the support of the baking paper it will almost certainly fail.

Charlie
 

Attachments

  • track_3.jpg
    track_3.jpg
    81.3 KB · Views: 453

charliec

Active Member
Jan 18, 2004
384
1
36
75
Brisbane, Australia
Back the inside of the track with baking paper - when dry - cut out the track side.

At this stage we've got two track sides - both supported by a layer of baking paper but capable of hinging around the cuts on the track hinges.

Charlie
 

Attachments

  • track_4.jpg
    track_4.jpg
    47 KB · Views: 452

charliec

Active Member
Jan 18, 2004
384
1
36
75
Brisbane, Australia
Now glue the two sides together making sure that the hinge lines are aligned and the track sides are oriented in the correct directions. One the glue is dry
cut out the drive slots (again) - the slots will be obstructed with the baking paper layers but it's easy to cut out with a sharp #11 blade.

I found it's easier to work from the inside of the track for this rather than guess where the slots are from the outside.

Trim off the edges of the track - the Pz I track is wider at each hinge. I used a ground down chisel blade to do this (thanks Jim Nunn).

Charlie
 

Attachments

  • track_5.jpg
    track_5.jpg
    56.4 KB · Views: 446

charliec

Active Member
Jan 18, 2004
384
1
36
75
Brisbane, Australia
All that's left to do is add the grouser bars on the outside of the track and the guide plates on the inside.

The track will need to be painted since there are large white area exposed on the outside of the track.

I'll add a couple of images of a completed track section when I get it painted but .... that's all folks....

On second thoughts - I'll put up a couple of images of the completed track section before I hide the mistakes
under a paint layer...


Charlie
 

Attachments

  • track_outside.jpg
    track_outside.jpg
    39 KB · Views: 439
  • Like
Reactions: josve

charliec

Active Member
Jan 18, 2004
384
1
36
75
Brisbane, Australia
And - just to prove that the thing is flexible - a view from the other side.

I'll leave it to others to judge how reasonable this is compared to the original.

A couple of things which could be improved:

1. The original grousers had a couple of slots on the outer surface which aren't represented.

2. The profile of the guide plates is not quite right - they should be more pointed.

Once I've got the tracks done I guess I've got to build the rest of the tank to hang them on.

Charlie
 

Attachments

  • track_inside.jpg
    track_inside.jpg
    39 KB · Views: 434
Great technique, Charlie!
I'm gonna have to try this myself when I get a little time to play around with it.

Yeah, I would like to see it before and after painting.
Some close up shots would be awesome, if you can.

Thanks for sharing this, Charlie!
I think this is a great new way to lay some track!

Russell
 

charliec

Active Member
Jan 18, 2004
384
1
36
75
Brisbane, Australia
Here's the painted version.

I'm aiming at the "rust and dust" look.

It's a fairly thin coat of acrylic with grey highlight on the grousers.

Charlie
 

Attachments

  • painted_outside.jpg
    painted_outside.jpg
    41 KB · Views: 255
Charlie, that looks fantastic! Very realistic. Appears to be labor intensive, but I'm sure much less so than building each link individually. Thank you for the post. It's going in my favorites so I can refer to it when I tackle the tracks on my Modelik Panzer II (thread is in here somewhere, eventually I will finish it).
Regards,

Don
 

Clashster

Member
Dec 1, 2006
238
0
16
61
The Conch Republic
Beautiful looking tracks, Charlie! Very cool technique... I will have to give it a go with some of the many tanks I have laying around here! I would think the rest of the tank will be a breeze compared to the tracks! Thanks for an awesome tutorial!

Hey Chris, how about the reserves?

Chris
 
C

cgutzmer

Clashster said:
Beautiful looking tracks, Charlie! Very cool technique... I will have to give it a go with some of the many tanks I have laying around here! I would think the rest of the tank will be a breeze compared to the tracks! Thanks for an awesome tutorial!

Hey Chris, how about the reserves?

Chris

Yes indeed, excellent tutorial though tank tracks are painful enough for me already ;)
Chris
 
Status
Not open for further replies.