The difficult part is the cockpit interior. It prevents any support structure from going straight through the build. I'm thinking about adding a simple big rectangular tube which protudes straight from the nose section behind the CI through to the engine section. So the engine section has a hole at the front, the nose a rectangular tube at the rear. That way you'll ensure a durable connection which also will guarantee that the both parts are assembled straight. Like the neck tube on Crichton. 
Launch when ready!
- Thread starter Revell-Fan
- Start date
You are using an out of date browser. It may not display this or other websites correctly.
You should upgrade or use an alternative browser.
You should upgrade or use an alternative browser.
Okay, the thread images are back!
In the meantime some things have happened which affected this project. First, SketchUp and Pepakura accept higher reolution images as textures. This build will benefit from it tremendously. I'm still toying around with the CG model. I have cleaned up the lines abit more to avoid edges which are smaller than 1.5 mm (in 1/18 scale, that is). I guess this is the correct approach to keep everything smooth but not too detailed so that you don't have to deal with flaps which are 1 mm or even less wide. Unfolding will be easier, too.
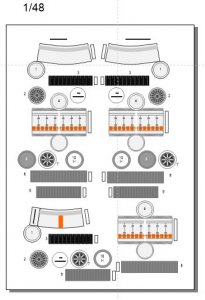
In addition, I found detailed kit part maps which give excellent views at the greeblies used on the original filming miniature. These have already helped me making a preliminary texture for an easy version of the Viper. Yep, there won't be only the big one.
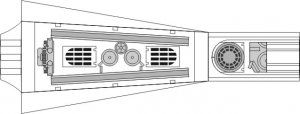
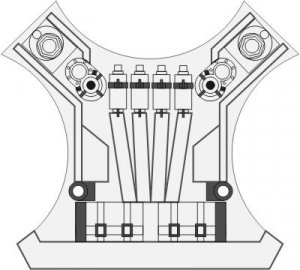
Here are a few images of my tracing efforts:
An accurate replica of the original greeblie plate between port and high engine:

Port greeblie plate behind the main gun:

Landing gear cover plate:

The big cahoona at the back:

Every line you can see was traced. I needed to take a break after 80 % of the work because I started to feel dizzy. I used stand-in colours to see if the shapes were correctly traced. I could have used green, red and yellow but chose various grey tones in order not to confuse anybody. I may use those on the final one instead.
I'm tweaking the colours now to add a fake 3D effect. CU soon!
In the meantime some things have happened which affected this project. First, SketchUp and Pepakura accept higher reolution images as textures. This build will benefit from it tremendously. I'm still toying around with the CG model. I have cleaned up the lines abit more to avoid edges which are smaller than 1.5 mm (in 1/18 scale, that is). I guess this is the correct approach to keep everything smooth but not too detailed so that you don't have to deal with flaps which are 1 mm or even less wide. Unfolding will be easier, too.
In addition, I found detailed kit part maps which give excellent views at the greeblies used on the original filming miniature. These have already helped me making a preliminary texture for an easy version of the Viper. Yep, there won't be only the big one.
Here are a few images of my tracing efforts:
An accurate replica of the original greeblie plate between port and high engine:

Port greeblie plate behind the main gun:
Landing gear cover plate:

The big cahoona at the back:

Every line you can see was traced. I needed to take a break after 80 % of the work because I started to feel dizzy. I used stand-in colours to see if the shapes were correctly traced. I could have used green, red and yellow but chose various grey tones in order not to confuse anybody. I may use those on the final one instead.
I'm tweaking the colours now to add a fake 3D effect. CU soon!
Last edited:
These parts look FANTASTIC!!! I am glad there are going to be two versions. I am looking forward to building both!!!
Avtually there will be three: 1/18, 1/32 and 1/50. That should be enough for the time being. 
Target size of the other versions (Mk IV etc.) is 1/32. Everything else will derive from that.
Target size of the other versions (Mk IV etc.) is 1/32. Everything else will derive from that.
I am very happy to hear that this project is not dead!! - These parts look fantastic!!!
Just thinking - would be nice if all these Vipers (1/18 1/32 and 1/50) could be presented on the suitable launch rail.
Do you think about doing the launch rail also in these scales?
Just thinking - would be nice if all these Vipers (1/18 1/32 and 1/50) could be presented on the suitable launch rail.
Do you think about doing the launch rail also in these scales?
Actually, Revell-Fan is also working on the Launch rail as well. Here is the link: https://www.zealot.com/index.php?threads/accurized-tos-battlestar-galactica-launch-rail.180715/I am very happy to hear that this project is not dead!! - These parts look fantastic!!!
Just thinking - would be nice if all these Vipers (1/18 1/32 and 1/50) could be presented on the suitable launch rail.
Do you think about doing the launch rail also in these scales?
Thank you! But it is not finished yet. 
NEVER!!!
fear guess there will be some fans (actually: ONE) who might be crazy enough to do so..! 


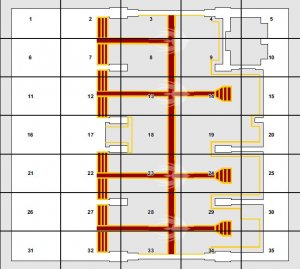
This is the tile plan for the base of the 1/32 New BSG hangar bay. Each numbered rectangle equals one printed page. And this is just the floor; there are even more pages for the walls, tool shop and launch tunnels. Total display area: 1.2 sqm.
An optional sled is on my list, too.
I am very happy to hear that this project is not dead!!
NEVER!!!
Right now the plan is this: 1/32 and 1/50 wil get a complete one,1/18 a partial one similar to what Murphy did. Everything else would be too big once the first wall is ready. That doesn't mean that you won't be able to enlarge the parts from the regular version but 1/18 would need a complete floor layout with appropriate numbering. I've gone through that once (with the New BSG hangar bay, and that was in 1/32 scale) and the amount of pages was ridiculous... Ah well, IJust thinking - would be nice if all these Vipers (1/18 1/32 and 1/50) could be presented on the suitable launch rail.
Do you think about doing the launch rail also in these scales?

This is the tile plan for the base of the 1/32 New BSG hangar bay. Each numbered rectangle equals one printed page. And this is just the floor; there are even more pages for the walls, tool shop and launch tunnels. Total display area: 1.2 sqm.
An optional sled is on my list, too.
So, this whole layout would be (approximately) 60" X 55" (using letter size cardstock). That is a HUGE layoutThank you! But it is not finished yet.
NEVER!!!
Right now the plan is this: 1/32 and 1/50 wil get a complete one,1/18 a partial one similar to what Murphy did. Everything else would be too big once the first wall is ready. That doesn't mean that you won't be able to enlarge the parts from the regular version but 1/18 would need a complete floor layout with appropriate numbering. I've gone through that once (with the New BSG hangar bay, and that was in 1/32 scale) and the amount of pages was ridiculous... Ah well, Ifearguess there will be some fans (actually: ONE) who might be crazy enough to do so..!
View attachment 177421
This is the tile plan for the base of the 1/32 New BSG hangar bay. Each numbered rectangle equals one printed page. And this is just the floor; there are even more pages for the walls, tool shop and launch tunnels. Total display area: 1.2 sqm.
An optional sled is on my list, too.
Last edited:
- Apr 5, 2013
- 13,499
- 9,551
- 228
This is the whole studio set built for the 2003 TV show - at 1/32 scale. Total dimensions are: 1120 x 1250 cm.So, this whole layout would be (approximately) 60" X 55" (using letter size cardstock). That is a HUGE layout
Last edited by a moderator:
I know. She is a hatchling and still needs a good feeding to grow. 

I thought it was time to continue the project. Work and life are still stealing my time and I had a fairly naughty rhinosinusitis twice which prevented me from doing anything. That darn stuff has literally overrun my hometown; there is no-one I know who hadn't got it. I'm still coughing a bit. So I can't make any promises on the launch date. However, I'm counting on the assistance of someone to test the parts. That person has a whip and big hands, yaknow.
Ahem. SO. What I'm doing now is adding the flaps and checking the dimensions. The start of the small version was a bit bumpy because I had to redesign some parts on-the-fly to make them buildable at the smaller scale. For example, I didn't unfold the tubes but used mathematics instead. Due to some small rounding differences I noticed that some dimensions were off which required another check. The test build will show if there needs to be other changes. I'm curious to see how the texture on the parts works. To speed things up a bit I'm avoiding the weathering for the time being; it is most important to see if the parts fit.
I am glad you are feeling better. I think that has been going around here too, my wife and I had it over December.
It would be easier to have someone test it at a more buildable scale, just sayin".
I mean, they grow up so fast...
It would be easier to have someone test it at a more buildable scale, just sayin".

I mean, they grow up so fast...
Yep. It could be interesting to experience the natural life cycle of the vicious Viper species: from infant to teenager to adult..! 
I too am glad that you are feeling better!!!
I am glad to see that you are returning to this project! Not including the weathering is really no big deal.
I am looking forward to seeing how this will turn out!!!
I am glad to see that you are returning to this project! Not including the weathering is really no big deal.
I am looking forward to seeing how this will turn out!!!


