This kit is a free download from http://udonfact.hp.infoseek.co.jp/paper/down/down.html
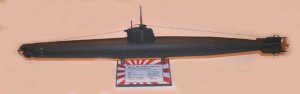
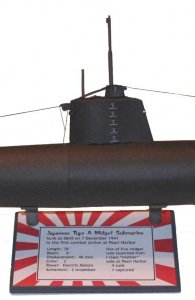
This A-class Midget Submarine is one of five that took part in the Japanese attack on Pearl Harbor, Hawaii on 7 December 1941. Launched from I-class "mother" subs, these experimental two-man subs tried to enter the harbor and attack shipping there. Each Midget carried two torpedoes and was powered by electric motors. Four were sunk, one was beached and captured. While no one is certain, it is doubtful that any of the midget subs caused any significant damage to US Navy shipping in the attack. Three of the sunk subs have been located. One is still missing, sunk somewhere in or near the harbor.
The kit comes in PDF format with five pages of parts. A sixth page (Sheet B)
is a printed back side for Sheet A. The instructions are on the download site, in the form of photos. They provide good detail for most of the project. I copied the photos to a Word file for convenience.
I wanted a companion model to my 1/33 "Kate" and unbuilt 1/33 Zero, for a Pearl Harbor display. I used photoshop to enlarge the model to 1/33 scale. There's not much detail to begin with; enlarging the model didn't seem to affect the quality or crispness of the parts.
I followed the designer's construction sequence, starting with the bow and working aft to the stern, then adding the sail, the propellers and fins, and the torpedo guards. Finally, I built a stand with a simple paper cradle. The finished model is light and I probably over-engineered the stand.
As you assemble the hull sections, be carefull to keep track of which is which. The boat is not symmetrical from bow to aft.
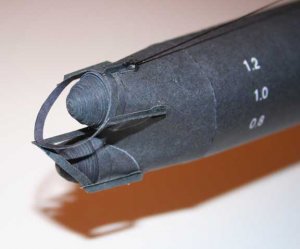
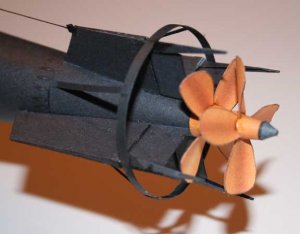
In 1/33 scale, the sub is 29 inches long. That made working on the bow and stern a bit awkward after the hull was assembled. If I were doing it again, I would assemble the bow section,(parts A3, C1, D2) and the stern section (D1, D3, C3, C4). I would detail the bow and stern (torpedo guards, fins, propellers), and then join the bow and stern sections to the center section (C2).
The sail is built as a separate assembly then attached to the center section. Be sure that the bottom former (A39) is clear of the vents/scuppers. I added a flap of black construction paper to the underside of A39, as a view block behind the scuppers/vents--probably not necessary in 1/48. Everything on the sail went together well except part A56. I hand-drew a replacement that was a little less delicate. I folded part A42 (the snorkel?) over a piece of fine piano wire and made a pinhole in the top of the sail to attach it. I rolled the periscope around a heavier (about 1/32) piece of piano wire and painted it with Testor's Model Master "Gunship Grey." I drilled a hole in the top of the sail and glued the periscope in place.
The last step was attaching the UHF antennas. I used dark brown thread from my wife's sewing kit and secured it with superglue.
The model scales out well and looks impressive. It was an enjoyable weekend project. Some of the parts were very small even in 1/33 scale. To build this in 1/48 would require smaller fingers and stronger reading glasses than I have but it should still be a fairly easy project.
A big thanks to U-Don for a nice kit of a rare subject. To learn more about these subs, check out http://www.soest.hawaii.edu/HURL/midget.html
Merry Christmas!
Soli Deo Gloria!
--David
This A-class Midget Submarine is one of five that took part in the Japanese attack on Pearl Harbor, Hawaii on 7 December 1941. Launched from I-class "mother" subs, these experimental two-man subs tried to enter the harbor and attack shipping there. Each Midget carried two torpedoes and was powered by electric motors. Four were sunk, one was beached and captured. While no one is certain, it is doubtful that any of the midget subs caused any significant damage to US Navy shipping in the attack. Three of the sunk subs have been located. One is still missing, sunk somewhere in or near the harbor.
The kit comes in PDF format with five pages of parts. A sixth page (Sheet B)
is a printed back side for Sheet A. The instructions are on the download site, in the form of photos. They provide good detail for most of the project. I copied the photos to a Word file for convenience.
I wanted a companion model to my 1/33 "Kate" and unbuilt 1/33 Zero, for a Pearl Harbor display. I used photoshop to enlarge the model to 1/33 scale. There's not much detail to begin with; enlarging the model didn't seem to affect the quality or crispness of the parts.
I followed the designer's construction sequence, starting with the bow and working aft to the stern, then adding the sail, the propellers and fins, and the torpedo guards. Finally, I built a stand with a simple paper cradle. The finished model is light and I probably over-engineered the stand.
As you assemble the hull sections, be carefull to keep track of which is which. The boat is not symmetrical from bow to aft.
In 1/33 scale, the sub is 29 inches long. That made working on the bow and stern a bit awkward after the hull was assembled. If I were doing it again, I would assemble the bow section,(parts A3, C1, D2) and the stern section (D1, D3, C3, C4). I would detail the bow and stern (torpedo guards, fins, propellers), and then join the bow and stern sections to the center section (C2).
The sail is built as a separate assembly then attached to the center section. Be sure that the bottom former (A39) is clear of the vents/scuppers. I added a flap of black construction paper to the underside of A39, as a view block behind the scuppers/vents--probably not necessary in 1/48. Everything on the sail went together well except part A56. I hand-drew a replacement that was a little less delicate. I folded part A42 (the snorkel?) over a piece of fine piano wire and made a pinhole in the top of the sail to attach it. I rolled the periscope around a heavier (about 1/32) piece of piano wire and painted it with Testor's Model Master "Gunship Grey." I drilled a hole in the top of the sail and glued the periscope in place.
The last step was attaching the UHF antennas. I used dark brown thread from my wife's sewing kit and secured it with superglue.
The model scales out well and looks impressive. It was an enjoyable weekend project. Some of the parts were very small even in 1/33 scale. To build this in 1/48 would require smaller fingers and stronger reading glasses than I have but it should still be a fairly easy project.
A big thanks to U-Don for a nice kit of a rare subject. To learn more about these subs, check out http://www.soest.hawaii.edu/HURL/midget.html
Merry Christmas!
Soli Deo Gloria!
--David