HO, Hon3 Trees are thousands .......

Status
Not open for further replies.

kettlestack

Member
Jan 18, 2002
859
0
16
84
Scotland UK
Visit site
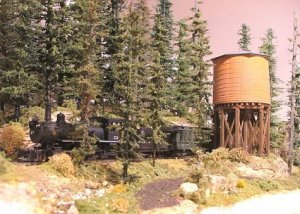
This link inspired me to make good pine trees the easy and inexpensive way :-

http://www.trevinocircle.com/sippin/index.html

As I can't find the original materials used in that link, I had to innovate ....

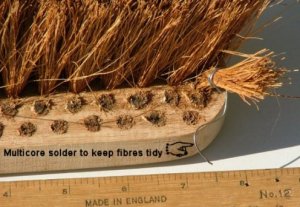
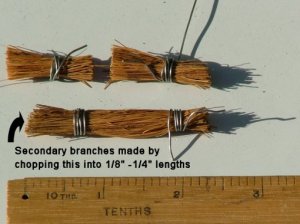
1) Branches and secondary branches .... from a sweeping broom with natural fibles (cheap).
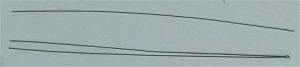
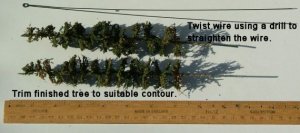
2) Tree trunk ....... Green plastic covered iron "garden wire" 1mm OD is good, 2mm OD is OK.
3) Overal colour paint ..... dark brown or dark green Automotive acryllic spray cans of paint.
4) Adhesive ..... Spray can of matt Acryllic lacquer (best) or cheap hairspray.
5) 1/2 inch wide masking tape.

1st picture.... The broom, "getting the branches" :)

Errol
 

Attachments

  • treemaking_1.jpg
    treemaking_1.jpg
    52.5 KB · Views: 1,689

kettlestack

Member
Jan 18, 2002
859
0
16
84
Scotland UK
Visit site
The branches

Having cut the fibres away from the broom head, you might find the full length of the fibres too long (mine would make 17 scale feet diameter trees).
As I prefer "scraggy" trees I cut the bundle in half.
Chopping a bundle of fibres into 1/8th or 1/4" lengths provides secondary branches.

Errol
 

Attachments

  • treemaking_2.jpg
    treemaking_2.jpg
    39.9 KB · Views: 1,593

kettlestack

Member
Jan 18, 2002
859
0
16
84
Scotland UK
Visit site
Getting branches to stay in place

When using the 1mm diameter wire I cut the 1/2" wide masking tape into 4 strips and place the strips sticky side uppermost. Place the main branches on the tape and seal them in place by placing one of the strips on top (sticky side interfacing with the sticky side which has the branches on.

reminder .... http://www.trevinocircle.com/sippin/index.html for a picture of this.

Taper the lengths of branches near the top. Accuracy doesn't matter in placing or tapering the branches. Your 1st tree will let you know how best to do future trees. :eek:

Errol
 

kettlestack

Member
Jan 18, 2002
859
0
16
84
Scotland UK
Visit site
Preparing the wire

The chances are that once you cut lengths of wire they are anything but straight. Clamp one end in a vice and using a drill to twist the wire while pulling it firmly but not tight. This not only straightens the wire but also work hardens it slightly (which helps it keep it's straightness).

Bend the length of wire at it's halfway point ( use a screwdriver to form a loop at the bending point).

Clamp the loop end in a vice and slip the tape (with branches sealed on it) in between the two ends of the looped wire.

Use a drill to twist the wire until the all the branches are trapped in the wire.
You now have a bottlebrush and should trim the tree at this point (or wait till it's all finished and painted).

Errol
 

Attachments

  • treemaking_4.jpg
    treemaking_4.jpg
    6.5 KB · Views: 1,627

kettlestack

Member
Jan 18, 2002
859
0
16
84
Scotland UK
Visit site
Applying secondary branches.

I find that matt Acryllic Lacquer is sticker than hair spray for this operation.
Spray the whole assembly till you see tiny globules of the lacquer on the branches and while it's still wet sprinkle the small cut secondary branches onto the assembly.

Don't get fussy about neatness as secondary branches stick to parts of the trunk. Real Pines have short branches around their trunks! Also .."leaves" will cover much of what you think is "overdone".

Errol
 

Attachments

  • treemaking_5.jpg
    treemaking_5.jpg
    26.9 KB · Views: 1,544

kettlestack

Member
Jan 18, 2002
859
0
16
84
Scotland UK
Visit site
Adding colour and texture.

Spray the whole assembly with either the brown or green Acryllic Auto Spray Paint.
While it's wet roll the tree in a mound of Woodland scenics green turf ground foam.
After 10 minutes spray the tree with hairspray or Lacquer and roll it again in turf (perhaps of a lighter or darker shade than before).
Secure the new "leaves" with hairspray or lacquer.

Voila! you have the makings of tree, It just needs trimming to suit your idea of a tree.

Errol
 

Attachments

  • treemaking_3.jpg
    treemaking_3.jpg
    36.4 KB · Views: 1,542

kettlestack

Member
Jan 18, 2002
859
0
16
84
Scotland UK
Visit site
The general effect......

In 8 days I made 38 trees using the above method. Not all are perfect but the overal effect is pleasing to my way of thinking :D .

Here's a picture of the effect.

Errol
 

Attachments

  • HOn3 diorama 3.jpg
    HOn3 diorama 3.jpg
    66.3 KB · Views: 1,608

kettlestack

Member
Jan 18, 2002
859
0
16
84
Scotland UK
Visit site
One more picture.

Thank you for the compliments gentlemen, (Strutting around with a big grin on my face now).

Dash, 20 brooms and a razor blade on their way to you! :p :D :D :D .
Shaygetz, one can of lacquer on its way. (geee, I'm good to you guys :D ).
Belge, If this thread get's your dad producing then it has served it's purpose.
I found the process to be quite theraputic.
Charlie, I have to work on my ground cover to get it like yours.

One more photo to get others started making trees:-

Errol
 

Attachments

  • HOn3_diorama_6.jpg
    HOn3_diorama_6.jpg
    64.2 KB · Views: 1,653
Status
Not open for further replies.