Alternative (EASY!) Method to plastering scenery (Pics!)

Status
Not open for further replies.

Arlaghan

Member
Sep 9, 2003
658
0
16
50
S. FL
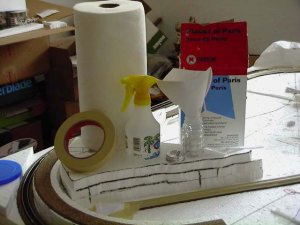
If you're like me, and like to take your time to make sure you get the exact results you are looking for, then you have probably also wasted many bowls of plaster that dried before you got a chance to use it. Also, you probably can't stand the dripping mess that plaster soaked paper towels make, or the hassle of cutting wet material to fit a particular spot.

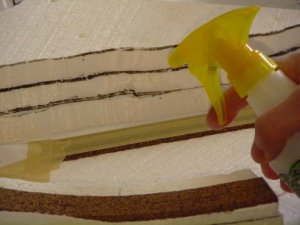
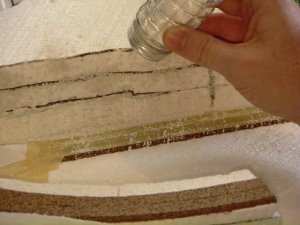
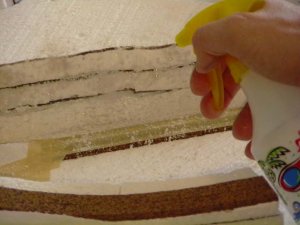
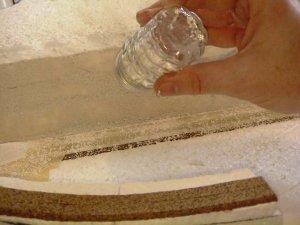
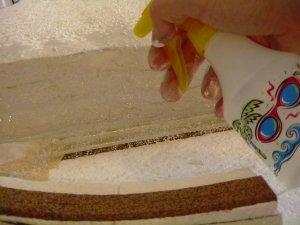
Well my friends, this how-to is for you! I pondered one night how to eliminate these problems. I've tried constantly mixing the plaster so it wouldn't set - that's no good, because plaster only sets ONCE, so once it starts to set, by mixing it, I broke it up and ruined its hardening properties. I was at an impass... then it occurred to me: Why mix the plaster at all? Why not put the plaster powder on the layout, then mist it with a sprayer and allow it to set just as it fell? Well, I set out to try it, and am very pleased with the results! All of which I plan to share with you:
 

Arlaghan

Member
Sep 9, 2003
658
0
16
50
S. FL
STEP 1

First, you will need some materials:

I used the following:

1) Plaster of paris (this sets quickly - much preferable)
2) A spray bottle with water
3) Masking tape
4) A salt shaker
5) A plastic spoon
6) A paper funnel
EDIT: 7) And duh, paper towels. (Where is my brain)

Cover any nearby trackwork with the masking tape, and fill the shaker with plaster using the spoon and funnel.
 

Attachments

  • pana0621.jpg
    pana0621.jpg
    44.7 KB · Views: 1,221

Arlaghan

Member
Sep 9, 2003
658
0
16
50
S. FL
STEP 2

Using your sprayer, mist the area you are going to work on. Get it nice and wet. Since foam doesn't take well to water, the water beads up, so get it good and wet.
 

Attachments

  • pana0623.jpg
    pana0623.jpg
    34.1 KB · Views: 1,176

Arlaghan

Member
Sep 9, 2003
658
0
16
50
S. FL
STEP 3

Use your salt shaker and sprinkle some plaster over the wet area. Plaster doesn't come out like sand from an hourglass, so you have got to tap the bottom like a ketchup bottle.
 

Attachments

  • pana0626.jpg
    pana0626.jpg
    39.1 KB · Views: 1,168

Arlaghan

Member
Sep 9, 2003
658
0
16
50
S. FL
STEP 4

Spray the sprinkled plaster to get it nice and wet. Don't be stingy with the water, as when you apply paper towels, it will soak it up and hold it in place while it dries.
 

Attachments

  • pana0627.jpg
    pana0627.jpg
    34.7 KB · Views: 1,215

Arlaghan

Member
Sep 9, 2003
658
0
16
50
S. FL
STEP 5

While the paper towel is dry, it is easy to cut it to the exact shape that you need. Do this now and apply it to the wet area.
 

Attachments

  • pana0629.jpg
    pana0629.jpg
    32.2 KB · Views: 1,150

Arlaghan

Member
Sep 9, 2003
658
0
16
50
S. FL
STEP 6

Here is the paper towel in place. Be sure to press out any air bubbles as you see fit.
 

Attachments

  • pana0631.jpg
    pana0631.jpg
    31.1 KB · Views: 1,152

Arlaghan

Member
Sep 9, 2003
658
0
16
50
S. FL
STEP 7

Now, sprinkle more plaster onto the top of the paper towel. This is to get both sides of the paper towel coated with plaster - the same effect as soaking it in ready mixed plaster.
 

Attachments

  • pana0632.jpg
    pana0632.jpg
    39.3 KB · Views: 1,137

Arlaghan

Member
Sep 9, 2003
658
0
16
50
S. FL
STEP 8

Wet the newly applied plaster so it will set. You can repeat steps 7 and 8 as often as you like to get the desired thickness/appearance that you are looking for.
 

Attachments

  • pana0634.jpg
    pana0634.jpg
    38 KB · Views: 1,131

Arlaghan

Member
Sep 9, 2003
658
0
16
50
S. FL
STEP 9

I am a little impatient, so I used a blow dryer to dry up any excess run off water. This allows you to dry the area without having to touch your work.

While this gets rid of the run off water, it doesn't dry the scenery, so be sure not to touch it yet! (Unless you are making changes to the texture by means of some tool... in that case, now is the time to do it, while the plaster is still "pasty.")
 

Attachments

  • pana0637.jpg
    pana0637.jpg
    38.5 KB · Views: 1,181

Arlaghan

Member
Sep 9, 2003
658
0
16
50
S. FL
STEP 10

Here is a sample area I did last night using the same techniques outlined here. Allowed to dry overnight, it's hard as a rock, but very light weight!
 

Attachments

  • pana0641.jpg
    pana0641.jpg
    37.4 KB · Views: 1,109

Arlaghan

Member
Sep 9, 2003
658
0
16
50
S. FL
THE END

Well folks, that's my story and I'm sticking to it! :D :D :D

Questions/Comments welcome!

-Aaaaaaallllllleeeeeexxxxxxxx
(Some of you will get this joke)

For the rest of you:
-Alex

:D :D :D
 

shaygetz

Active Member
May 2, 2003
3,612
0
36
64
www.freewebs.com
Looks like a nominee for the Academy. Might even want to consider an article for MR or RMC magazines. Kinda harkens back to the old days of zip texturing with Rit dye and plaster sifted together for ground effect. As soon as my module reaches that stage, I'm going to give that a try, I love the smooth, rolling effect on the hill.
 

belg

Member
Apr 28, 2001
861
0
16
63
New Jersey USA
Visit site
Great tutorial!

Alex unfortunately I'm one of the people that don't get the joke but I enjoyed seeing your work, after this has set up how do you make holes for trees and the like without cracking the surface? If you were to use a drill that would wear out rather quickly????

Thanks Pat
 

Arlaghan

Member
Sep 9, 2003
658
0
16
50
S. FL
Hi belg, good question!

I just did a quick test right now: It's very simple, you can poke a hole right through with a regular pin. The layer of plaster/paper towels is very thing (hence light weight) but it's strong so it won't crack. (I put a test hole where I plan to put a building, so no damage done :D)
 

spitfire

Active Member
Jul 28, 2002
3,448
0
36
75
Toronto, Canada
www.parkdaleyard.com
Cool!

That's a great idea Arlaghan! I love it when people find new solutions to supposedly tried and true methods, and this sure qualifies. You started by thinking "there must be a better way" and sure enough, you found one! I am going to file this away for future reference. Thanks!!!!

cheers
Val
 
Status
Not open for further replies.