Indianapolis International Airport in 1:400

IndyJets

Active Member
Well, after receiving the advice of several other 1:400 aircraft collectors I've decided to convert my project from a paper model design to 3D printing. So my task at this point is to go back through my 3D models and add in all the detail that would have been drawn on the paper, increase the depth a little further on the stuff that would have been built up by layering, and to design decal templates for the fine details.

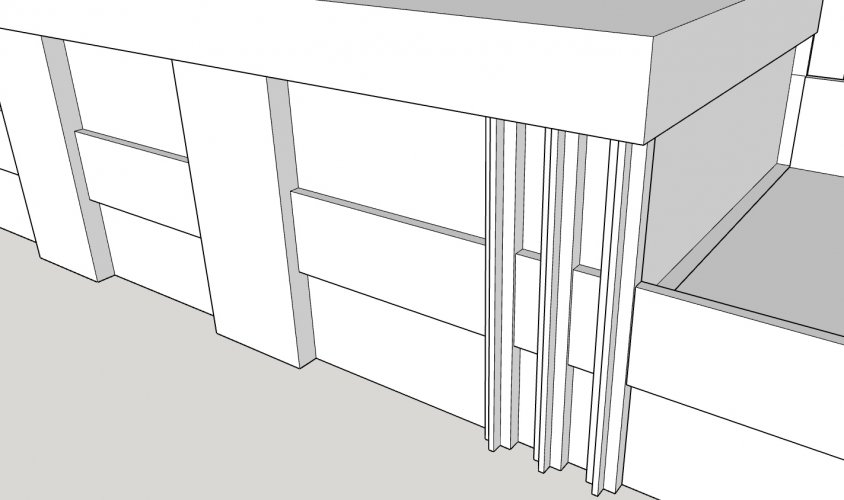
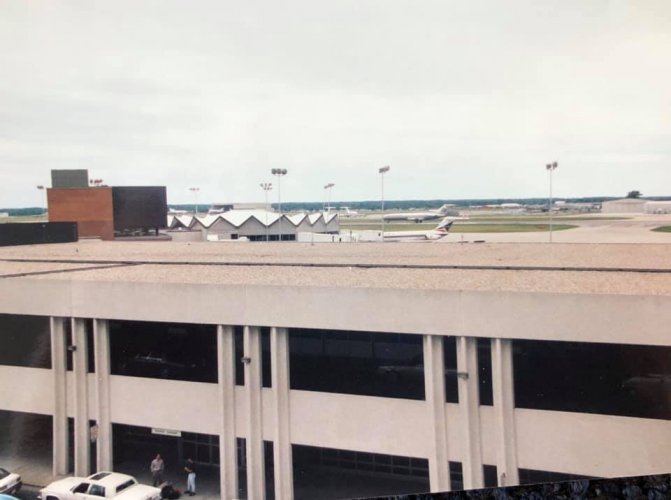
This here is Concourse C, built in 1987. It was a fairly simple design for paper... then that all changed once the time came for me to go back in and mark it off every 5 feet and carve in the panel lines...

By the way, what's the best way to accentuate these lines on the finished model? The real ones were filled with a dark gray caulk. Should I use a paint or ink wash, or go over them with pencil lead, or some other technique I haven't thought of yet?


in progress 55.jpg
 

micahrogers

Moderator "Where am I, and how did I get here?"
Staff member
Moderator
A paint wash would be best, but will only show off detail on the print. pencil or liner works to draw in detail.
 

Revell-Fan

Co-Administrator
Staff member
Administrator
Moderator
COOL! Thank you for continuing to post your progress! This will be a very impressive piece! :)
 

IndyJets

Active Member
A paint wash would be best, but will only show off detail on the print. pencil or liner works to draw in detail.
I modeled all of the panel lines into the print. It took me over a week just to put the lines on Concourse C. And there's an adjacent portion of the main terminal that was part of the same project that is going to need the same treatment, once I get done with the decal design for the concourses.
 

zathros

*****SENIOR ADMINISTRATOR*****
Staff member
Administrator
Moderator
If the caulk was receeded between the joints, a sharp pizza cutter wheel would make very nice strips that would give real texture, and in penned in with a pencil, would be easy not to paint too much. If relying and using the printers pain, the same method would produce shadows. ;)
 

IndyJets

Active Member
If the caulk was receeded between the joints, a sharp pizza cutter wheel would make very nice strips that would give real texture, and in penned in with a pencil, would be easy not to paint too much. If relying and using the printers pain, the same method would produce shadows. ;)
Thanks for the tip, but this is 1:400 scale so all I need is some way to get some dark gray color into the joints (which will be engraved on the model as printed, so I just need to get the color on there).
 

micahrogers

Moderator "Where am I, and how did I get here?"
Staff member
Moderator
I like AV Vallejo model paints, and The Army Painter figure paints. both have washes and shades in many colors.
 

micahrogers

Moderator "Where am I, and how did I get here?"
Staff member
Moderator
These are just the washes and shades that I keep in my paint racks.
20220406_135618.jpg
Both manufacturers make many other washes and shades.
 

IndyJets

Active Member
Have any of you guys ever worked with craft acrylics before? Delta Ceramcoat, Plaid, etc.? They do have some intriguing colors that might be good starting points for the various brick and concrete shades that I'll need, as well as the two-tone gray color scheme for the painted steel paneled portions. And the prices are definitely right too.

If you're applying a detail wash over flat paint, is it easy to wipe it off from the raised areas where you don't want it or does it tend to "grab" onto the flat paint surface?

Otherwise, not much to write home about on the design front at this point. Just going through photos and calculating RGB values for each of the needed colors, to print off chips for matching the paint. And designing decals for each of the doors, windows, vents, and other details, and assigning each a numbered key, and tallying up how many of each are needed at minimum (plus a 50% allowance at least on the more delicate ones). And writing a detailed, illustrated instruction manual for painting and decal application, since I have at least one friend so far who's expressed interest in having a copy of this for himself... I'll just put all the color chips and instructions into PDF format, send him those along with the STL files, and let him go to town...

This is just for the concourses so far. Once I have this part finished, printing and construction on the concourses can proceed while I resume 3D work for the main terminal and the parking garage, then prepare the decals and instructions for those.
 
Last edited:

micahrogers

Moderator "Where am I, and how did I get here?"
Staff member
Moderator
Just about any craft paint will work, I use Apple Barrel from WalMart sometimes. The washes do "Grab" a bit, it can be tedious to apply, wipe, repeat... The wash is best used as a three step, basecoat, wash, highlight.

The main difference between "craft", and Hobby" paint is in the size of the pigment powders, and the toughness??? of the binders. craft paints can have pigment grains large enough to notice with the naked eye... "Hobby" paints will have a very fine pigment. "Craft" paints will have the cheapest binders available that meet the ASTM or other regulating agency specs for toxicity, while hobby paints use true acrylic lacquers, or polyurethane resins.
 

IndyJets

Active Member
It's gettin' real, folks!!! Laying out the decal sheets in Inkscape, to export to raster PNG then print at 300 dpi. This A4 sheet (slightly larger than US letter) is nearly full... and this is just the windows for concourses A and D. I had no idea they would take up this much real estate... I had expected to fit everything onto a single sheet with plenty of room to spare.
in progress 56.jpg
 

IndyJets

Active Member
Shaping the front facade of the main terminal... increasing the depth of relief and carving out the groups of 3 T-section columns. This wouldn't have been possible to execute in paper, and all of this detail would have been drawn in.
 

Attachments

  • in progress 57.jpg
    in progress 57.jpg
    233.3 KB · Views: 3
  • 116798924_10157928585463462_1787595250784134691_n.jpg
    116798924_10157928585463462_1787595250784134691_n.jpg
    41.9 KB · Views: 3

zathros

*****SENIOR ADMINISTRATOR*****
Staff member
Administrator
Moderator
Lots of work ahead. It will be awesome!! :)
 

IndyJets

Active Member
By the way... how should I handle the two structures in the lower right corner of the screen? The air conditioning chiller and the corrugated metal shed structure. In real life, both were housed within an enclosure made of corrugated metal that was open at the top (apparently to improve the aesthetics for the public). I want to create the needed effect without creating deep narrow crevices that would be impossible to get paint into (remember these are 1:400 scale and the enclosure wall is within a foot of what's inside it, in some cases. My thought is to partially fill the space almost to the top and paint it the deepest, darkest flat black that I can possibly find, while painting the AC chiller itself a stainless steel/aluminum color. The fan on top of the unit will be represented by a decal. Do you all think this will work?
 

micahrogers

Moderator "Where am I, and how did I get here?"
Staff member
Moderator
That would work, just a deep black. darker than NATO Black,
 

IndyJets

Active Member
That would work, just a deep black. darker than NATO Black,
Do you have a specific product in mind? I'm going to need this same black on the facade and on the parking garage as well... and a grayish black to simulate a tar roof in a couple of spots. I really want to use Black 3.0 but at 30 bucks for 5 ounces, my wallet says no.
 

micahrogers

Moderator "Where am I, and how did I get here?"
Staff member
Moderator

Rhaven Blaack

!!!THE MAN BEHIND THE CURTAIN!!!
Staff member
Administrator
Moderator
That is very cool and interesting. I may have to order a bottle to see what all I can do with it!
 
Top