Zedob's Layout Party

zedob

Member
Dec 26, 2004
757
0
16
62
Chicopee, MA
I started this project before the actual party’s start date, so I could be sure to complete it before the end of the month came around. I still don’t know if it will be completed in time because I may have to tear it down before the 28th. It’ll be for the better anyways, so I’m not complaining. Well, enough with the intro to the intro, so…


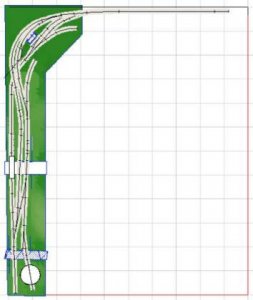
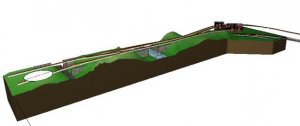
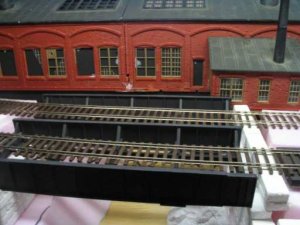
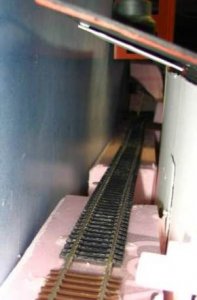
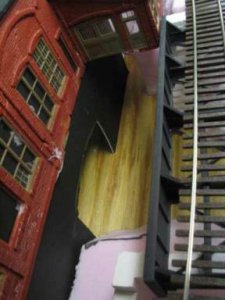
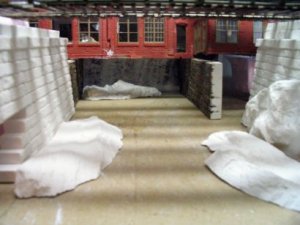
On my layout, “with no name”, I wanted to create a very New England look. As you can see in the pic below, the layout consists of a double track main, the “high line” and lower “low line” section that runs down to an industrial area and to a hidden storage track. A branch that runs along the front of the backdrop, which is to be scenically blocked by some building flats and trees, connects the two. Although hiding the branch is not anything out of the ordinary, I wanted to try a little slight of hand to help create the illusion of …uh...not being there?


There is a crossover on the main just above the white rectangle (river), but I was having a bear of a time getting it to work in 3rd Planit, so I just left it out. It’s on the real layout, so the drawing is not totally correct. In fact, nothing from this drawing is absolute. The layout is actually narrower, 12” vs. the 18” shown. I couldn’t get the topography mesh to work right without having to break it down into smaller meshes and I really don’t have time to learn all about meshes.
 

Attachments

  • Copy of shelf_layout2-2.jpg
    Copy of shelf_layout2-2.jpg
    15.9 KB · Views: 309
  • Copy of shelf_layout2-2-1.jpg
    Copy of shelf_layout2-2-1.jpg
    11.7 KB · Views: 307

zedob

Member
Dec 26, 2004
757
0
16
62
Chicopee, MA
Anyways, I wanted to put a passenger station with a pedestrian walkway where the river is located, but I didn’t care for the way things were going to work out. The next pic is of my initial attempts.


Attachments

  • Copy of hiddenstorage 082.jpg
    Copy of hiddenstorage 082.jpg
    21 KB · Views: 303

zedob

Member
Dec 26, 2004
757
0
16
62
Chicopee, MA
It was ok, but it didn’t have the impact that I was looking to create, so I started to think about a road with a decent sized plate girder bridge with a set of stairs going up to the station from the road. I liked the foreground look, but the only problem was terminating the road behind the mainline because of the hidden branch to the lower level of the layout. I tried and tried to get something to work, but it just didn’t look right.
 

Attachments

  • underpass_attempt.jpg
    underpass_attempt.jpg
    22.1 KB · Views: 298

zedob

Member
Dec 26, 2004
757
0
16
62
Chicopee, MA
Then I started to realize that I really didn’t need to have a passenger station, even though I would like one, I wasn’t going to have a lot of that type of service on my railroad. I could get away with a small depot and still be happy. So, ok, now what to do?


How about a river? I could have a mill flat sitting on the top of a stone foundation that has an arch, in which a river runs underneath. I could cut out a portion of the hidden track’s roadbed and replace it with a bridge and could create the effect that the viewer would be looking through the archway under a mill, not under a hidden track.

I knew exactly where there is a prototype for it, so why not?


Note, the bridge in the pic is not a RR bridge, but it helps give the effect I was looking for.
 

Attachments

  • Copy of mill 004.jpg
    Copy of mill 004.jpg
    33.9 KB · Views: 297

zedob

Member
Dec 26, 2004
757
0
16
62
Chicopee, MA
I was going to use some random stonewall castings, but when I went to take the pics the other day I realized that the builders had used cut brownstone (how convenient), which would make this project much easier for me. I had already started on my layout project before I took this particular pictures, so you may see some random stonewalls being used in the mock-ups.


I’d like to point out the coloring (weathering) of the stonework. The base color of all of the stone is reddish brown just like the finished stone below the brickwork. The stones above the arch had a bluish black color and the stones to the side are covered with moss, hence the green funk color. I’m going to attempt to color my stonework like this in this layout party.
 

Attachments

  • Copy of mill 001.jpg
    Copy of mill 001.jpg
    38 KB · Views: 297
  • Copy of mill 002.jpg
    Copy of mill 002.jpg
    37.9 KB · Views: 294

zedob

Member
Dec 26, 2004
757
0
16
62
Chicopee, MA
Ok, now I had a prototype. Not that I am planning on modeling that particular building, I’m just using it for the idea. The following pics show how I mocked up the scene to see how it would work. You can see where I cut the roadbed out for the hidden track to make room for the river. I plan on using one of them non-prototypical Atlas bridge girder bridges for that section.


I plan on kit-smashing my Concor/Revell (?) engine house model for the powerhouse for the mill complex. The “boiler room” for that kit has now become the turbine room and will sit on top of a stone and concrete foundation that will have an opening, or tail water discharge from the turbine.
 

Attachments

  • layout_mill_1.jpg
    layout_mill_1.jpg
    23.2 KB · Views: 293
  • layout_mill_2.jpg
    layout_mill_2.jpg
    15.3 KB · Views: 287
  • layout_mill_3.jpg
    layout_mill_3.jpg
    16.3 KB · Views: 295

zedob

Member
Dec 26, 2004
757
0
16
62
Chicopee, MA


Since I was going through to the backdrop I needed a way to terminate the scene without it looking too stupid, so I printed out a picture I had taken of a dam and mill site in Hazardville, CT. I cut the dam out and mounted it on a piece of foam board. The top of the dam being even with the top of the FB, and to the backside I mounted the mill part of the scene. This was just to give it a little 3D effect. I then mounted it to the layout backdrop, so when you look through the arch, you see a waterfall. It seems to work; the only problem is that I have no light source back there, yet.
 

Attachments

  • layout_mill_9.jpg
    layout_mill_9.jpg
    20.6 KB · Views: 288
  • layout_mill_10.jpg
    layout_mill_10.jpg
    15 KB · Views: 285
  • layout_mill_4.jpg
    layout_mill_4.jpg
    14.9 KB · Views: 290
  • layout_mill_12.jpg
    layout_mill_12.jpg
    24.9 KB · Views: 288

zedob

Member
Dec 26, 2004
757
0
16
62
Chicopee, MA
I cast up a bunch of rocks from some old WS rock molds that I had bought 20yrs ago and began to play around with them to see how they would look in a variety of different ways, but am still up in the air as to their final placement.


I’m planning on using the Gloss Medium technique for my water, but I have a feeling it’s going to be a mix of different “water” materials. This layout was built to test out different techniques, so I guess this is going to be one of them.
 

Attachments

  • layout_mill_8.jpg
    layout_mill_8.jpg
    20.5 KB · Views: 284

zedob

Member
Dec 26, 2004
757
0
16
62
Chicopee, MA
I needed to make a mold for the cast concrete section of the turbine house foundation, so I whipped this up out of some scribed sheeting I had lying around.
 

Attachments

  • layout_mill_14.jpg
    layout_mill_14.jpg
    16.4 KB · Views: 286

zedob

Member
Dec 26, 2004
757
0
16
62
Chicopee, MA
Fair warning, if you build a mold out of wood, make sure you glue stiffeners to the backside of the scribed sheeting and seal it. Otherwise, you have things like this happening. Notice the nifty curved section in the casting? It must be the one place I didn’t glue.

It’s not a big deal. I can cut the casting below that point and work from there, or rebuild my mold. What I do is going to depend on what mood I’m going to be in.
 

Attachments

  • layout_mill_15.jpg
    layout_mill_15.jpg
    6.6 KB · Views: 287

zedob

Member
Dec 26, 2004
757
0
16
62
Chicopee, MA
I didn’t have the time to build up the arch stone-by-stone, so I just roughed it out with my Dremel and did some hand carving, which came out rather nicely. The next pic shows the basic layout of the components, sans rocks. The holes in the bridge abutments will be covered by rock casting and will not be seen in the final scene.
 

Attachments

  • layout_mill_16.jpg
    layout_mill_16.jpg
    30.8 KB · Views: 287

zedob

Member
Dec 26, 2004
757
0
16
62
Chicopee, MA
That's enough for right now, I'll be back in a few days with an update.

It sure has been alot of fun so far.:D What a great idea.:thumb:
 

Art67

Member
Apr 18, 2005
192
0
16
57
Baltimore
Looks like you are off to a great start. I was particulary impressed with your waterfall idea, from the pictures you have posted, it seems to be pretty effective. I always find it interesting how those of us with smaller layouts, cope with fitting all of the elements into a giving area. Lots of luck with the rest of the layout, Stuart.
 

zedob

Member
Dec 26, 2004
757
0
16
62
Chicopee, MA
Thanks guys.

Art67, This layout is an experiment in progress. :D I figure that if I can make it look deeper than it is, then anything wider than that would be a piece of cake. Well, when I have the room for a wider layout, that is.:rolleyes:

rksstl, The girders are Central Valley's. I recommend getting a pack. They go along way for projects like that 3rd pic. Second choice would be Micro engineering's tall trestle kits. Lots of good parts, lots of flash trimming, too.

I did progess on the project today, but haven't resized the pics. I'll try and post something tommorrow.