Yard progress

spitfire

Active Member
Jul 28, 2002
3,448
0
36
75
Toronto, Canada
www.parkdaleyard.com
I did a little "gardening" yesterday - getting some earth for my layout!! And a little baking after that.... model RR style that is.

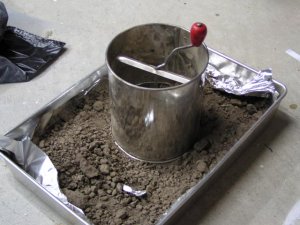
First I spread the earth out in a baking pan and "cooked" it at 500°F for 20 mins to kill all the little micro-critters that may have been there. It sure looked yummy when I got it out of the oven.

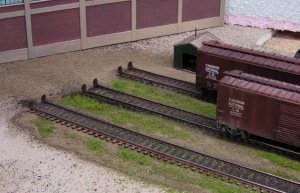
Then I bashed it up to a fine powder with a hammer. Borrowed my mom's flour sifter to strain the result (pic 1).

Nothing looks as much like real earth as real earth! I built up the ground between the tracks using spackle thinned to pouring consistency with water. Why not Plaster of Paris you ask? Because the stores were closed and I couldn't wait!! It dried overnight with no shrinkage so that's another one for the old bag of tricks.

Painted it with my ground colour, but by the time I finished airbrushing the tracks to weather them, there wasn't much left of that colour. So... I just added the earth right over top. Brushed on some thinned white glue and spread earth over top.

When dry, I used a dry paintbrush to sweep up as much of the earth as possible. I will also vaccuum the area, but I wanted to reclaim as much material as possible.

Actually, I really like the way that earth got into the ties and dulled them down. Maybe before I vaccuum I should hit it with Dullcoat to keep that look.

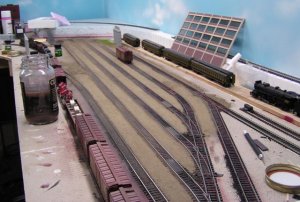
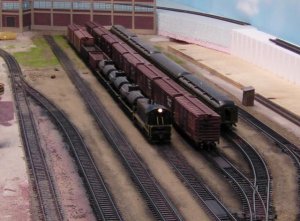
Pic 2 shows the overall yard.

Val
 

Attachments

  • sifter.jpg
    sifter.jpg
    58 KB · Views: 334
  • Yard01.jpg
    Yard01.jpg
    64.2 KB · Views: 336

spitfire

Active Member
Jul 28, 2002
3,448
0
36
75
Toronto, Canada
www.parkdaleyard.com
Here is a closeup of the earth, and a shot of the "Bridge to Nowhere". I must say I like the look of it there - will have to try to find a way to work it into the scene.

(for some reason although I sized all my files to 640 x 480 I am getting a message that my file size is too big - hope this works.)

Val
 

Attachments

  • Yard02.jpg
    Yard02.jpg
    67.2 KB · Views: 332
  • Yard03.jpg
    Yard03.jpg
    60.8 KB · Views: 337

MasonJar

It's not rocket surgery
Oct 31, 2002
5,362
0
36
Ottawa, Canada
Visit site
Looks great Val! You are making good progress... putting me to shame :blush:

As for the image size, I find that specifying the resolution (e.g. 640x480 @ 72 dpi) works better - or is maybe more predictable - than just using the "jpeg quality" slider to make the images smaller.

Andrew
 

jetrock

Member
Dec 18, 2003
894
0
16
55
Visit site
Nice work filtering the dirt down to size--it looks very tidy! Some grime and weeds and spare parts might be called for--or you could always suggest that the local yardmaster is fanatical about keeing his yard spotless!
 

Ralph

Remember...it's for fun!
Jun 18, 2002
5,134
0
36
64
St. Paul, MN
Visit site
Very nice Val! Add a couple of weeds and a little junk in that close up pic of the tracks and I wouldn't have known it was a model! I like the bridge to nowhere too. Nice effect!
Ralph
 

cabdriver

Member
Jan 23, 2005
207
0
16
68
Val, we're watching your progress closely. We love your rail ballast work -- looks great! :thumb: We're particulary interested in your real dirt process. :) :thumb:
 
N

nachoman

I like the bridge to nowhere. In fact, that is good advice to the rest of us. Bridges get replaced or abandoned. Every layout could use an old rusty bridge with no approaches, or a few masonry piers from a previous bridge paralleling the current bridge.

kevin
 

CN1

Active Member
May 6, 2003
1,059
0
36
Very nice

Is this model after a real place? Proto-lance?

Looks great

Nice bridge too.
 

Gary Pfeil

Active Member
May 7, 2001
2,510
0
36
Boonton NJ
Visit site
Looks nice Val. I just use a tea strainer and teaspoon to sift my baked dirt thru. And a piece of my wifes discarded pantyhose fastened over the hose on a shopvac works great at reclaiming material. Just use a rubber band to hold it in place. Can't wait to see it finished!
 

ezdays

Out AZ way
Feb 3, 2003
6,339
0
36
Arizona
bigbluetrains.com
spitfire said:
Thanks for the input folks!! Jetrock, it's not finished yet, but I like your suggestions.

Val
Aw, pay no attention. What do they say, "a messy yard is the devil's workshop"...:eek::D:rolleyes:

Just kidding, it's looking great,:thumb::thumb: but yeah, a few weeds, an oil spill, a couple of boxes and parts here and there, not too much cuz the yardmaster could be a neat freak.:cool::cool:
 

spitfire

Active Member
Jul 28, 2002
3,448
0
36
75
Toronto, Canada
www.parkdaleyard.com
Thanks very much everyone!! And thanks Gary and Will for the shop-vac and stocking tip - I'll definitely use that next time. :thumb:

Should have some more progress photo's this weekend. Interurban and the Traction Gang are coming over to help me put in my switch motors and dwarf signals. Alriiiiiight!!!!! :D :D :D

Val
 

spitfire

Active Member
Jul 28, 2002
3,448
0
36
75
Toronto, Canada
www.parkdaleyard.com
Ok, I made a little more progress last night and today. I airbrushed black all along the tracks. In the steam era, there was a lot of oil spillage on the outside of the rails, so that's what I'm doing. I also have diesels, so spillage between the rails works too.

The first shot shows the rail stops in place. You can see that weeds have started to grow around the tracks. :)

Val
 

Attachments

  • stops.jpg
    stops.jpg
    61.3 KB · Views: 159