WS plaster cloth/hydrocal fun

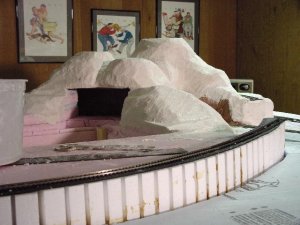
Having jumped over the hurdle that was my fear of beginning my scenery, I'm now headlong into cuts and valleys on my door based N layout. :) Since the quantities needed are small, I've gone with the WS plaster cloth, which is great stuff. Easy and fun to use.
However--:(
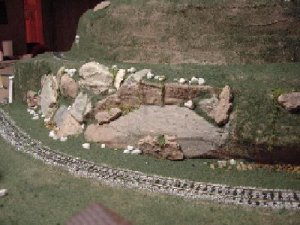
Probably thanks to not doing it quite right, I've got areas where the 'mesh' is visible, ie there is plaster missing. This is because I didn't use a brush to spread it out and I'm also not overlapping the product as much as I likely should. I've also got some gaps here and there where I need to mate tunnel portals and things to the mountains. I made some feeble attempts at doing this with the lightweight Hydrocal, but I find that it dries far too quickly for me to manage it. My first batch actually was drying on the brush. :mad: I've since added water to slow it down but it still isn't easily used to patch these areas. Therefore:
1) How to cover areas where I'm too thin. Another layer of plaster cloth? Better way to use the LW Hydrocal? Or do I go with a different product?
2) How to fill the gaps. Get the slower acting plaster from WS? Kinda hate to buy all that product if I don't need more than a little.
3) Is drywall mud a suitable product for any of this? Have some in stock.
4) My layout base is foam board. Would it be wise to cover all the foam with some sort of plaster product to add texture?
5) I read somewhere today that Hydrocal may not accept paint easily?

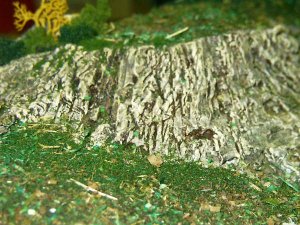
BTW, the Hydrocal hasn't been a total bust...I'm having a jolly time casting rock faces using aluminum foil molds. Works surprisingly well. :thumb:
 

Vic

Active Member
Feb 1, 2002
1,699
0
36
79
Columbus GA
Visit site
Hi David, Try adding a tablespoon of vinegar to the Hydrocal to retard it when you mix it up. That will usually buy you some drying time.

I don't know what "light Hydrocal" is. All I've ever used was a dense heavy material that is so strong you can dance on it when its dry:D I would expect that the WS hydrocal is right expensive. You can get a 100 # bag of white Hydrocal for about $25 at some building materials places or places that sell materials for making ceramic molds.

Sheet rock mud will crumble if applied thickly. If all you need is some patch up get a box of moulding plaster from Home Deopt or Lowes. Mix up a batch about the thickness of house paint and just paint it on with a brush to cover up those holes.

When dry and hard Hydrocal will accept paint. I like to "stain" mine using those cheap craft acryclics thinned with water and sprayed out of a spray bottle and "flowed" on with a cheap house paint brush.

With any plaster always add water to the plaster and not plaster to the water when mixing it. Also clean your mixing bowl throughly between batches. Plaster that has been mixed and then gone dry has undergone a chemical change and will cause your new batch to set real fast if it gets in with it.

Hope this helps.
 

60103

Pooh Bah
Mar 25, 2002
4,754
0
36
Brampton, Ontario, Canada
Visit site
David:
Try the Zip-texturing technique. Take some more regular plaster, a strainer and a squirt bottle. Wet the plaster cloth where it's too thin, then sift plaster onto it from the strainer.
I think drywall mud is a problem because it shrinks as it dries. Plaster of paris dries too fast and too hard.
The zip texturing goes onto hydrocal and gives you a plaster that can be coloured. Hydrocal does not stain well.
I use WS Scenic paste to cover foam scenery. I've also used latex paint, if the surface is about the right shape. Both are then covered with scenic material.
 

billk

Active Member
Jun 12, 2001
1,116
0
36
Marion, IA, USA
You might try using Durham's Rock Hard Water Putty instead.Mix it up pretty thin, about the consistency of pancake batter, add a little water-based paint of your choice of background color, and use a cheap paint brush, your fingers, popsicle sticks or whatever else you finds that works to smear it on. NOTE - I've never tried it over hydorcal - try a small area first.
 

Will_annand

Active Member
Jan 12, 2004
1,464
0
36
69
Huntsville, Ontario
www.muskokacomputes.com
My personal favourite is Plaster of Paris and I have my wife save our "dryer sheets". For the small areas, I dip the dryer sheets into a watery mixture of POP and lay the "dryer sheet" across the scenery frame. If I need a thicker surface so I can carve a rock face, I add more POP to the mix so it is thicker and spoon it right on.

A friend tried Drywall mud, but it has a tendancy to shrink when it dries.
 
The lightweight Hydrocal is exactly that...much lighter than regular Hydrocal, but it sets very quickly. I have a small layout so the expense isn't horrible, and it's basically the same stuff the plaster cloth is made of, so I didn't worry about compatability.
I'm wondering if I could zip some powder Hydrocal on there and wet it to fix my problem areas?
There are other areas where the cloth isn't perforated, but you can see the cloth fabric sort of show through. Do you think this will disappear with ground cover, or do I need to go over it with something?
You're right, drywall does shrink. Forgot that little detail. :wave:
 

ezdays

Out AZ way
Feb 3, 2003
6,339
0
36
Arizona
bigbluetrains.com
Since I am working on my first layout and haven’t acquired any bad habit yet, I struck out to find some :). No, really, what I wanted to do was try different techniques to see what worked best for me and my budget. Budget-wise was easy. A large bag of plaster-of-paris at Home Depot ran under $10. A bucket of wall mud (joint compound) just a few bucks. I first did the “dip the paper towel in the plaster” thing and it seemed to work OK. Just that I used towels with a heavy texture and when the plaster dried, I had hills with texture. Not really bad in some cases since it made it look as if the hill was drilled and cut away. I used a thinned out mixture of plaster to go over those areas that needed to look more natural. The biggest problem was that the plaster set really quick and as pointed out by others, it dried hard. How hard? Well I had to drill pilot holes for my rail nails, and the bits would dull very quickly. I’m not sure I want to do this the same way on my next layout.

I used the wall mud to sculpt rock formations and found it a lot easier to work with. It has a long drying time. I used as thin a layer as I could but it was a lot thicker where I needed outcroppings. I let it set for a while then used a putty knife to shape it. I waited a few hours and went back and reworked it and found it set up stiff enough that I could get sharper lines and the hills and rocks started to look more natural. Also, if you let the stuff set up a while, and you poke it just right, some of the wet stuff from underneath will break out giving you a smooth rock among the rugged. About 12 hours later I found I could still do a bit of shaping since the mud had set up but was still a bit pliable. I got some nice layered rock doing this.

As soon as we get settled in our new house, I plan on trying a few other techniques to see if they work any better for me, but I find that whatever you use, it is very forgiving regardless. You can patch, rework, chip out, cut away or just keep adding until you get it the way you like.

Here is a shot of an N scale hill outcrop I did just using the joint compound and a putty knife.
 

Attachments

  • imag0009a.jpg
    imag0009a.jpg
    64.7 KB · Views: 222

Will_annand

Active Member
Jan 12, 2004
1,464
0
36
69
Huntsville, Ontario
www.muskokacomputes.com
That looks great Don. :thumb:

I am just starting an N Scale layout. I had thought of using the POP, but I will give the Joint Compound a try.

You said:
------------------------------------------------------------------------------
The biggest problem was that the plaster set really quick and as pointed out by others, it dried hard. How hard? Well I had to drill pilot holes for my rail nails, and the bits would dull very quickly. I’m not sure I want to do this the same way on my next layout.
------------------------------------------------------------------------------

I have learned, through my work at the local RR Club, not to put plaster under the rails. We mount our roadbed (cork) right on the wooden base and we plaster up to the cork. The cork area will be ballasted later. Also we try and do all the plastering BEFORE the track is laid. It is much easier to wipe off the cork than it is to wipe off N Scale track :D
 
F

Fred_M

I have used plaster, drywall mud, spackling compound, white glue paper mache, foam, plastic body putty, expanded foam, ceiling tile, plaster cast rocks, and real rocks (have I left any out?). IMHO they all work and all have problems. The easiest for me is a wire frame covered with masking tape covered with plaster soaked towels covered with cream thick plaster and/or wallboard mud. I also like ceiling tile for rocks. The ones I disliked the most was paper mache, zip texturing, and plaster cast rocks. The other day I was thinking on that acoustic spray on ceiling goop for a mountain, but I currently don't need a mountain. FRED
 
While you guys were typing all these replies (thanks!!), I was at Lowes checking out the plaster aisle. I was a bit surprised to find they don't carry much...most repair products are now tubs of pre-made stuff. But, they still had a box of DAP Plaster of Paris, $2.50 vs. $7.50 for WS stuff. Heck, for $2.50 I'll try anything.
Hope to test it out tonight. Will report back on my findings. :)
 
F

Fred_M

It (DAP) will work fine, it's just a bit softer than hydrocal. I use the DAP all the time due to $$$$. Just don't tell them boys at MR as they will say nothing but hydocal and homasote will work for a model railroad. That's yet another reason I lost faith in them. FRED
 

Climax1880

New Member
Feb 13, 2004
43
0
6
At the edge of the woods
Visit site
WS Plaster Cloth, Hydrocal etc.

I think that PofP is the best way to go. I know, it's somewhat messy but not too much if you are careful.

To eliminate those annoying little holes in the plaster wrap, when you put it down, rub your WET fingers over it and kind of smooth it out.

Drywall mud can be useful BUT just like you do with wall patches, OVERFILL the area. It does shrink and crack. You can also work it with brushes using plain old water to smooth it out.

Also, a word of warning about Styrofoam. The dust created when sawing or filing it is FLAMABLE. PLEASE BE CAREFUL if there are any open flames nearby (Water heaters, furnace pilot lights, cigarettes etc. etc.) Also, I know it's sometimes annoying but PLEASE WEAR A DUST MASK!!!

Talk at ya later
 
Well...:(
After some experimentation and a lot of thought, I think I'm going about some of this the wrong way.
For the 'blanket' I'm sticking with the WS cloth. It just works so darn well, and one more package will give me more than enough. $16 is worth it not to have to screw around learning a new procedure.
I found a way to fill my little 'holes' in the otherwise finished areas. Tried sprinkling some Hydrocal powder on the areas, then wetting with the sprayer. That blew a lot of it around, and it wasn't easy to control or see where my powder actually was. I then trickled a little into my mixing pan and sprayed it with the H2O sprayer, making it just liquid enough to be watery. Dabbed a brush in it and painted it over the trouble spots, and it fills in nicely. This keeps the amount controllable so it won't dry out too fast on me. Okay, that problem solved.
I tried PofP with a paper towel...boy, did that suck! :rolleyes: Mostly just made a mess. Hard part was getting the consistency thin enough to dunk the towel in and still having enouch 'stick' that I had any on it. Spread it out with my fingers and not real happy with the results. It also hardens up pretty quickly (yeah, I know, vinegar ...) and I found myself throwing away as much as I was using. I think I'm trying to use it in the wrong way...not really for ground cover so much as a carving tool for building up areas. :confused: It does stay workable for quite some time, but spreading it needs to be done pretty quickly. Having used my fair share of body filler and drywall mud on their intended purposes over the years, I'm just not used to stuff hardening up this fast.
Don't know until you try! ;)
Dash10, you seem to be the PofP expert, any comments? Flame me at will. :D
 

Will_annand

Active Member
Jan 12, 2004
1,464
0
36
69
Huntsville, Ontario
www.muskokacomputes.com
Originally posted by ddavidv
Dash10, you seem to be the PofP expert, any comments? Flame me at will. :D

Keep me out of the flames there. :wave:

We use PoP down at the club, they mix some paint in with it and it seems to take longer to dry. It is messy and you end up with green, brown or gray hands (depending on what you are modeling). :D

Put it does work. Paper towels over crumpled newspaper or over cardboard frames. One or two base coats and then a thick appication using a small trowel or putty knife to get the rock ridges in.

One fellow made his own moldings using crumbled aluminum foil. He shaped it and then poured the thick soupy PoP into the foil. When it dried, he peeled away the foil and had nice rock castings.
 
F

Fred_M

This is a flame free zone.:) Paper towel is the biggest problem. I say paper towel you think Brawny or Bounty (the quicker picker upper). That's not the Chuck Yeager. The restroom brown stuff or the 3 rolls for a $1.50 walmart stuff is what to use (coarse and rough). The good stuff sticks to itself and all and just makes a god awful mess. This is one time when cheap is truly better.:D But this is a do what you want thing. There is no correct or incorrect way. I know a guy who used old bed sheets ripped into strips for plaster gauze, it worked great (for him). If you use plaster a lot with your bare hands I suggest Corn Huskers Lotion as the plaster dries your hands out. FRED
 
P

philip

whats in the hydrocal "secret mix"

Anybody know what calcined alumina is? I think its the additive that woodland scenic uses in there special mixture of hydrocal. I have a Material safety Data sheet from WS and the ingredient is Organosilicon modified Aluminum Silicate Micro speres. TSCA CAS #7631-86-9,1344-28-1..........any chemist here in the forum care to enlight us on this overpriced product. I know calcined alumina comes from Aluchem, Inc, Reading Ohio. White hydrocal comes from US Gypsum..... is less than 20 bucks per hundred pounds.


here is what is not included with the instructions.
 

Attachments

  • warning.jpg
    warning.jpg
    61.5 KB · Views: 99
F

Fred_M

Re: whats in the hydrocal "secret mix"

Originally posted by philip
Anybody know what calcined alumina is?
Yes phillip, it's an anti-caking or "free flowing agent" that keeps it from settling and getting hard during shipping/storage. Most powdered materials not for human consumption contain this or a simular agent. FRED
 

Roger Wellman

New Member
Feb 3, 2003
25
0
1
82
Delaware, Ohio
Visit site
Here's my two cents worth ... when I started my layout, I realized I had a LOT OF SPACE to cover ... so after putting the builders foam in place, I talked with someone at the local hospital ... and was able to get some of that plaster material used to cover broken bones ... plaster rolls. I also purchased some in bulk, and found that it works quite well. The trick is to use only a foot or so at a time, overlapping, and the result is a hard surface for the layout. In the picture below, I wrapped the "mountain" and later covered with grass, trees, etc. I think I used several dozen rolls overall, and still have some left over in order to "modify" the layout.
I found the Smith + Nephew Gyposona "LPL 2" rolls after a web search. It is Plaster of Paris, extra fast setting rolls. It was also helpful in building rock outcrops, simply by placing some odd shaped chunks of styrofoam on the "hills, then using the plastic cloth, then pressing the cloth into the holes and depressions, and painting the "rocks" after it dried.
 

Attachments

  • gauge pic #1.jpg
    gauge pic #1.jpg
    60.3 KB · Views: 80