CNW1961well,even if your not a master craftsman,your pretty darn good,btw,I wish I lived in germany,I like germany  . also speaking of my scratchbuilding have you seen my latest attempt-*cough*cough,i mean,project?
 ops: ,(look in the scratchbuilding section)
 ...anyway sorry for advertizing my own thread,but also,seriosly, your really good at this scratchbuilding stuff.
Wheeler Machinery Co.
- Thread starter cnw1961
- Start date
You are using an out of date browser. It may not display this or other websites correctly.
You should upgrade or use an alternative browser.
You should upgrade or use an alternative browser.
Joesho, it is funny that you’d like to live in Germany – I don’t like living here too much . I can think of better places to live. But "the grass is always greener on the other side".  No problem with advertising your thread here - your freighthouse is very nice, good job.
Galen, my google search turned up some nice pics of sawtooth roofs. They are great. I think a roof like that can make a model look very interesting. But in this case I decided against it, because I dont think that the Wheeler building had such a roof. The sawtooth roofs (skylights) are quite high, and I think you would see it in the picture of the Wheeler building. But a sawtooth roof is a very good idea. I will keep it in mind for one of my future projects.
OK, here is my update. After painting went wrong last night, I bought some better paints today and this time, it turned out fine. And I did the signs today. Now, only the roof remains to be done (and a few details, but I’ll do that later).
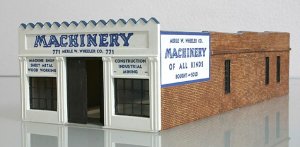

jawdrop Oh, my GOD!! WOOOOOWWWW!!!! jawdrop HOLY MOLEY THAT's not Real?!
How did you:
-Make the lettering?
-Make the bricks an uneven color?
-Notch the tops of the facade to create the roofline?
-Make the little columns?
-What did you make the brick from!?!
-Are the side windows from styreme, or a kit?
So...Kurt! do you have a list of materials and that .pdf file you created? Would you be so kind as to e-mail the file to me, so I could make a similar model? (my e-mail is in my profile)
How did you:
-Make the lettering?
-Make the bricks an uneven color?
-Notch the tops of the facade to create the roofline?
-Make the little columns?
-What did you make the brick from!?!
-Are the side windows from styreme, or a kit?
So...Kurt!
once agian i envy you any your skills, and the building itself.it looks perfect,high five!!,and give yourself a pat on the back.!!!!!!!


MilesWestern said:How did you:
-Make the lettering?
-Make the bricks an uneven color?
Ditto. The unpainted (white) brick in the previous photo just doesn't show well, but when you gave it that great coloring it really stands out. And it's an excellent choice of color - very appropriate tan brick for LA.
Gus, Galen, Miles, Josh, Joesho, thank you for your very kind words  .
.
OK, Miles, here we go:
The list of materials is rather short. I used various sheets of styrene : .013, .020, .040 and .080". I don’t buy any strips of styrene, I cut them from the sheets. BTW, it’s necessary to have a very sharp knife. I use a knife with snap-off blades and even a scalpel for tiny parts and thin strips (I think, I spend nearly as much on blades as I do on styrene ).
).
The styrene brick sheets are from the small german manufacturer Auhagen. They are available in the US: Euro Train Hobby - HO - AUHAGEN - PARTS - HO . Look for item # 52412 or # 52413. Don’t look too closely at the pics on this site, they are misleading. The bricks on these sheets are slightly irregular and uneven, which gives them a very realistic look. The only problem with these sheets: the material is very hard and therefore cutting is not easy. Especially cutting openings for windows is a real pain .
.
The windows and doors in the side walls are what I had at hand. They are from Walthers modulars. But the prototype picture does not show what the doors look like or if there are any windows at all. So you can use, whatever you think is appropriate.
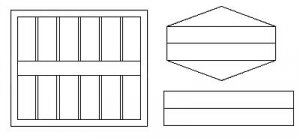
I notched the top of the facade, after I glued the two parts together that make the front wall (see second pic of post # 14 of this thread). The cutting template should still be attached. I laid the wall on the table, placed the knife along one of the lines, with the tip in the corner where the lines meet. Then I just pressed the knife down. After cutting out all the notches (and some sanding), I cut a .160 strip of .013 styrene. I glued small pieces to one side of the notches. After the glue had dried, I cut the protruding strips to size and next glued stips to the other side. After cutting the strips and some sanding, it was done.
As you can see in the third pic of post # 14, the trim on the columns is just thin strips of styrene. For the small capitels on top of the columns, I cut a .060 x .040 strip and sanded the corners on one side to make it half rounded. Next I glued small pieces of this strip to the facade and carefully chipped off a small piece of styrene (using the scalpel) in the middle of the capitels. Then I sanded them until they had the right shape.
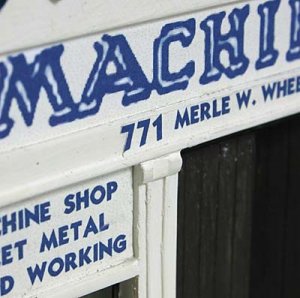
The lettering is only a simple print out of my inkjet. I just tried to hide the edges of the paper. For the lettering that sits in those frames on the facade, I cut the paper to fit exactly inside the frames. To hide the edges of the strip for the lettering above the front door, I cut the paper to match the height of the rim. I cut this strip along the # 7 at the front and the # 1 at the the end of the lettering. Now the edges are almost invisible.
The lettering MACHINERY is from the original photo. I browsed through hundreds of fonts to find a font to replace the lettering, but I couldn’d find any that even comes close. So I decided to use the original lettering to keep an authentic look, even though the quality is not very good. For the rest of the lettering, I used the font "Kabel bold". I will send you a PDF with the lettering together with the drawing of the front wall.
To paint the building, I used artist acrylic paints. The recipe for the color: 1 part black, 3 parts white and 6 parts burnt sienna. I diluted the paint with water. Before you start to paint the building, you should give it a wash with thin paint to make the bricks stand out. Wipe off the paint from the surface of the bricks immediately, so that some paint only remains in the lines.
To paint the walls, I used a piece of cloth (from an old cotton T-shirt) . I soaked it with paint and then wiped and tapped with the cloth to apply the paint. Make sure to apply only thin layers of paint, because the color will be much darker when the paint is dry. It is easier to apply another layer if the color is too light than to remove paint if the color is too dark. To highlight some bricks, rub off some paint when it starts to dry. This method is all trial and error, you have to get a feeling for it.
I hope, I answered all your questions now .
.
 .
.OK, Miles, here we go:
The list of materials is rather short. I used various sheets of styrene : .013, .020, .040 and .080". I don’t buy any strips of styrene, I cut them from the sheets. BTW, it’s necessary to have a very sharp knife. I use a knife with snap-off blades and even a scalpel for tiny parts and thin strips (I think, I spend nearly as much on blades as I do on styrene
The styrene brick sheets are from the small german manufacturer Auhagen. They are available in the US: Euro Train Hobby - HO - AUHAGEN - PARTS - HO . Look for item # 52412 or # 52413. Don’t look too closely at the pics on this site, they are misleading. The bricks on these sheets are slightly irregular and uneven, which gives them a very realistic look. The only problem with these sheets: the material is very hard and therefore cutting is not easy. Especially cutting openings for windows is a real pain
The windows and doors in the side walls are what I had at hand. They are from Walthers modulars. But the prototype picture does not show what the doors look like or if there are any windows at all. So you can use, whatever you think is appropriate.
I notched the top of the facade, after I glued the two parts together that make the front wall (see second pic of post # 14 of this thread). The cutting template should still be attached. I laid the wall on the table, placed the knife along one of the lines, with the tip in the corner where the lines meet. Then I just pressed the knife down. After cutting out all the notches (and some sanding), I cut a .160 strip of .013 styrene. I glued small pieces to one side of the notches. After the glue had dried, I cut the protruding strips to size and next glued stips to the other side. After cutting the strips and some sanding, it was done.
As you can see in the third pic of post # 14, the trim on the columns is just thin strips of styrene. For the small capitels on top of the columns, I cut a .060 x .040 strip and sanded the corners on one side to make it half rounded. Next I glued small pieces of this strip to the facade and carefully chipped off a small piece of styrene (using the scalpel) in the middle of the capitels. Then I sanded them until they had the right shape.

The lettering is only a simple print out of my inkjet. I just tried to hide the edges of the paper. For the lettering that sits in those frames on the facade, I cut the paper to fit exactly inside the frames. To hide the edges of the strip for the lettering above the front door, I cut the paper to match the height of the rim. I cut this strip along the # 7 at the front and the # 1 at the the end of the lettering. Now the edges are almost invisible.
The lettering MACHINERY is from the original photo. I browsed through hundreds of fonts to find a font to replace the lettering, but I couldn’d find any that even comes close. So I decided to use the original lettering to keep an authentic look, even though the quality is not very good. For the rest of the lettering, I used the font "Kabel bold". I will send you a PDF with the lettering together with the drawing of the front wall.
To paint the building, I used artist acrylic paints. The recipe for the color: 1 part black, 3 parts white and 6 parts burnt sienna. I diluted the paint with water. Before you start to paint the building, you should give it a wash with thin paint to make the bricks stand out. Wipe off the paint from the surface of the bricks immediately, so that some paint only remains in the lines.
To paint the walls, I used a piece of cloth (from an old cotton T-shirt) . I soaked it with paint and then wiped and tapped with the cloth to apply the paint. Make sure to apply only thin layers of paint, because the color will be much darker when the paint is dry. It is easier to apply another layer if the color is too light than to remove paint if the color is too dark. To highlight some bricks, rub off some paint when it starts to dry. This method is all trial and error, you have to get a feeling for it.

I hope, I answered all your questions now
 .
.Wayne, thank you. You are very kind (as usual  ).
).
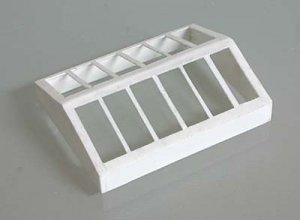
It took about three hours to build the skylights, paint them, insert glass, glue them to the roof and ............... I DIDN’T LIKE THEM :cry: . They just did not look right. So I ripped them off and covered the roof with "tarpaper". The building is ready to be placed on the layout now. I will add some small details later, but for the moment, I spent enough time on it. I will post pics in the photo fun thread that show the Wheeler Co. on my layout.
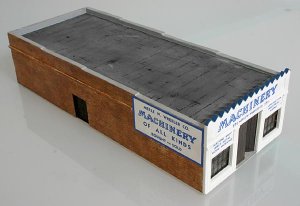
It took about three hours to build the skylights, paint them, insert glass, glue them to the roof and ............... I DIDN’T LIKE THEM :cry: . They just did not look right. So I ripped them off and covered the roof with "tarpaper". The building is ready to be placed on the layout now. I will add some small details later, but for the moment, I spent enough time on it. I will post pics in the photo fun thread that show the Wheeler Co. on my layout.

Way to go Kurt! Firstly, for the courage to try something, make an honest decision you didn't like it, and rip it out! I've heard some modelers at various train shows complaining about their work, apologizing for it. Why do that? Why not just fix it? That takes courage to commit to that sort of change.
And secondly, for the fantastic example you've given all of us. Thanks again for sharing your progress.
And secondly, for the fantastic example you've given all of us. Thanks again for sharing your progress.
I DIDN’T LIKE THEM
What, you've never seen an ugly building...!?!?
It is truly surprising what horrible modifications (or original installations) people make. I suppose our advantage is that we are absolute rulers of our micro worlds, so we can always get what we want...!
sign1
Andrew
Andrew, I don’t mind having an ugly building on my layout - it may have more character than a beautiful structure. No, I didn’t like the result of my work. The skylights looked like bad models, not like real ones. They did not reach the standard of the rest of the building.What, you've never seen an ugly building...!?!?
MadHatter, yeah, no friend of wasting time.Jeez, you don't waste time do you?
I think I've said this before (probably on your last project thread)...I really need to check out this forum more often! I almost missed this ops: .
Kurt...
Another, in a growing number of flat-out awesome projects.:thumb: :thumb: :thumb: :thumb: :thumb:
Not only do you do outstanding work, but you present it in such an interesting and professional way.:thumb:
This will be an excellent addition to your layout. The stark white front with the blue lettering contrasted with the aged brick sides, makes for one unique and eye-pleasing point of interest for your layout!:thumb:
Keep up the excellent work and inspiration my friend
I can only ditto what everyone else has said...but that just doesn't say enough about your skills and ability. Amazing work, really amazing.
Besides the excellent workmanship, :thumb: :thumb: one of the things that makes this structure so appealing is that we've all, at one time or another, seen this building, or a close relative of it, in our hometowns. The colour scheme may have been a bit different, and the businesses housed in it may have varied widely, but we've all "seen" it, somewhere. A great choice to model, Kurt, and one that could be at home on almost any layout.
Wayne
Wayne


