What I've been up to lately...

roryglasgow

Active Member
Jun 3, 2001
1,223
0
36
55
Huntsville, TX USA
web.wt.net
I just wanted to let everyone know that I haven't completely disappeared, and that I'm still working on train stuff!

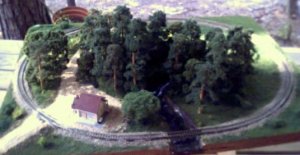
This is a layout that I'm building for my office. It measures 22" x 28" and will sit on top of a filing cabinet (hanging over slightly). The trackplan is a simple loop. I wanted to concentrate on scenery more than operation.

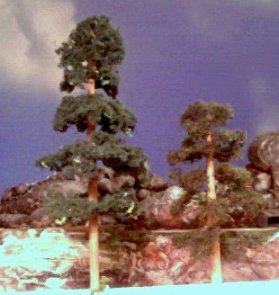
I'm about 85% done with it. I ran out of nice looking trees, so I will have to make some more. The trees that will go in the middle of the table will be pretty simple, since the foreground trees will cover any "interior lack of detail." :)

The whole thing sits on a 3/8th inch piece of plywood, with a ceiling tile for the sub-roadbed.

I took these pictures on my back porch, so the real trees add a nice effect in some of the shots!
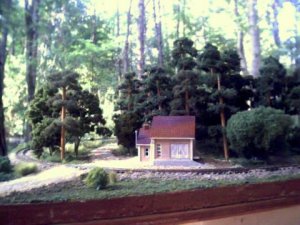
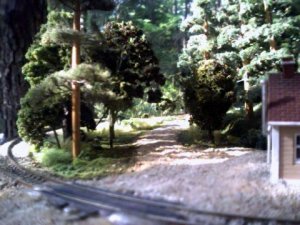
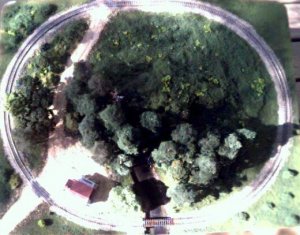
 

Attachments

  • front.jpg
    front.jpg
    33.1 KB · Views: 210

roryglasgow

Active Member
Jun 3, 2001
1,223
0
36
55
Huntsville, TX USA
web.wt.net
This is more or less the angle that most people will view it from. The table will be in a corner, so I don't intend to put much effort into detailing the back.

I've cut a section out of the backdrop from the old Copper Ridge to use on this layout. I'm going to try to paint trees and fields and things onto it... Pray for me! :)
 

Attachments

  • store.jpg
    store.jpg
    46.8 KB · Views: 210

roryglasgow

Active Member
Jun 3, 2001
1,223
0
36
55
Huntsville, TX USA
web.wt.net
Here's the creek. This is my first attempt at water. I covered the creekbed with plaster, painted it, then covered in a couple layers of laquer.

The bridge abutments and the pier are carved from blue foam insulation. I love that stuff!
 

Attachments

  • bridge.jpg
    bridge.jpg
    43.4 KB · Views: 209

roryglasgow

Active Member
Jun 3, 2001
1,223
0
36
55
Huntsville, TX USA
web.wt.net
And here's an aerial photo...

The era will be early '50s somewhere in East Texas. Since I work in an office complex in Huntsville's West Hill Mall, I thought of calling the railroad the West Hill RR.

Next week I'm going to the train show in San Antonio. I hope to pick up a few detail items (cars, figures, etc.).

I'll post more pics when I finally get it into its new home!
 

Attachments

  • aerial.jpg
    aerial.jpg
    61.9 KB · Views: 194

SD90

Active Member
May 23, 2003
789
0
36
Canada
Visit site
Looks excellent, who says you need a big layout to show your talent! I hope my layout looks half as good as this when it's done. I have thought it would be interesting to do a small layout like this, nice work, I'll be sure to check back to see your updates!
 

Drew1125

Active Member
Jan 28, 2001
2,975
0
36
Hey Rory!
Good to hear from you again, old friend! :)
You know I don't need to tell ya how I feel about small layouts! :D
You've done a fantastic job there...the scenery looks great, & your photos are really outstanding!:cool: :eek: :cool:
Hey, don't be a stranger, OK?
 

SD90

Active Member
May 23, 2003
789
0
36
Canada
Visit site
I really like the picture of the dirt road going through the woods! The real trees in the back ground really add life to it! That's another advantage of having a layout that you can take outside! You have the advantage of real background and natural light!
 

roryglasgow

Active Member
Jun 3, 2001
1,223
0
36
55
Huntsville, TX USA
web.wt.net
Thanks for the compliments! I've had a lot of fun with this one. Like I said above, this is the first time I've done water. And the dirt road turned out really nice, I think.

About the lighting: What inspired me to take these pictures was when I picked it up off the dining room table to return it to the corner where I've been storing it. I happened to be looking down the dirt road out the window and thought, "This will look pretty nice with some outdoor light." :)

I've been regretting taking the Copper Ridge down, but haven't had the time and resources to jump into another Copper Ridge. I started this little layout back in February, but the move and other obligations cut into construction time. The past week, though, I've been able to put some muscle into it.

Over the past year I've developed an affinity for the small layout concept. Mike Fischer's small track plans have been a great source of inspiration. In fact, one idea I've had for the Copper Ridge Mark II combines a couple of Mike's plans (slightly modified) in a stacked shelf...

I was hoping that this might help inspire a few folks at work to think about the hobby, but the main reason I decided to build it was because I just wanted a layout in my office. :):D

I really appreciate all of the hints, tips, information, instructions and encouragement I've gotten from y'all here on The Gauge (yes, I'm from Texas). I couldn't have done it without you!
 

Lighthorseman

Active Member
Jul 24, 2002
1,240
0
36
57
Out in the sticks
Visit site
Love The Small Layouts...

It sure is nice to see you back again, Rory, and what a superb little layout! :) I'd love to go for a walk down that back road.

How did you carve the bridge abutments on the creek? They look great.
 

roryglasgow

Active Member
Jun 3, 2001
1,223
0
36
55
Huntsville, TX USA
web.wt.net
Steve,

The abutments and pier were carved from pieces of blue foam insulation. I had quite a bit left over from the Copper Ridge and have been using it for this-and-that. I used my hobby knife to carve the stone pattern, then I painted it. The foam is really easy to work with, and if I mess up I don't cringe at throwing away my mistakes 'cause it's cheap.

I made a couple of stone bridges using foam, too. I posted a picture of one on the old Copper Ridge. I had just finished the new bridge when I decided to take down the CR, though, so it currently doesn't have a home. I don't know what I've done with it...or I'd post a picture. Gee, I hope I didn't accidentally throw it away!
 

roryglasgow

Active Member
Jun 3, 2001
1,223
0
36
55
Huntsville, TX USA
web.wt.net
Jim,

For the pine trees I used a technique that is similar to one described by Shamus on his CD. Basically, I cut some dowel sticks to length (50 to 70 scale feet), tapered the ends, roughed them up by scraping them with a jigsaw blade, and painted them a grayish-brown color. I used a small drill bit (inserted into the end of my hobby knife handle) to drill some holes, into which I put little branches of preserved caspia. Then I glued some pieces of Woodland Scenics foliage to the branches.

It's a fairly labor-intensive process (especially drilling the holes), but the results are pretty nice. Shamus sometimes uses little plastic fern leaves; but he's modelling a different kind of tree. I'm shooting for more of a loblolly/short leaf look.

I've attached a picture of a couple of trees from my old Copper Ridge Railway layout. These were transplanted onto the West Hill RR.

Most of the other trees are dried pieces of a plant called "iron weed." I covered them with ground foam. To date, I've only found one patch of iron weed in my area...and it's inaccessible to me now. I've been keeping my eyes open, though!

BTW, I've been watching the progress on the Elizabeth and Austin Branches of the PRR for a couple of years now. I was sad to see it go, but am looking forward to the Chartiers Branch. You've been giving me a lot of inspiration!
 

Attachments

  • trees1.jpg
    trees1.jpg
    18.9 KB · Views: 111

Jim Cullen

New Member
May 24, 2003
64
0
6
79
Martinsburg, West Virginia, USA
Rory,

Thanks for the info and pictures on your tree making - they look great. I'm a ways from making trees for my new layout, but have been doing some looking around on different techniques and styles. Perhaps this needs to be the start of a new topic.

Anyway, last layout used all of WS trees and I thought they were a litttle "heavy" looking. Thanks also for the nice comments about the E&A layout. I just finished painting the track on the new layout and now have some cleanup to do. Jim