Weekend Project: An LED Tester
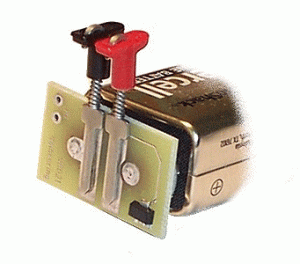
I was looking through my latest Walther's sales flyer. I saw in it an LED tester. The cost is $7.49. You can build this alot cheaper or for nothing if you already have the parts.:thumb: Here's what you will need.
(1) 9v battery connector.
(1) 500 to 1000 Ohm resistor
(1) Red alligator clip
(1) Black alligator clip
1 inch of red wire
Heat shrink tubing
solder
soldering iron or gun
heat gun
Lets get started:
Take the 9v battert clip and solder the resistor to the red wire of the clip. Solder the red wire to othe other end of the resistor. Clip the wires of the resistor short. Then slide the heat shrink tubing over it. Use the heat gun heat and shrink the tubing over the resistor and solder joints. On the other end of the red wire, solder the red alligator clip. Some clips has a screw to tighten up. Then solder the black alligator clip to the back wire. You are now done!
Operation:
Coonect a battery to the clip. The gently pull apart the leads on the LED. Connect the LED to the alligator clips. If it doesn't light, reverse the clips. It should now light. If you are testing new LED's. The shortest wire usually gets connected to the black clip.
This is the simplest project to do. Even a beginner should have no problems. Good luck and let me know if the instructions I gave are easy to follow!
Andy