USS Spruance 1/200th
- Thread starter barry
- Start date
You are using an out of date browser. It may not display this or other websites correctly.
You should upgrade or use an alternative browser.
You should upgrade or use an alternative browser.
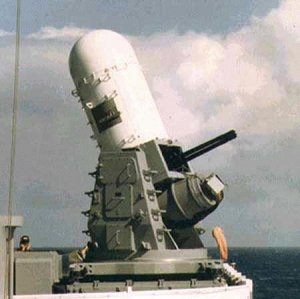
Phalanx gun
First attempt at the phalanx gun did not realise how big these things are. Certainly needs a bit more detail than current, if anly drawn on.


First attempt at the phalanx gun did not realise how big these things are. Certainly needs a bit more detail than current, if anly drawn on.


Great start on an a very interesting feature, bazzer!
I'm not sure what you are using as reference, but you might want to take a look at the pictures at this website:
http://www.fas.org/man/dod-101/sys/ship/weaps/mk-15.htm
Here is just one of a few they have there.
Cheers!
Jim
I'm not sure what you are using as reference, but you might want to take a look at the pictures at this website:
http://www.fas.org/man/dod-101/sys/ship/weaps/mk-15.htm
Here is just one of a few they have there.
Cheers!
Jim
Attachments
Sea Whiz II
Another try I was quite pleased with it till I took the close up pic then it looks pretty rough and the Sea Sparrow launcher needs a set of better cross braces. That is roughly half the ships weapons.
Jim how do you set about fitting the tiny bits like the steps on the Phalanx and what type of glue do you use they always look drunk for me.
I got carried away on the doors for the Sparrows and tried my hand at painting the ends to represent a raised centre (diamond pressing) looked quite good in the end on a big blow up on the screen after about 2 hours trouble is you just can't see them.


foreturret and Sea Sparrow launcher
A bit more added to the armour foreturret and Sea Sparrow 6 unit launcher. The gun is a bit of a pig to do, glue a very small piece, and leave it to dry probably not helped by removing most of the fold lines, the Sea Sparrow, well it's just two more boxes. I have not put the doors on the launcher my eyes are too tired, time to stop for the night.


I think the gun will need a coat of acrylic paint too many joins, I used a watercolour pencil but it' a bit dark and it seems to run quite a lot.
Odd request has anyone got a good pic of an American watertight door please.
regards
Great job on some of these additions, bazzer!
You asked about the steps on the Phalanx, but I see you did a superb job of them already! I would have used fine wire, depending upon the scale, which I would bend with needle nose tweezers and then glue them in place using a small pin hole for locations. It's probably easiest to make the holes before assembly of the parts, and you might even be able to glue the steps in too if you are careful in assembly. Otherwise, I would just make the placement holes before assembly and add the steps after the part is built.
The forward gun came out great, any white edges could be painted as you say. I use both acrylic paints from a bottle and water color pencils to color joints. I use a fine brush with just a dab of water on the bristles on the points of the pencils, and it seems to work okay if you work the water into the pencil color until you get the thickness you want...just like using water colors.
I couldn't find many examples of water tight doors, and the ones I found had to be pulled from photos of larger pics so they are not very clear, but here is what I found. Hope they help, but I rather doubt they will given the blurry images.
Cheers!
Jim
Attachments

Watertight doors
Thanks Jim
That answered my question compared with the British version they are indeed flat except for the lip at the edge.
regards
Thanks Jim
That answered my question compared with the British version they are indeed flat except for the lip at the edge.
regards
revamp on hanger
Hi All
Actual build progress is about nil spent all day soldering the foremast and then managed to break it all doing the final bends back to the drawing board might even try to make it in paper.
I revamped the hanger it could do with an interior but so far I have not found a pic of the inside and as a sort of must do something added the bridge wings.
Does any know if the early Spruance class carried only one helicopter because I noticed a caption on one pic said "with extended hanger for two aircraft".


Foremast
Some things just irritate you and soldering lattice's does nothing for me after yesterdays fiasco I decided to try making a former for the thing. I soldered the two long sides using a flat former then attached them to a 3d former using BlueTac. It's not that good a job anyway but at least it helped to get it together and by the time all the other bits are tacked on it should be alright.
I think the time has come to admit age is catching up and fill the hulls with foam and either plastic metal joints or plastic for the masts
for some strange reason the keel section has gone on shrinking and causing the starved horse look I suppose it might be the central heating.


Foremast
Some things just irritate you and soldering lattice's does nothing for me after yesterdays fiasco I decided to try making a former for the thing. I soldered the two long sides using a flat former then attached them to a 3d former using BlueTac. It's not that good a job anyway but at least it helped to get it together and by the time all the other bits are tacked on it should be alright.
I think the time has come to admit age is catching up and fill the hulls with foam and either plastic metal joints or plastic for the masts
for some strange reason the keel section has gone on shrinking and causing the starved horse look I suppose it might be the central heating.
....and back to card
The wire mast was rubbish when it came to fitting the platforms so it's back to card, after all it is supposed to be a card model. Ok it's a compromise should be round tubes but I will settle for it being reasonably straight.


The wire mast was rubbish when it came to fitting the platforms so it's back to card, after all it is supposed to be a card model. Ok it's a compromise should be round tubes but I will settle for it being reasonably straight.


Wotcher, bazzer!
I think the card version came out great; it has the right look right down to those reinforcement dohickies along the struts!:grin:
She's really coming along very nicely, mate.
Looking forward to seeing more when you can....
Cheers!
Jim
I think the card version came out great; it has the right look right down to those reinforcement dohickies along the struts!:grin:
She's really coming along very nicely, mate.
Looking forward to seeing more when you can....
Cheers!
Jim
VERY nice ship, sir. I,too like the card mast. Keep up the great work and I love seeing the pictures. Don't worry about going back and forth between wire and card. Maybe the wire mast wasn't as good as you hoped, but I bet the one on your next model will be!")
Barry,
Good call on the card mast. Came out great. Sometimes it's good to back up and have another go.
You're coming along very well. The ship looks great.
Good call on the card mast. Came out great. Sometimes it's good to back up and have another go.
You're coming along very well. The ship looks great.
Masts continued
Hi All
Thanks for all the kind words.
No I have not stopped working on it Jim it's just it takes me ages these days to cut the crossbeams out, takes it's toll on my fingers a bit. Then gluing the pairs together and waiting for the paint to dry. Funny I never manage to cover all the white bits first time round.
The main mast now has it's platforms ready for the radar's etc as usual I am in clumsy drop everything mode so I shall leave the pole mast bits off and do them last with the propshafts. I,m quite happy with the design of the Phalanx guns but the fore one needs to be updated to match the rear.
A new overlay to correct the decks should sort out the white mess one more gun to build and we are getting near to the fiddly bits like bollards etc.


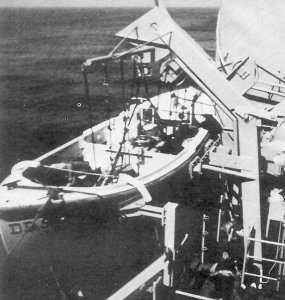
The boat davits on Spruance are a type I have not seen before has anyone got a picture ?
regards
Hi All
Thanks for all the kind words.
No I have not stopped working on it Jim it's just it takes me ages these days to cut the crossbeams out, takes it's toll on my fingers a bit. Then gluing the pairs together and waiting for the paint to dry. Funny I never manage to cover all the white bits first time round.
The main mast now has it's platforms ready for the radar's etc as usual I am in clumsy drop everything mode so I shall leave the pole mast bits off and do them last with the propshafts. I,m quite happy with the design of the Phalanx guns but the fore one needs to be updated to match the rear.
A new overlay to correct the decks should sort out the white mess one more gun to build and we are getting near to the fiddly bits like bollards etc.


The boat davits on Spruance are a type I have not seen before has anyone got a picture ?
regards
Barry,
Closeup pictures on the Spruance are hard to find.
Came across these on Navsource, but they're too far away to make out good details on the davits...
http://www.navsource.org/archives/05/0596606.jpg
http://www.navsource.org/archives/05/0597224.jpg
http://www.navsource.org/archives/05/0597609.jpg
Here is a 1/350 plastic model that has some good close ups...
http://www.steelnavy.com/DragonSpruSMarc.htm
Wotcher, bazzer!
Here are a few images I found:


I'm hoping from the lot you might find something of interest and help.
Cheers!
Jim
Here are a few images I found:
I'm hoping from the lot you might find something of interest and help.
Cheers!
Jim