U.S.S. Enterprise - NCC-1701 (JJverse)

bgt01

Exemplary Confidant
Jan 26, 2012
576
843
93
Ohio
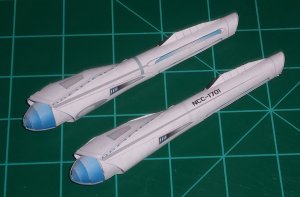
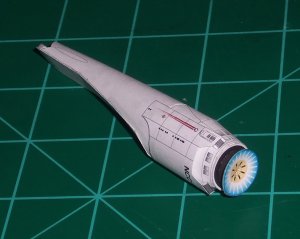
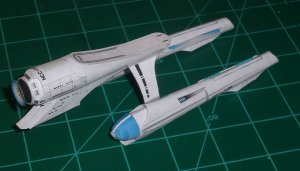
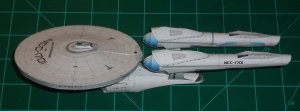
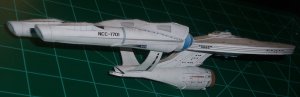
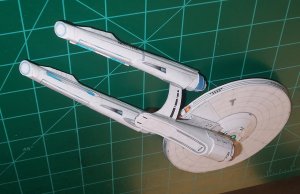
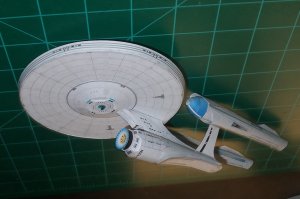
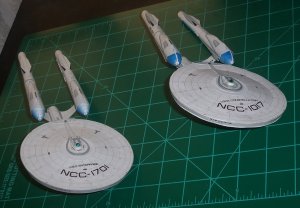
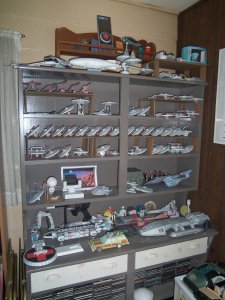
I'm launching another ship with my build of Rawen's small version of the U.S.S. Enterprise from the 2009 JJ Abrams film. I've done a previous build of this model repainted as the Constellation from the TOS episode "The Doomsday Machine." It was time to take those skills and apply them to Enterprise. I'm still not fan of this design, but it is part of Star Trek history and it was time for her to join my fleet. After redoing all the registries to my liking it was on to the build!

Note: all parts are scored as needed before cutting begins. I use a sewing seam ripper and a straight edge as needed.
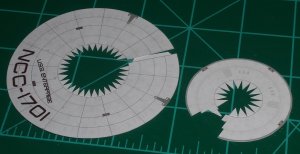
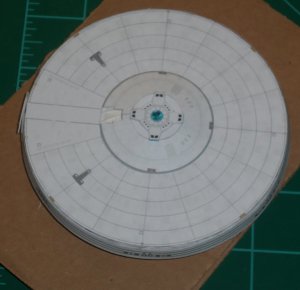
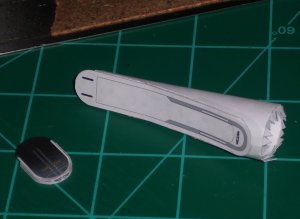
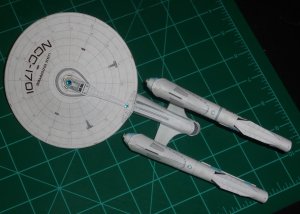
SAUCER

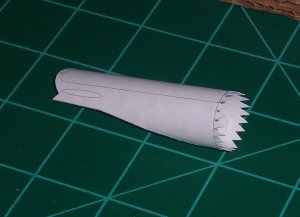
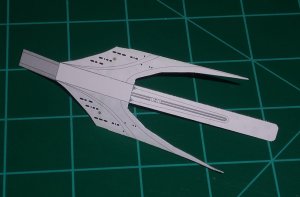
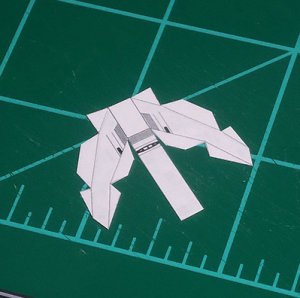
I started at the top with the saucer section, using the standard practice of cutting off most of the join tabs and remounting them on the back of the parts for a smooth seam. I left the tabs in the center of the top and bottom saucer domes to give the circular hull parts a place to glue.

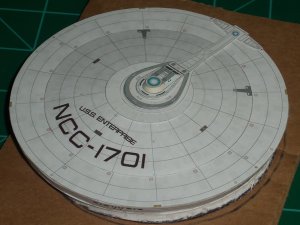
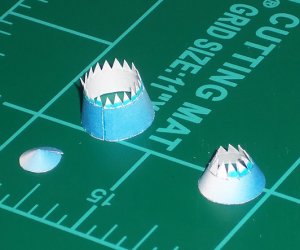
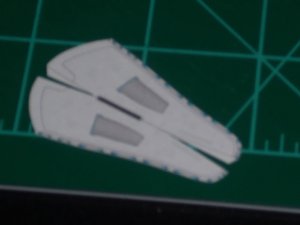
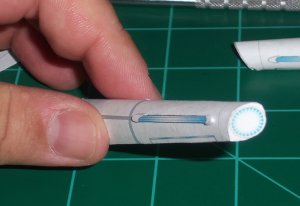
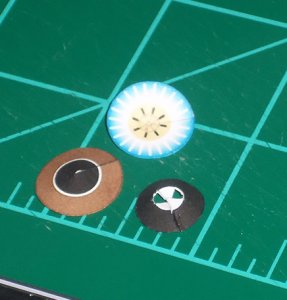
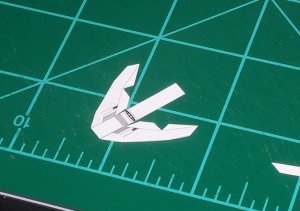
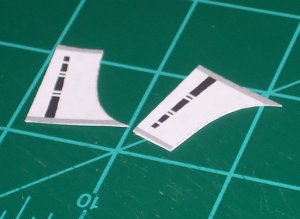
I skipped the white parts that say "glue to card" and glued the actual parts straight to some 67lb. white cover. It's comparable to 1mm card and gives a nice white edge when trimmed. I also glued the blue engine "vents" to the cover so they're raised detail. I assembled the entire upper bridge assembly.

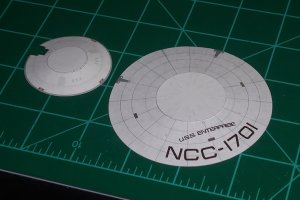
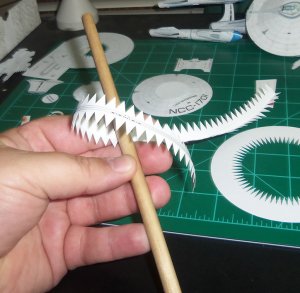
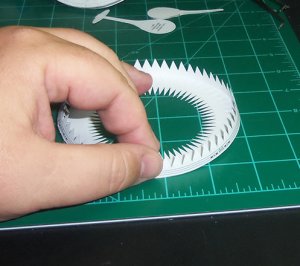
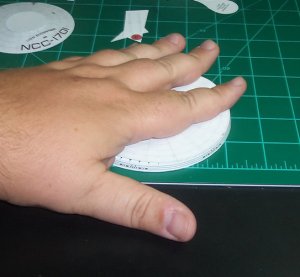
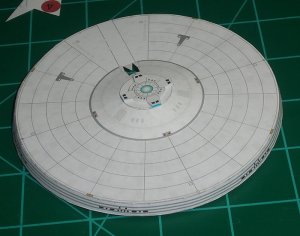
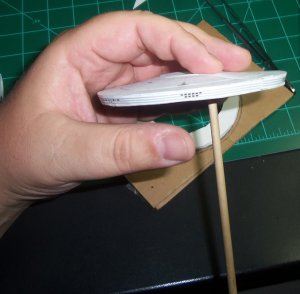
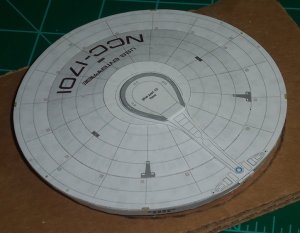
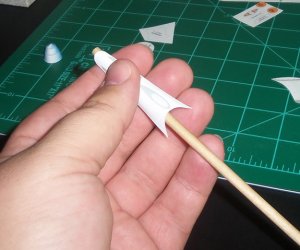
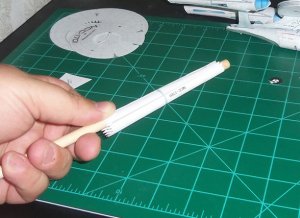
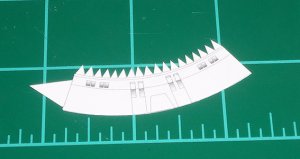
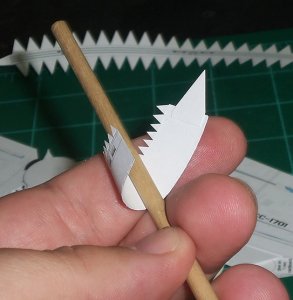
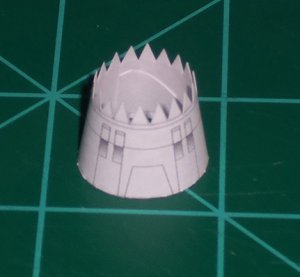
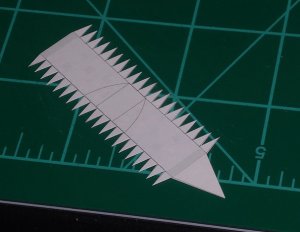
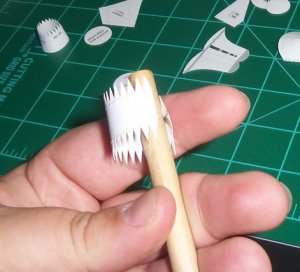
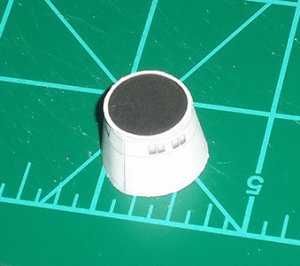
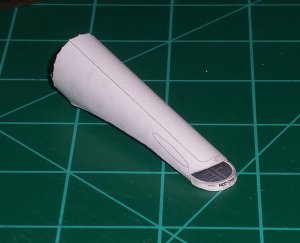
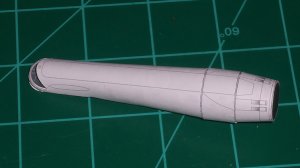
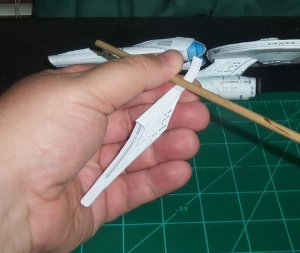
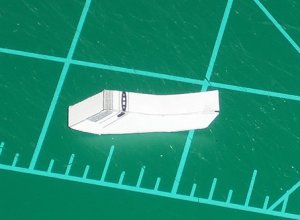
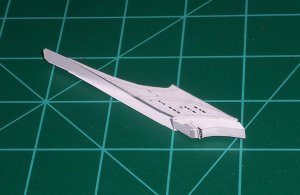
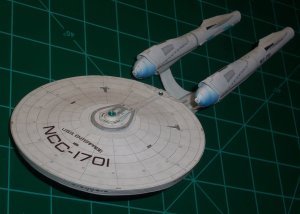
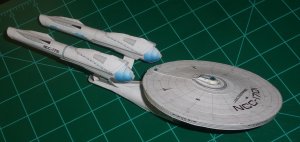
I'd had this model on the desk for some time, so I decided to make this saucer using the old method (without 1mm card glued to the flat top and bottom). I trimmed the saucer edge strip and curled it by running a wood dowel over it. I marked the strip on the center tab so I could line it up with the forward center navigation light on the top hull part. I slowly glued it a little at a time while firmly holding the saucer top flat on the desk. I folded over the bottom tabs and slowly glued the bottom hull part on, keeping my hand flat on it after every section was glued. It came out pretty nice and straight. When I glued the top dome section on it got a little pushed in, so I used my dowel through the hole in the bottom for the neck to push it back in place.

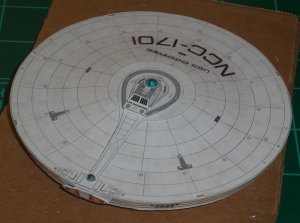
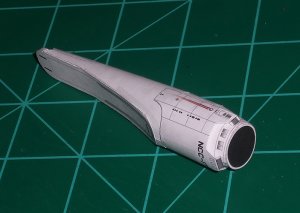
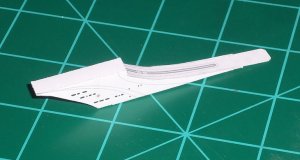
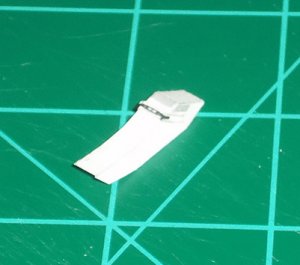
Then I glued on the bridge section and !!!BLAM!!!! KOBYASHI MARU TIME! :mad:I glued the whole bridge section off center and at an angle. :banghead:There was no way to save the main hull, but I did manage to cut off the bridge section and the planetary sensory before she got thrown into the atmosphere (i.e. tossed in my burning barrel).
 

Attachments

  • A1.JPG
    A1.JPG
    229.5 KB · Views: 23
  • A2.JPG
    A2.JPG
    159.9 KB · Views: 21
  • A3.JPG
    A3.JPG
    139.6 KB · Views: 23
  • A4.JPG
    A4.JPG
    184.7 KB · Views: 21
  • A5.JPG
    A5.JPG
    97.2 KB · Views: 19
  • A6.JPG
    A6.JPG
    224.1 KB · Views: 20
  • A7.JPG
    A7.JPG
    128 KB · Views: 21
  • A8.JPG
    A8.JPG
    125.8 KB · Views: 24
  • A9.JPG
    A9.JPG
    166.3 KB · Views: 23
  • A10.JPG
    A10.JPG
    167.6 KB · Views: 21
  • Like
Reactions: linweseregon

bgt01

Exemplary Confidant
Jan 26, 2012
576
843
93
Ohio
SAUCER

Since I had to start over, I decided to build this saucer with my new method. I cut out the center glue tabs on the flat top and bottom and folded them up. I spray glued them to 67lb. white cover (keeping the tabs off the glued card) and trimmed them out. I cut the tabs off the saucer edge and glued it SLOWLY and a little at a time to the saucer top using Super Glue Gel. I use the gel because it sets fast and gives me less time to slip. The cover stock on the top and bottom parts gives a nice edge for gluing. The ends didn't quite meet up in the back, so I glued a piece of scrap from the old saucer edge in the hole.

Using the Super Glue makes the edge very ridged, so the bottom should basically drop in, but it didn't. :sour:Almost every Rawen-type ship I've built has a gap at the rear of the saucer on the edge strip. I don't know if it's me or if the parts are off. Using this cover stock and edge glue method gives me a bottom that isn't wide enough to meet flush the bottom edge of the saucer strip. Gluing my way around one side left about a 1-1.5mm gap on the other side. My solution was to fill the gap with scrap paper and give it a coat of Super Glue to hold it. It worked, and since the part and scrap paper are white it's not as noticeable.:)

I glued the salvaged bridge and planetary sensor to the hull. I used a little blue marker on the edges of the sensor where they light up to give that illusion. I trimmed out spares of the gray "landing legs" and glued them top and bottom so they were raised like onscreen. I added aquamarine 12ss Glamour Glitz rhinestones for the bridge dome and sensor dome and a 10ss aquamarine stone as the impulse crystal. The aquamarine is a pale blue and looks very "Starfleet."
 

Attachments

  • B1.JPG
    B1.JPG
    177.4 KB · Views: 22
  • B2.JPG
    B2.JPG
    274.1 KB · Views: 20
  • B3.JPG
    B3.JPG
    238.7 KB · Views: 21
  • B4.JPG
    B4.JPG
    153.5 KB · Views: 26

bgt01

Exemplary Confidant
Jan 26, 2012
576
843
93
Ohio
Thanks @CrimsonLine . With my "fleet" I scale everything to approximately 1:1300 scale. My goal is to have all the main Star Trek ships represented at least once in this scale. I call them Rawen-sized models because his were my first builds and I printed them at 90% to get them on 8.5x11 paper. By chance, that landed me at 1:1300. This ship is around 9" long. Now, if I ever build an Oberth it'll have to be about 11.5 cm to be in scale.:nailbiting: Not looking forward to that!
 

bgt01

Exemplary Confidant
Jan 26, 2012
576
843
93
Ohio
WARP DRIVE

I decided to tackle the warp engines next because they have a good deal of fiddly parts and take a while to assemble. First was the bussard collectors. I cut off the tabs and glued new ones on the back, then curled and glued them into shape. I kept the center tabs and edge colored them with blue marker. I glued the three parts with the main seams inline. I didn't glue on the two white strips at the front until the collectors were mounted to the nacelles. That way I could keep the straight with the centerline of the engines.

The upper and lower housings were curled with a wood dowel. The upper housings were glued using the tabs as is. The main engines were curled and glued using the existing tabs. I keep the parts on the dowel so I can use it to apply pressure at the seam when gluing.

The rear engine openings get covered with a round part. Unfortunately, the opening isn't round! :mad:So, to avoid a gap I cut some scrap into shape and glued it to the opening first, then glued the round part to that. That area is recessed on the studio model, but I chose to go with it as is.

I assembled the rear top vents in a certain order to make them look the best. After scoring, I folded all the parts a couple to times. That makes them flexible for gluing. Then I edge glued the parts using Super Glue gel on a sharpened toothpick. It's more slow going, but they turn out pretty nice.

After some dry fitting and final curling of parts, everything is glued in place. For the upper and lower housings I got them well shaped before applying glue. I used regular gel paper craft glue, started at a front corner and glued one side in place front to back, then repeated that on the other side. I use tweezers and toothpicks to squeeze and shape the parts into final shape. I took special care to make sure everything was as centered as possible to avoid the engines looking lopsided when mounted. I cut out extras of the "circle" areas on the top of then engines and glued them on for a raised detail. Originally I thought about recessing the vents on the upper and lower housing, but then I got lazy and went as is. Enterprise's engines look much nicer than Constellation's.:)
 

Attachments

  • C1.JPG
    C1.JPG
    133.2 KB · Views: 16
  • C2.JPG
    C2.JPG
    143.9 KB · Views: 15
  • C3.JPG
    C3.JPG
    102.1 KB · Views: 16
  • C4.JPG
    C4.JPG
    159.8 KB · Views: 17
  • C5.JPG
    C5.JPG
    155.5 KB · Views: 16
  • C6.JPG
    C6.JPG
    135.8 KB · Views: 15
  • C7.JPG
    C7.JPG
    172.1 KB · Views: 16

bgt01

Exemplary Confidant
Jan 26, 2012
576
843
93
Ohio
SECONDARY HULL

Building Enterprise showed me some real mistakes I made on Constellation. I cut the main tab off the front housing and glued it from behind. I curled and glued it, keeping the center tabs. Same with the next section back. I added the black base for the deflector. FOUND MISTAKE #1: When gluing these parts together for Constellation I got them turned 180 degrees wrong. :sour:There is a pattern that lines up on both showing where the neck glues on. The one for Enterprise is correct. ;)

The deflector was standard assembly. I cut off the tabs and edge glued them using Super Glue gel. I used markers to lightly edge color. I kept the seams inline and pointed down on the final assembly.
 

Attachments

  • D1.JPG
    D1.JPG
    100.9 KB · Views: 12
  • D2.JPG
    D2.JPG
    139 KB · Views: 12
  • D3.JPG
    D3.JPG
    87.4 KB · Views: 14
  • D4.JPG
    D4.JPG
    125.3 KB · Views: 12
  • D5.JPG
    D5.JPG
    128.2 KB · Views: 12
  • D5.JPG
    D5.JPG
    128.2 KB · Views: 13
  • D6.JPG
    D6.JPG
    90.1 KB · Views: 13
  • D7.JPG
    D7.JPG
    115.1 KB · Views: 14
  • D8.JPG
    D8.JPG
    115.1 KB · Views: 13

bgt01

Exemplary Confidant
Jan 26, 2012
576
843
93
Ohio
SECONDARY HULL

The main part of the secondary hull was curled and glued. I used the existing tabs because they will be covered by the bottom part and are helpful when gluing the narrow hull piece in place.

For the fantail/shuttle bay, I cut off all the tabs and cut the fantail free of the shuttle bay floor and the bottom hull piece. Trying to fold and glue with the parts connected just mangles it. I curled the fantail and slowly glued it in place using Super Glue gel. FOUND MISTAKE #2: The fantail is longer than needed and forcing it inside the opening will distort or tear the hull.:bawling: It should meet up flush with the angled edge of the hull. To do this, I slowly trimmed off the excess fantail with precision scissors until everything lined up. Also, I glued the bottom hull piece into place before adding the shuttle bay to give me a surface to "slide" the bay into. FOUND MISTAKE #3: The black area at the back of the shuttle bay floor should be folded up slightly to come in contact with the hull so you can't see into the model, as you can with Constellation.:inpain: For Enterprise, I used my pick to push the back wall up through the open front of the hull.

I glued all the hull parts together and added the "wrap-around" piece at the front. I curled it and did a lot of test fitting before using regular paper craft gel to glue it in place. I used dabs of Super Glue gel at the three spots in the front that attach behind the deflector. Then, on went the deflector and the secondary hull was done.:smug:
 

Attachments

  • E1.JPG
    E1.JPG
    138 KB · Views: 13
  • E2.JPG
    E2.JPG
    184.8 KB · Views: 14
  • E3.JPG
    E3.JPG
    137.6 KB · Views: 16
  • E4.JPG
    E4.JPG
    118.1 KB · Views: 14
  • E5.JPG
    E5.JPG
    142.6 KB · Views: 14
  • E6.JPG
    E6.JPG
    156.3 KB · Views: 15

bgt01

Exemplary Confidant
Jan 26, 2012
576
843
93
Ohio
NECK AND SECONDARY HULL

I cut all the neck tabs off and edge glued. This keeps points like at the rear nice and straight. All the seams got reinforced from behind with a little Super Glue. The front part with the torpedo launcher was also edge glued. To make it look a little more like the studio model, I printed out an extra and glued it to 67 lb. white cover. I trimmed out just the torpedo area and glued it in place. I glued the neck together and glued the whole thing to the secondary hull.
 

Attachments

  • F1.JPG
    F1.JPG
    153.8 KB · Views: 21
  • F2.JPG
    F2.JPG
    120.2 KB · Views: 19
  • F3.JPG
    F3.JPG
    143.3 KB · Views: 14
  • G1.JPG
    G1.JPG
    106.5 KB · Views: 15
  • G2.JPG
    G2.JPG
    125.6 KB · Views: 15
  • G3.JPG
    G3.JPG
    98.7 KB · Views: 14
  • G4.JPG
    G4.JPG
    92.1 KB · Views: 16
  • G5.JPG
    G5.JPG
    130.2 KB · Views: 18
  • G6.JPG
    G6.JPG
    170.7 KB · Views: 14

bgt01

Exemplary Confidant
Jan 26, 2012
576
843
93
Ohio
PYLONS

FOUND MISTAKE #4: The pylons have a clearly marked inside/outside on the parts sheet. I managed to get them reversed on Constellation.:asshat: The black strips go to the outside. For Enterprise, I cut off the tabs and glued them using regular gel paper craft glue. I shaped them using a wood dowel and referenced screen caps from the movie for final shaping. Once I had them in their final shape I used brush on Super Glue along the edges to help them hold their shape and strengthen them. The Enterprise pylons are a terrible design. They are too thin, too curvy and mount in a weird place on the hull… but that's how it is. I used regular gel glue to set them on the hull. That gave me some leeway for final positioning. I locked them into final position with a fair amount of Super Glue gel at the seam using a sharpened toothpick for application.

You really need three hands to mount the engines, especially since the thin pylons give almost no surface area to glue to. I used regular gel glue to get them in position, checking from as many angles as possible to keep the engines in line for all axis. Again, I applied Super Glue gel at the seams to lock them in final position and add strength.
 

Attachments

  • H1.JPG
    H1.JPG
    110 KB · Views: 18
  • H2.JPG
    H2.JPG
    187.7 KB · Views: 17
  • H3.JPG
    H3.JPG
    186.3 KB · Views: 21
  • H4.JPG
    H4.JPG
    234.3 KB · Views: 19
  • H5.JPG
    H5.JPG
    199.4 KB · Views: 19

bgt01

Exemplary Confidant
Jan 26, 2012
576
843
93
Ohio
COMMISSIONING

Here she is in all her reboot glory (minus the lens flares ;)) - U.S.S. Enterprise NCC-1701. This model is a good bit better quality than what I did with Constellation, but that's what test builds are for. I even took a shot of the two "sisters" together in formation. I think the extra steps added a lot to the model's look and made it look a good bit closer to studio model. I don't see myself building 12 more of these, but this one came out nice enough that maybe there's a battle damaged "Into Darkness" Enterprise in my future. No matter which version it is, it's always fun to build an Enterprise. I highly recommend this one if you are a fan of the new movies. Thanks again to Rawen for a great model.:vulcan:
 

Attachments

  • I1.JPG
    I1.JPG
    248.1 KB · Views: 28
  • I2.JPG
    I2.JPG
    256.6 KB · Views: 27
  • I3.JPG
    I3.JPG
    210.1 KB · Views: 24
  • I4.JPG
    I4.JPG
    174.5 KB · Views: 24
  • I5.JPG
    I5.JPG
    267.7 KB · Views: 33
  • I6.JPG
    I6.JPG
    185.1 KB · Views: 26
  • I7.JPG
    I7.JPG
    243.3 KB · Views: 24
  • I8.JPG
    I8.JPG
    244.4 KB · Views: 30
  • I9.JPG
    I9.JPG
    214.9 KB · Views: 26
  • I10.JPG
    I10.JPG
    296.2 KB · Views: 28

bgt01

Exemplary Confidant
Jan 26, 2012
576
843
93
Ohio
Thanks guys. I really appreciate all the kind words and I'm glad you like the results. It's just as much fun for me to watch your stuff. Hard to believe building a 6-sided Borg cube for my office desk as spiraled into this, but it has been fun. I might have to start spacing out these posts a little more. I tend to "Binge Post" an entire build and it can take me an hour to organize and write the whole thing. So much left on my hobby shelf to build!:jawdrop::jawdrop::jawdrop:

FYI: Here's some bonus pics of what this whole collection looks like in my house.:D
 

Attachments

  • 100_3360.JPG
    100_3360.JPG
    1 MB · Views: 36
  • 100_3361.JPG
    100_3361.JPG
    808.1 KB · Views: 36
  • 100_3362.JPG
    100_3362.JPG
    1 MB · Views: 36
  • 100_3363.JPG
    100_3363.JPG
    889.5 KB · Views: 33
  • Like
Reactions: Cybergrinder

CrimsonLine

Member
Aug 14, 2014
83
49
23
51
Poughkeepsie, NY
That's a whole lotta saucers! Especially love Balok on the view screen, KITT, the Griswold's station wagon, and the saucers, saucers, saucers!

HEY! You still need to build a Buck Rogers Thunderfighter! Get on it, man!