Tunnels, Rockwork, & Ground Cover On The Poor Fork RR

Drew1125

Active Member
Jan 28, 2001
2,975
0
36
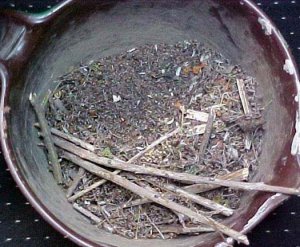
I'm finally getting around to doing some more scenery on my little N scale layout...so I thought I'd show my methods for building tunnels & rockwork, & how I'm doing woodland ground cover.

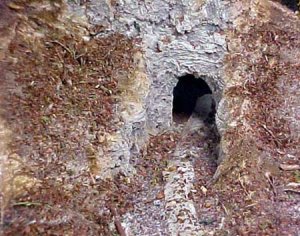
This is an area of the layout I'm calling Casey Ridge...It's where the trains enter the scene from the other side of the backdrop by means of a blasted rockface tunnel, a small rock cut through a wooded area, & then round the bend into the town of Glasgow Jct.

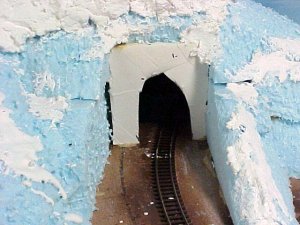
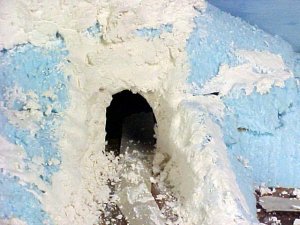
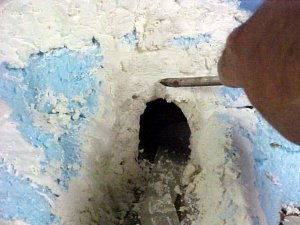
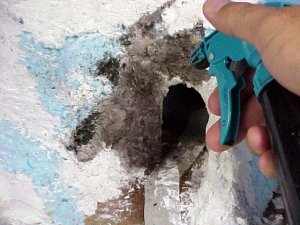
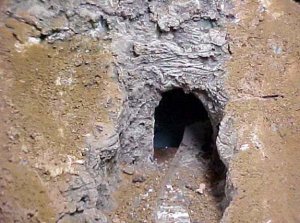
The scenic base is 2" blue styrofoam, stacked & shaped to represent hills. I cut a piece of foamcore board to serve as a starting point for a tunnel portal. (I model the Appalachian Mtns, circa 1930's, & blasted rockface tunnel portals were very common, & can even still be found in the area today.)

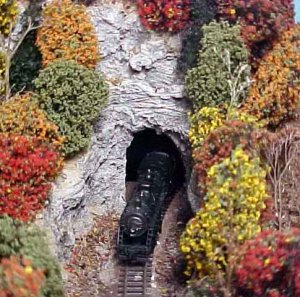
Now is a good time to do test-running to check clearances...
 

Attachments

  • mvc-004f.jpg
    mvc-004f.jpg
    55.6 KB · Views: 302

Drew1125

Active Member
Jan 28, 2001
2,975
0
36
...now put some masking tape over the track, because things are going to get kida messy...

Mix some plaster of paris, wait a minute for it to thicken a bit, & then apply some heavy dollops of it to all the vertical surfaces...
 

Attachments

  • mvc-005f.jpg
    mvc-005f.jpg
    56.2 KB · Views: 301

Drew1125

Active Member
Jan 28, 2001
2,975
0
36
...after the plaster has set, take a flathead screwdriver, & make rough horizontal strokes across the rock faces...this will rough-up the rock surfaces, & create some horizontal striations...
 

Attachments

  • mvc-006f.jpg
    mvc-006f.jpg
    51.5 KB · Views: 290

Drew1125

Active Member
Jan 28, 2001
2,975
0
36
...next apply a black wash of India ink & alocohol...
 

Attachments

  • mvc-007f.jpg
    mvc-007f.jpg
    59.6 KB · Views: 291

Drew1125

Active Member
Jan 28, 2001
2,975
0
36
When this has dried, drybrush with acrylic earth colors, starting with dark browns, & gradually go to lightwer colors, ending with white...
 

Attachments

  • mvc-008f.jpg
    mvc-008f.jpg
    61 KB · Views: 287

Drew1125

Active Member
Jan 28, 2001
2,975
0
36
...now I use earth-colored latex paint to paint the sorrounding area, & sprinkle sifted dirt into the wet paint...don't worry too much about getting paint or dirt on the rockwork...
 

Attachments

  • mvc-014f.jpg
    mvc-014f.jpg
    62 KB · Views: 277

Drew1125

Active Member
Jan 28, 2001
2,975
0
36
...next, I get out what I like to call my "debris bowl"...it's a big bowl full of all kinds of scenery leftovers...dried leaves, twigs, pebbles, bits of ground foam, etc...
 

Attachments

  • mvc-015f.jpg
    mvc-015f.jpg
    61.8 KB · Views: 270

Drew1125

Active Member
Jan 28, 2001
2,975
0
36
I wet the area with "wet" water, & then flow on a 50/50 mixture of white gloe & water, then I sprinkle on some "debris"...
 

Attachments

  • mvc-016f.jpg
    mvc-016f.jpg
    56.9 KB · Views: 270

Drew1125

Active Member
Jan 28, 2001
2,975
0
36
After I've 'planted' some trees, all that's left is to ballast the track.
 

Attachments

  • csyrdg1.jpg
    csyrdg1.jpg
    46.8 KB · Views: 269

Matthyro

Will always be re-membered
Dec 28, 2000
4,550
0
36
86
Georgetown, Ontario,Canada
Thanks Charlie, This is great help to me as I have a similar situation and had been avoiding doing the tunnel and rock. Now you have inspired me to get on with it using your methods.
 

Drew1125

Active Member
Jan 28, 2001
2,975
0
36
Thanks for all the nice words, everyone!:)
This is all part of my "cheap, fast, & easy" approach to model railroading! :D
I discovered it was easier (for me) to do rockwork this way, rather than the more popular method of casting them in molds.
 

ezdays

Out AZ way
Feb 3, 2003
6,339
0
36
Arizona
bigbluetrains.com
Charlie,

Great looking rockwork. I'm at that stage right now on my layout and find it fun to do. You can be as creative as you want and not worry too much about being sloppy.:eek: I still have a ways to go with the surrounding scenery, but I pick up a lot of tips from threads like this. Thanks...:)

Don