Truro Junction Layout in Progress!

Agatheron

Member
Nov 8, 2003
317
0
16
54
Mississauga, Ontario, Canada
Visit site
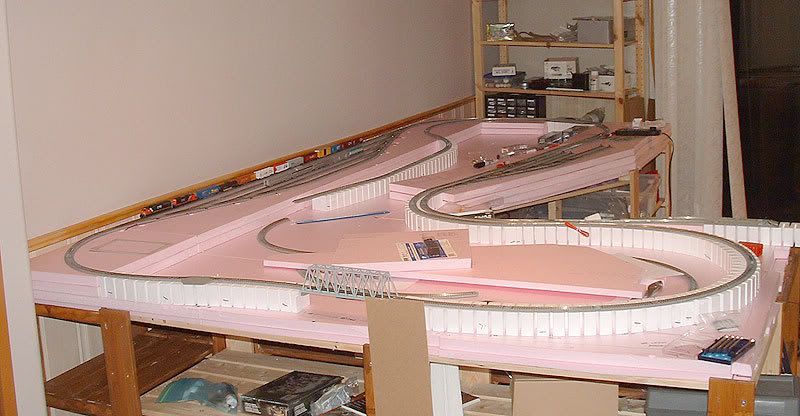
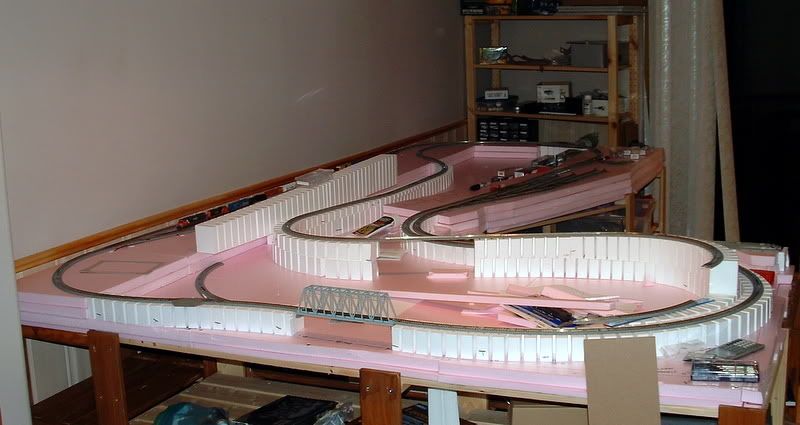
Unitrack, from my own experience, is great for a newbie like me. This is my first layout, and the ability to literally piece together track, dismantle, and then try a new setup is very helpful for someone like me who couldn't draw a trackplan to save my life. I had a vague idea of what I wanted, had suggestions from many people... and then I just started building track.

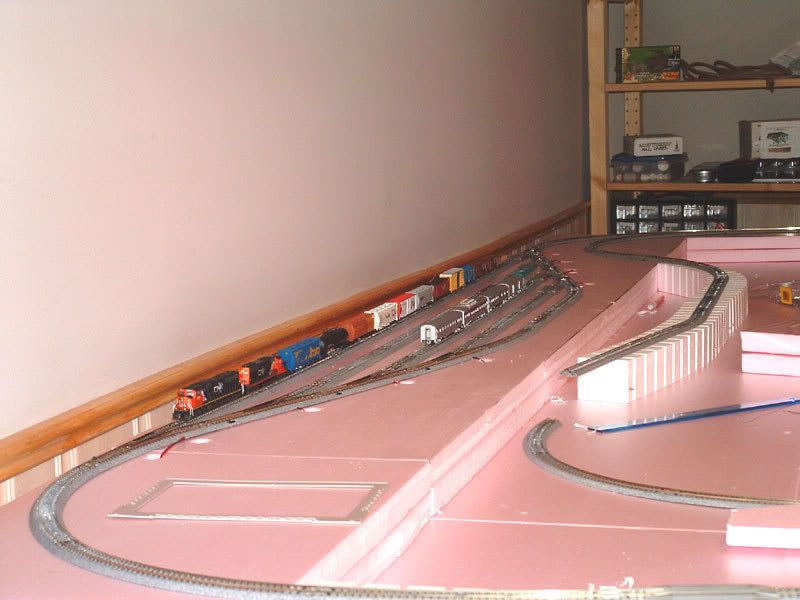
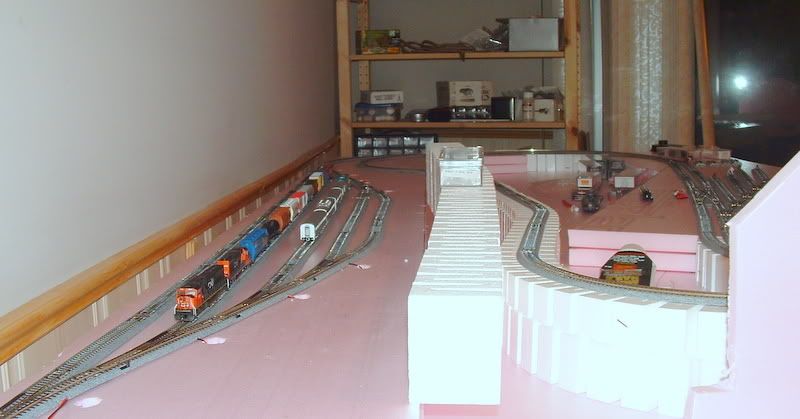
I also like it because it's nearly bulletproof... which means that cars run smoothly over it without derailing (most of the time). The only issue I've noted is that I have to do some fine tuning to the #4 turnouts in the yard at the front... the #6's behave flawlessly out of the package.

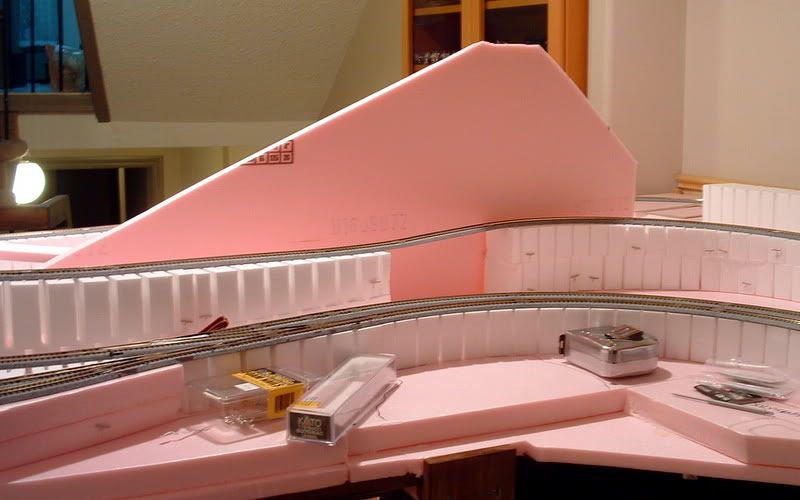
mcbane: I will be painting/weathering/ballasting the track once I start getting the scenery in place. I did some work today in getting more of the risers around the layout, but I imagine that painting/ballasting the track is still a few months off yet.

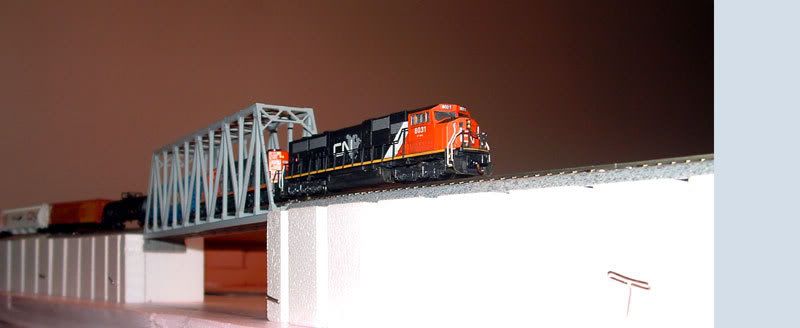
Grumbeast: you of all people will notice the extraordinary liberties I am taking with this layout. In real life, the yard is part of the CBCNS line and would be located on the branch instead of the main, the planned tire factory is on the Oxford spur out of Stellarton, and not on the main CBCNS line, same goes for Neenah Paper... although there's enough paper mills out there that it doesn't matter too much. I am also planning on painting up my EMD locos in the traditional CBCNS colours, even though they only saw use on the old Alco units. If I ever get an Intermountain SD45-2, I may paint it up to be in HATX colours, just to have one rent-a-wreck on the road. --All this is why I've called it "Truro Junction" :p

That having been said any pictures of structures around there I wouldn't mind making use of. I personally like the look of the VIA Station in Amherst, rather than the mall entrance in Truro... so I may transplant that particular building in one of my many liberties with the prototype :)
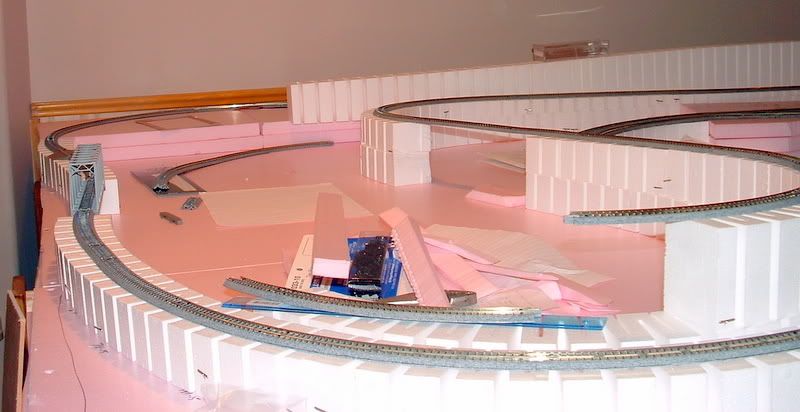
 

Agatheron

Member
Nov 8, 2003
317
0
16
54
Mississauga, Ontario, Canada
Visit site
Well... things are progressing quite nicely on the Truro Junction. Here's my latest batch of pictures:

First.. I've installed 2" risers on the mainline part of the layout. I've even made room for my first bridge!

Trurojunctionrisers1.jpg


Secondly, the Staging yard is now fully functional, and I was able to control two trains in and out of the yard without having to lean over the layout! :)
functionalstaging.jpg


The controls are done with the traditional Kato switches... at least as far as these controls are concerned. I may use smaller DPDT switches for other locations on the layout, but I wanted to keep these ones distinct and separate from what the rest of the layout might be.

Once I get everything in place, I'll mount these switches about where I am holding them. Yes, the jumbled mess of wires in behind will be much cleaner very soon!
stagingcontrols.jpg


And finally, I couldn't resist an action shot with the new bridge on the layout. SD70Mac 8031 and SD40-2 5931 cross a bridge between Belmont and Folly Lake on its way from Moncton to Truro Junction. :)

bridgecross.jpg


For those of you who know CN and know that CN doesn't run SD70Mac's, it's one of many liberties I am taking with this layout. I painted the SD70Mac on my own in CN colours and decals.

So far so good!
 

holdenburg

New Member
Dec 29, 2006
64
0
6
70
Florida
www.nettechonline.net
Nice trasitions and elevations...

Agatheron said:
Well... things are progressing quite nicely on the Truro Junction. Here's my latest batch of pictures:

First.. I've installed 2" risers on the mainline part of the layout. I've even made room for my first bridge!

Trurojunctionrisers1.jpg


Secondly, the Staging yard is now fully functional, and I was able to control two trains in and out of the yard without having to lean over the layout! :)
The controls are done with the traditional Kato switches... at least as far as these controls are concerned. I may use smaller DPDT switches for other locations on the layout, but I wanted to keep these ones distinct and separate from what the rest of the layout might be.
So far so good!

I like the elevations you have done here. Especially the upper back area. This should allow for some good transition into the valley with some rock work. The Kato snap track looks good! I still have not made a decision on what track to purchase yet but am leaning toward what you have used... Thanks for the pictures as it is helping in my decision.

Maby some of the regulars can critique your setup and give you some tips. I don't have enough experience but looking at what you have started results in the what I call "Drool Factor". Get the sponges out! It will be interesting to see you progress on this... There are still many possibilities for mountain and rock work plus ballast etc., including the interior line you have on foam...

Thanks for the update! :wave:

Herb
 

Agatheron

Member
Nov 8, 2003
317
0
16
54
Mississauga, Ontario, Canada
Visit site
Even though I posted these pictures yesterday, I've done some more progress, and have even more pictures to share:

Here's the layout with risers for the branchline installed, along with a 3% incline:
DSCF0106-2.jpg


Where the inclines end on the right hand side of the picture is 3" above the track below. Enough, I think for a scene separation of the tire plant/industry that will go into that big gaping hole between where the incline ends, and the next incline begins at the back of the layout. Here's another shot:
DSCF0109-2.jpg


Here's how the incline look a bit closer up:
DSCF0108-2.jpg


I decided to add in a piece of Styrofoam as a stand-in scenic divider. Exactly if I'll use it, and what I will actually use is still up for debate, but this next two pictures gives an idea as to how it may split up the scenes:
DSCF0111-2.jpg

DSCF0114.jpg


Here's where the incline will continue along the back, helping to obscure the staging yard in behind. Unfortunately, it doesn't give a real sense of how's it's going to look... but here's the picture anyway:
DSCF0113.jpg


The far end of the layout from this picture will be at the height of the end of the incline riser... about 4 1/2" above the mainline track, about 6 1/2" above the base foam for the layout. I'm planning on putting a paper mill down there...

Beyond gluing stuff down, attaching Fascia, or painting locos or rolling stock, this is about as far as January's budget will allow me to go :)
 

holdenburg

New Member
Dec 29, 2006
64
0
6
70
Florida
www.nettechonline.net
How High Can You Go!! ;)

Wow, that puppy is up there... With about 96 cars, it should be fun to watch your loco chug up that grade!! WOW... Yesterdays pic I thought for sure the center was a valley. The only thing now is that it might get difficult to reach in the back area...! :wave:

Herb
 

Agatheron

Member
Nov 8, 2003
317
0
16
54
Mississauga, Ontario, Canada
Visit site
That's been the common critique, and one that I have myself. However, I do have a handy step stool that will allow me access back there if absolutely necessary... One alternative is to move the layout about 12" out from the wall for emergency access. I plan on having the backdrop mounted on the wall, so that shouldn't make a difference.

As for the 3% grade, I did a test run. 2 locos can pull 11 cars up the grade with no issues... A single SD40-2 locomotive begins to spin its wheels even with only 7 cars in tow once all of them hit the grade and it goes into the curve.

Needless to say, I will be making sure that trains going up and down the grade will be always paired up. :)
 

holdenburg

New Member
Dec 29, 2006
64
0
6
70
Florida
www.nettechonline.net
Keep Going!!!

Agatheron said:
That's been the common critique, and one that I have myself. However, I do have a handy step stool that will allow me access back there if absolutely necessary... One alternative is to move the layout about 12" out from the wall for emergency access. I plan on having the backdrop mounted on the wall, so that shouldn't make a difference.

As for the 3% grade, I did a test run. 2 locos can pull 11 cars up the grade with no issues... A single SD40-2 locomotive begins to spin its wheels even with only 7 cars in tow once all of them hit the grade and it goes into the curve.

Needless to say, I will be making sure that trains going up and down the grade will be always paired up. :)

Just observations on the rise but I really like the elevated back area and center area and if I can take the liberty to say the center has some awsome potential at installing a nice span, bridge etc. which would be way cool. Especially in the center of your layout...
Herb
 

Agatheron

Member
Nov 8, 2003
317
0
16
54
Mississauga, Ontario, Canada
Visit site
There will be a bridge for sure, but I hadn't given thought to its size just yet. I need to cross back over the track somewhere around the end of the largest riser at the back to create a reversing loop at the top of the branchline. I think I have some flexibility to do a nice large span of deck-plate bridges back there! Thanks for the suggestion... I'll see what I can do.

Here's a link to one such span that's actually in the area that I am modeling:
showpic
 

holdenburg

New Member
Dec 29, 2006
64
0
6
70
Florida
www.nettechonline.net
Did you and are you going to convert everything to MT?

Agatheron said:
Right now they're the stock ones... but I have a package of Microtrain trucks that will be installed on any non-microtrains ones soon :) I do realize that may well affect how much a single loco might be able to tow up the grade...

Are you converting everything to Microtrain? If you have done so already with some of your stock, can you make a comment on what type of trucks your using. Brakie gave me a tip and pointed me to the web site with the truck schedule but I don't have a clue on what to order if I were to change anything...??

The reason I am asking is the my ATLAS C&NW cars arrived yesterday to the doorstep! The Lifelike Engine got to the post office but I have to goto the post office and sign for that package. The ATLAS passenger cars are built in Italy and have the stock couplers on them...

I don't know about everyone else but this thread will be fun to watch as you develop your track plan and make the adjustments. Especially when you start the ground and plaster work...

TTYL...
Herb
 

berraf

Member
Oct 29, 2006
260
0
16
69
Odeshog, Sweden
www.fasth.de
It sure look´s like the raisers do a good job.
I think it´s allways difficult to do a incline with the perfect climbing but those raisers could do the job.
By the way, your layout is very inspiring and interesting to watch.
Thanks for the pictures!
 

Agatheron

Member
Nov 8, 2003
317
0
16
54
Mississauga, Ontario, Canada
Visit site
Are you converting everything to Microtrain? If you have done so already with some of your stock, can you make a comment on what type of trucks your using. Brakie gave me a tip and pointed me to the web site with the truck schedule but I don't have a clue on what to order if I were to change anything...??

I'm using the bulk pack of the Barber Roller-bearing truck. I model post 1970s, so that seems to be the most common type for my era. If you go to this part of the Micro-Trains website, it explains each truck type:

http://www.micro-trains.com/n trucks.htm
 

holdenburg

New Member
Dec 29, 2006
64
0
6
70
Florida
www.nettechonline.net
More questions...

:wave:
Agatheron said:
I'm using the bulk pack of the Barber Roller-bearing truck. I model post 1970s, so that seems to be the most common type for my era. If you go to this part of the Micro-Trains website, it explains each truck type:

http://www.micro-trains.com/n%20trucks.htm

Agatheron...

Thanks for your response...

Ok, yes I was on this site. Your comments regarding post 70's will help with the freight.

What to do regarding my 80' passenger cars. I will look at the site again and try to figure this out. I have been scouring the web for folks who have converted Atlas passenger cars but no luck yet. There was an article I read about not using MT on 80' passenger cars. The recommendation was to use non magnetic types. I can always purchase a set but I think a call to them might enlighten the situation...

NEW... Ok, I found the xls conversion sheet on the MT site. Now, I just have to decifer the information.
It says for Rivarossi cars (C&NW Italian) there are two types that I can see

Passenger or Freight Cars (w/ split 1 pc. draft gear box)
Passenger or Freight Cars (w/ metal draft gear box clip)
UPDATE: I think I found it... A little lower on the XLS there is a passenger catagory showing 1017.
Thanks!!!
I have to figure out what I have.....


My CNW engines will arrive tomorrow or Tuesday... lots more to do... How's your ground cover, bridge, and grass setup doing....??


Herb
 

60103

Pooh Bah
Mar 25, 2002
4,754
0
36
Brampton, Ontario, Canada
Visit site
Herb: when I did N scale (over 35 years ago) i converted full-length passenger cars 2 ways.
Some I just replaced the stock trucks with the neatest MT version. Others I carved the coupler mount off the truck and mounted a MT coupler on the floor.
I never had any problems with the body mounts down to 12" r curves.
 

holdenburg

New Member
Dec 29, 2006
64
0
6
70
Florida
www.nettechonline.net
Learning Curve is fun... Thanks for the reply...

60103 said:
Herb: when I did N scale (over 35 years ago) i converted full-length passenger cars 2 ways.
Some I just replaced the stock trucks with the neatest MT version. Others I carved the coupler mount off the truck and mounted a MT coupler on the floor.
I never had any problems with the body mounts down to 12" r curves.

Ok... I think this is more a learning curve and fear of the unknown. I was on the MT site and not knowing which ones to try I think I will call them. I have the italian cars that they have on the conversion spread sheet. Thanks for your comments. At least I am not going where no man has ever gone... (bad joke) What do you call the "neatest MT version"? I suspect in order to keep to spec, I will need to critique some photos and once I call MT they can perhaps shed some light on which ones to order. I have a name for the non spec items if I get too far out of standard. Formally in the IT field we call it "IFW Standard" aka: It Friggin Works...

I am glad you responded esp. regarding the 12" curves. I think if I replace the trucks I could enhance the look of my little project and get rid of the rapido couplers. I am beginning to understand more now about MTesp. when you said with MT you can run trucks and couplers separate when you need too. I found some other C&NW kit cars on some other sites. I think I am a glutton for punishment. I have not even finished the first train and now found some HW C&NW kit cars on another site! It will take some dicipline not to keep ordering stock and get my hands dirty and complete what I have started...

Thanks for the reply.... :wave:

Herb
 

dahumphrey

New Member
Nov 13, 2006
1
0
1
61
looking great! have a question though.

You're progress is inspiring. I'm laying out variations with the unitrack I have and I love the ease and ruggedness of it.

I may have missed it in this thread but I was wondering what is the smallest radius curve on the Truro Junction?

Your passenger train looks fine flying through Truro Junction on your youtube video. Thanks for sharing.