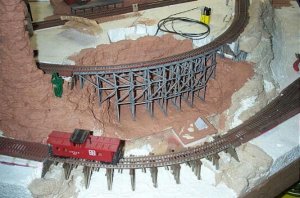
Trestlework on the layouts

Glen Haasdyk

Active Member
Feb 2, 2004
1,283
0
36
53
Kelowna, BC
Visit site
I couple months ago my club decided to change part of the mountain area a bit and that involved building a new, shorter trestle. I was the one nominated to build it. I did alot of research into the real thing so it would look as convincing as possible. Last year RMC did a story on trestle building which was invaluable as well I attended a clinic at a MR meet last spring that gave me alot of info as well. While I was at it I needed one trestle bent for my own layout so I built it while I built the others. I took a few pictures as I built so here they are:
ajq.jpg


Here's a completed trestle bent. I drew the plans for it on the peice of paper and pinned the plan onto a piece of blue insulation foam along with a sheet of wax paper on top of it. As I added wood parts to the bent I pined them in place on the plan so I would end up with bents with equal lengths. I needed 6 bents to buld the 70 foot trestle. This as actually the bent that I built for my layout. Below it is the footing that I built at the same time.

ajb.jpg


This isn't a very good picture but it does show how the stingers and crossbracing go. There is alot more structure in a real trestle than I see modelers add in their own. I page through older MR magazines and see most of the trestles leave out the crassbracing which in real life would make the trestle fold over like a deck of cards.

akj.jpg


This is the completed trestle on the club layout. It was also built on a curve which made assembly difficult. I had to pin the top stingers together and laminate them out of two strips so they would hold the cuvature. Then I glued the bents on, assembling the trestle upside down. You can't see in this picture but I 'faked' hardware buy using a fine tipped felt pen.
Finally be perpared to buy a large amount of stripwood when bulding these. This 70 foot trestle (scale feet) ate up almnost 40 (real feet) of lumber.
 

steamhead

Active Member
Apr 16, 2005
2,360
0
36
75
Brownsville, TX
Hi Glen,
That's a niece looking trestle... :thumb:
Could you give me some idea as to what the footings are, as well as to how the trestle is set on the ground..?? I'll be needing a trestle soon, so I need as much help as I can get..!! :D

Thanks.
 

Glen Haasdyk

Active Member
Feb 2, 2004
1,283
0
36
53
Kelowna, BC
Visit site
On the club layout we used strips of sheet styrene to simulate concrete footings. On my own layout I scratched cribwork out of basswood since it's going on my HOn3 logging line and in a river.
 

Doc Holliday

Member
Oct 27, 2002
613
0
16
Big Valley, California
Good looking trestle Glen!
I've got the same request Gus has. Show us how you set the foundations. I'm currently trying to plant a very similar trestle and am having a dickens of a time gettting the ground to just the right elevation under the trestle bent bottom beam. I've also just finished a pile trestle and am trying to float plaster of paris around the piles without much luck.
Thanks, Doc
 

Glen Haasdyk

Active Member
Feb 2, 2004
1,283
0
36
53
Kelowna, BC
Visit site
I can't really show you all that well since I don't have pictures of the installation. I guess planting the trestle properly starts with the inital measurments of the gap you have to bridge. The bottom of the canyon that I bridged was a flat piece of plywood. I took a straight length of 1"x1" and ran it aross the top of the roadbed on either side. Measuring staight down from there gave me the height of the trestle. I them subtracted the height of the track stringers and that gave me the height of the trestle bents. From there I drew my plans and carried on from there.
When we planted the trestle on the layout, the abutments were made out of masonite, painted concrete grey. the trestle slid nicely into place height-wise. I left the top stringers long so they could be cut to size during the instalation. Better to have them too long than too short and have to try to add material.

Doc, I didn't make a pile trestle. this is a frame trestle with no piles driven into the soil. The framed bents sit on concrete or wood sills off the ground so the bents don't rot from moisture. If you are having trouble fitting the trestle heighth-wise, try shimming with styrene sheet. As I mentioned before our trestle rests on them and If I have to I can pull the trestle back out again later.
I hope this helps.
 

steamhead

Active Member
Apr 16, 2005
2,360
0
36
75
Brownsville, TX
Ahhh..So these didn't have concrete footings like a bridge?? Were the bents buried in the ground to keep them fro moving..?? Or just sitting atop other beams..??
Thanks for any info.
 

Glen Haasdyk

Active Member
Feb 2, 2004
1,283
0
36
53
Kelowna, BC
Visit site
The frame trestles were set onto footings, either wood or concrete like what I made, Pile trestles were set on piles driven into the ground. Here's a better picture of my one bent about to be set up into position:
ajr.jpg


You can see the cribwork footings at the base. Since this picture was taken I added the stream that the cribwork rests in and the top stringers that secure the bent to the wooden abutment. I hope this makes it a little clearer:

aii.jpg


This is the underside of a real wood trestle. You can see the bents on the bottom are either resting on their wooden footings (left side) or their concrete footings(right side). These are frame trestles. The ground it almost all rock through this area so driving piles is impractical, if not impossible.
 

Doc Holliday

Member
Oct 27, 2002
613
0
16
Big Valley, California
Thanks for the info Glen.

Here's a poor pic of what I'm talking about. The bent trestle in the background is similar to the style of yours, although I elected to have it sit right on the rocky ground instead of on raised foundations. I built the trestle first, then rough formed the ground with ceiling tiles and then kept adding thin layers of plaster to raise the ground a little bit at a time until the fit under the tracks was tight.
The pile trestle in the forground is different. Since I wanted the piles to appear drilled into the ground, I built it first and then glued it to the track, leaving the ends just off the plywood. I'm now trying to float plaster around the piles to "bury" each pile just about 1/8" and am having a difficult time doing so, especially between the piles themselves. As bad as it it, sure makes me glad I'm not doing N scale.
Doc
 

Attachments

  • pile trestle.jpg
    pile trestle.jpg
    54.7 KB · Views: 151

Glen Haasdyk

Active Member
Feb 2, 2004
1,283
0
36
53
Kelowna, BC
Visit site
For my aging wash I use thinned acrylic paint. Black for greying wood and darker keosote treated wood like trestles.
Those are great looking trestles guys, just don't forget the crossbracing.
Doc, I read that early trestles were simply built on the ground until they figured they would last longer on footings, yours could be one of those.
Berraf, That's a great start. Five stories, just how tall are you making it?
 

stump7

New Member
May 15, 2005
46
0
6
83
Albuquerque, NM
Gus
The most important aid I found in building a wooden trestle was to build a jig. Lay out your plan as Glenn did on paper then very carefully built a jig over the plan. That way all the angles and lengths come out the same every time. I went crazy and wasted a lot of wood until I did this. Once the jig was made I made 12 bents in one evening!

If you are building a curved trestle don't forget that the top timbers for the road bed are not curved; they are a series of short straight sections with the inside timbers shorter than the outside to make a curve. It is a great visual effect to see the cruved track track on top of the straight sections on the finished trestle. Good luck.
Stump7
 

Doc Holliday

Member
Oct 27, 2002
613
0
16
Big Valley, California
I used a heavy black india ink wash on both the trestles in my pic above. For the smaller pile trestle, I brushed several coats over the raw wood and let it dry. THe larger trestle is plastic. I painted a light coat of flat white first, let it dry and then applied several varying coats of the same india ink wash. I scraped bot trestles with a razor saw first in order to give the timbers a grain.
Doc
 

steamhead

Active Member
Apr 16, 2005
2,360
0
36
75
Brownsville, TX
Hi guys...Thanks for all the tips and pics...!!! Just a couple more questions...I've seen pics of some bents made out of what must be whole tree trunks, i.e., rounded, and some of square stock. Why..?? Also, how far apart should the bents be from one another.?? Thanks again..!!
 

Glen Haasdyk

Active Member
Feb 2, 2004
1,283
0
36
53
Kelowna, BC
Visit site
The rounded trestle bents are often the pile type, probably because a round pile has less tendancy to splinter than a squared one and there's no reason to use milled lumber for the project. The framed trestles are designed and prefabed elswhere as well as each 'storey' is built on top of each other so the lumber is sqaured for a better fit.
Acorrding to my research spans between Bents should be 12, 14, or 16 feet. I think I built mine at 16 feet.
If anyone is intrested some of my infromation came from the May 2006 RMC magazine. The other source was a handout of ten photocopied pages from a very old Modelrailroader that I got at the clinic.
 

Glen Haasdyk

Active Member
Feb 2, 2004
1,283
0
36
53
Kelowna, BC
Visit site
I really don't know about RMC back issues. Don't worry about the questions, I'm happy to answer them. If you want I can scan and send those ten pages that I got at that clinic. They'll tell you all the info that you need. They are a little technical so you have to read them carefully.