The UHU02 Colonial Viper appreciation thread

silveroxide

Senior Member
Aug 22, 2007
2,036
525
113
Fayetteville NC
silveroxides Viper

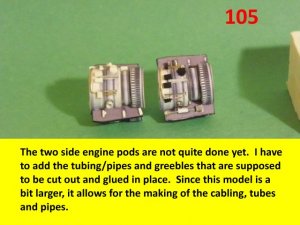
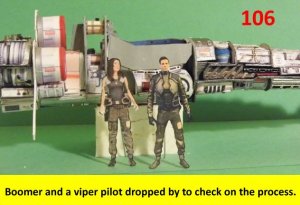
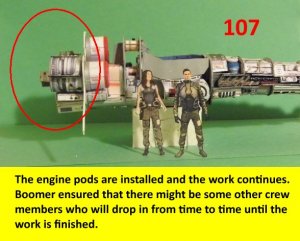
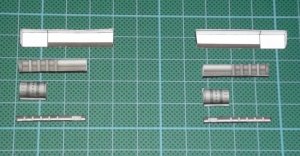
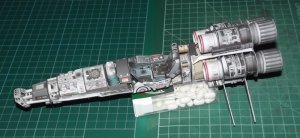
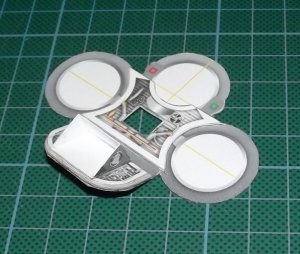
I will be busy this weekend so I may not do any photo updates until Monday. In the meantime, here is the last batch for now. I have to work on that side pipes and details for the side of the engine pods. I had a visitor drop by to check on the progress and Ms. Parks (Boomer) ensured that there may be some more visitors to come by during the process until it is finished. Kara will probably drop by next posting. Enjoy and see you all next posting.:thumb:
 

Attachments

  • 103.jpg
    103.jpg
    56.4 KB · Views: 19
  • 104.jpg
    104.jpg
    43.4 KB · Views: 17
  • 105.jpg
    105.jpg
    57.8 KB · Views: 21
  • 106.jpg
    106.jpg
    57 KB · Views: 21
  • 107.jpg
    107.jpg
    63 KB · Views: 22

Rhaven Blaack

!!!THE MAN BEHIND THE CURTAIN!!!
Staff member
Administrator
Moderator
Jun 12, 2009
12,492
9,854
228
Oregon
www.deviantart.com
SKINS for the Engines

Here are the SKINS for the engines. As mentioned earlier, I will not be putting these on the plane. They will be laying on the side of the diorama.

Parts for the intake fans
IMAG2948.jpg

Intake fans assembled.
IMAG2949.jpg

IMAG2950.jpg

IMAG2951.jpg

IMAG2952.jpg

Parts for the intakes.
IMAG2953.jpg

Intakes are assembles.
IMAG2954.jpg

Parts for the lower engine SKIN.
IMAG2955.jpg

IMAG2956.jpg

IMAG2957.jpg
 

Rhaven Blaack

!!!THE MAN BEHIND THE CURTAIN!!!
Staff member
Administrator
Moderator
Jun 12, 2009
12,492
9,854
228
Oregon
www.deviantart.com
More Engine SKINS!!!

IMAG2958.jpg

SKIN for the engine is complete.
IMAG2959.jpg

IMAG2960.jpg

Both Lower Engine SKINS are completely assembled.
IMAG2961.jpg

IMAG2962.jpg

Parts for the Upper Engine SKINS.
IMAG2963.jpg

Upper Engine SKINS are completely assembled.
IMAG2964.jpg

IMAG2965.jpg

Now onto the wings.
 

silveroxide

Senior Member
Aug 22, 2007
2,036
525
113
Fayetteville NC
I got a whole crew of 2d cutouts which I am prepping at the moment. Thanks for the posting as well. Like I mentioned earlier, I need those photos from you guys for the building process. The intake fans was confusing me a little and I was going to do them my way. Now that you posted it, I understand now how to place those tiny little bits. Keep up the good work.
 

Revell-Fan

Co-Administrator
Staff member
Administrator
Moderator
Aug 1, 2009
11,595
12,338
228
Vreden
+++ German sitrep +++

Hi, guys! :wave:

The German garage is back on line!

I'm now assembling the engines and will show you some pics soon. Till then I give you a piece of ... "Modern Art"! :mrgreen:
 

Attachments

  • modernart.jpg
    modernart.jpg
    142.2 KB · Views: 9

Rhaven Blaack

!!!THE MAN BEHIND THE CURTAIN!!!
Staff member
Administrator
Moderator
Jun 12, 2009
12,492
9,854
228
Oregon
www.deviantart.com
Speaking about figures, I have taken Tiricks X-Wing pilots and I am going to (attempt) turn them into "KNOCKLE-DRAGGERS".

I am glad that I was able to help you make sense of the intake fans.

Thank you for the kind words.
 

Revell-Fan

Co-Administrator
Staff member
Administrator
Moderator
Aug 1, 2009
11,595
12,338
228
Vreden
The parts for the rear assembly. I have used another layer of card on parts 190, 191 & 192 to increase the raised effect.
 

Attachments

  • DSCF2509.JPG
    DSCF2509.JPG
    157.6 KB · Views: 14

Revell-Fan

Co-Administrator
Staff member
Administrator
Moderator
Aug 1, 2009
11,595
12,338
228
Vreden
The rear of former 1 has to be shortened so that the rear parts can be attached. I attached part 188 to the black rectangle on the back of part 191; this way it is much easier to pinpoint the exact location of the part. The other parts were assembled exactly as the master showed it.
 

Attachments

  • DSCF2515.JPG
    DSCF2515.JPG
    114.8 KB · Views: 15
  • DSCF2516.JPG
    DSCF2516.JPG
    136.5 KB · Views: 10
  • DSCF2517.JPG
    DSCF2517.JPG
    139.4 KB · Views: 13
  • DSCF2518.JPG
    DSCF2518.JPG
    156.8 KB · Views: 16
  • DSCF2519.JPG
    DSCF2519.JPG
    172.9 KB · Views: 16
  • DSCF2520.JPG
    DSCF2520.JPG
    155.6 KB · Views: 15
  • DSCF2522.JPG
    DSCF2522.JPG
    135.1 KB · Views: 12

Revell-Fan

Co-Administrator
Staff member
Administrator
Moderator
Aug 1, 2009
11,595
12,338
228
Vreden
A quick tip: When you cut out the thin circles start cutting from the inside and cut out the white center first. Cutting from the outside first is too difficult.
 

Attachments

  • DSCF2523.JPG
    DSCF2523.JPG
    105.7 KB · Views: 11

Revell-Fan

Co-Administrator
Staff member
Administrator
Moderator
Aug 1, 2009
11,595
12,338
228
Vreden
The engines were assembled according to the master's instructions. I shoud have added an additional layer between the second and the third layer but I was too lazy :p 
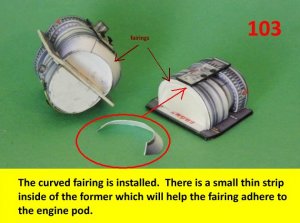
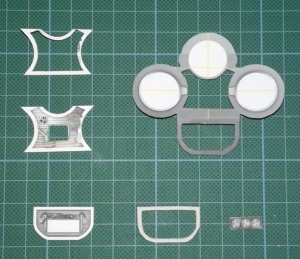
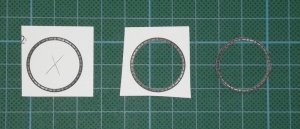
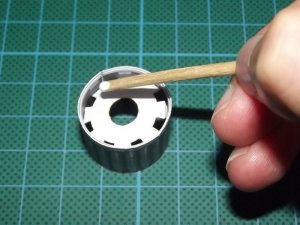
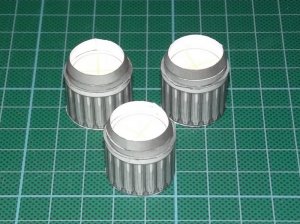
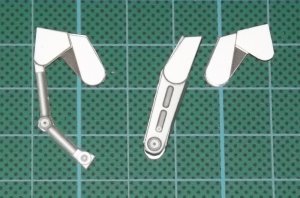
. So I had to trim the outer layer a bit.
 

Attachments

  • DSCF2527.JPG
    DSCF2527.JPG
    139 KB · Views: 11

Revell-Fan

Co-Administrator
Staff member
Administrator
Moderator
Aug 1, 2009
11,595
12,338
228
Vreden
The inserts fit very nicely. I didn't apply glue to them but to the engines using a rod. I pushed the inserts through to the middle of the engines, applied the glue and then put the parts in place. Everything went together very well. Like Rhaven I used the black engine exhaust parts.
 

Attachments

  • DSCF2529.JPG
    DSCF2529.JPG
    121.6 KB · Views: 13
  • DSCF2530.JPG
    DSCF2530.JPG
    121 KB · Views: 10
  • DSCF2532.JPG
    DSCF2532.JPG
    108.4 KB · Views: 12
  • DSCF2534.JPG
    DSCF2534.JPG
    162.4 KB · Views: 10
  • DSCF2535.JPG
    DSCF2535.JPG
    135.8 KB · Views: 10
  • DSCF2536.JPG
    DSCF2536.JPG
    161.3 KB · Views: 13

Revell-Fan

Co-Administrator
Staff member
Administrator
Moderator
Aug 1, 2009
11,595
12,338
228
Vreden
Attaching the engines to the plane was a bit tricky since I wanted to bring the Viper into an upright position so that I was able to align the engines properly. I improvised a mounting device made of food packaging and glued the engines to the fuselage.
 

Attachments

  • DSCF2539.JPG
    DSCF2539.JPG
    64 KB · Views: 13
  • DSCF2541.JPG
    DSCF2541.JPG
    113.5 KB · Views: 16
  • DSCF2546.JPG
    DSCF2546.JPG
    135.1 KB · Views: 12
  • DSCF2549.JPG
    DSCF2549.JPG
    120.4 KB · Views: 15

Revell-Fan

Co-Administrator
Staff member
Administrator
Moderator
Aug 1, 2009
11,595
12,338
228
Vreden
The front landing gear was assembled using the provided parts. A quick test-fit showed that my version wasn't thick enough. I'll sandwich another version of part 212 inbetween to make everything fit as intended.
 

Attachments

  • DSCF2556.JPG
    DSCF2556.JPG
    135.6 KB · Views: 14
  • DSCF2555.JPG
    DSCF2555.JPG
    73.6 KB · Views: 13

Danscrew

Danscrew
Oct 10, 2011
212
260
58
Rouyn-Noranda, Québec
I RV !

This is a fabulous model from an incredible model maker. It's all print out and on my ''to do list'' after complete my colonial mover.

Your build will be frakingfantastic ! and I will take this tread to help me with my build.

Keep going my German friend :thumb:
 

DanBKing

Dan the Man
Feb 29, 2012
1,817
1,587
113
Netherlands
Dunglish playing catch-up!!

@ AgO2, RF & RB: You guys are doing fantastic jobs on your builds. You are faaaaar ahead of me....... But, I'll get there.....
Nice work guys!! :thumb::thumb::thumb:

flag.png
Due to staffing issues at the Dunglish Viper factory, progress has been slow.

I managed to get the side rails assembled and attached.

DSC_0032[1].jpgDSC_0042[1].jpg

DSC_0053[1].jpgDSC_0050[1].jpg

I'll be back when I can.

:wave:
 

Rhaven Blaack

!!!THE MAN BEHIND THE CURTAIN!!!
Staff member
Administrator
Moderator
Jun 12, 2009
12,492
9,854
228
Oregon
www.deviantart.com
I have to say that EVERYONE that is participating in this build of UHU02's Viper is doing a FAN(FRAKKING)TASTIC JOB!!

:thumb::thumb:KUDOS TO EVERYONE!!!:thumb::thumb:
 

Rhaven Blaack

!!!THE MAN BEHIND THE CURTAIN!!!
Staff member
Administrator
Moderator
Jun 12, 2009
12,492
9,854
228
Oregon
www.deviantart.com
Another update from the Scorpion Ship yard

Here are the wings.

Here are the parts for the main guns.
IMAG2966.jpg

The main guns are assembled. They are very simple. You just layer one cylinder over the first.
IMAG2967.jpg

IMAG2968.jpg

Here are the parts for the wings.
(As you can see I put in one of the other flaps that go the the other wing in this photo.)
IMAG2969.jpg

Here is the flap.
IMAG2970.jpg

IMAG2971.jpg

The flap is in place.
IMAG2972.jpg

Internal supports and glue strips in place.
IMAG2973.jpg

Wing is assembled.
IMAG2974.jpg

IMAG2975.jpg
 

Danscrew

Danscrew
Oct 10, 2011
212
260
58
Rouyn-Noranda, Québec
I have to say that EVERYONE that is participating in this build of UHU02's Viper is doing a FAN(FRAKKING)TASTIC JOB!!

:thumb::thumb:KUDOS TO EVERYONE!!!:thumb::thumb:

Sorry..I never wanted to forget anybody in this tread but your absolutely right Rhaven Blaack.

For all those who have the courage and the patience to do this incredible build..............and at that size.............will do a FRAKING good job.

An million :thumb: for all of you !