TestVille, a 1x4 handlaid test layout

jkristia

Member
Aug 1, 2002
426
0
16
56
Simi Valley, CA,
Visit site
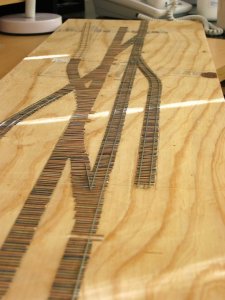
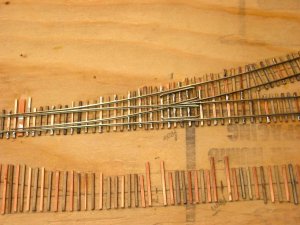
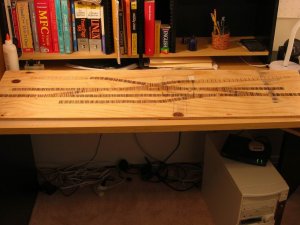
I just finished laying the ties on my small 1x4 test layout, TestVille, and I am actually pleased with the result considering this is the first time I do it. I still need more practice before I can make nice smooth curves and before the turnout ties looks correct, but as a first shot, it’s not too bad.

Well next step is to sand them smooth and level with the PC ties and then it’s RAIL-TIME!!. I don’t know exactly whre to start yet, but I think I will start with the right most turnout and then work from there.

I have a few pictues here if you are interested.

http://community.webshots.com/album/61130360zIWIIf


Jesper
 

Attachments

  • img_2013.jpg
    img_2013.jpg
    71.6 KB · Views: 585

jkristia

Member
Aug 1, 2002
426
0
16
56
Simi Valley, CA,
Visit site
I have added a few pictures of my progress with the hand laid turnouts. The first turnout took about 3 hours to build, the second one about 1 ½ hour, and I think I finally figured out the exact order of putting down the rails for the turnout. One problem I seem to have though is to keep the rails centered on the ties, in one end they are closer to the left side, and on the other they are closer to the right. Problem here is probably that I was off to begin with, and I didn’t notice until it was too late, well, it’s not too bad, and I’m still happy with the result so far.

The pictures are here
http://community.webshots.com/album/61130360zIWIIf

Jesper
 

Attachments

  • img_2041.jpg
    img_2041.jpg
    69.2 KB · Views: 499
Great looking pictures! I wish I had the skill and patience to hand-lay track. My motor skills and hand/eye coordination stop at the 'sledge hammer' level and I have to be satisfied with that. That looks like a great switching layout in addition to being a test-track. Well done!
 

kettlestack

Member
Jan 18, 2002
859
0
16
84
Scotland UK
Visit site
That's superb workmanship jkristia !!!

One way to keep track centred is to mark a dot at each end for the location of one rail. Rub a coloured chalk onto a length of thread and align the thread over the dots, pull it taught and "ping" the thread onto the sleepers, you will then have a staight line upon which to lay one straight, with your track gauge being used to position the other rail.

Just wish I had the dexterity to do what you're doing, yours looks great. It's also an extremely good layout, reminiscent of Charlie's switching layout. 1st class sir.

Errol
 

sumpter250

multiscale modelbuilder
Jan 19, 2002
3,073
0
36
80
Vernon Hills, Illinois
Visit site
Having hand layed HOn3 track, and some dual gauge, and having then spent years fighting to make it work, I have to stand in awe of your work! There are some things I can do, track, isn't one of them.
Pete
 

Lighthorseman

Active Member
Jul 24, 2002
1,240
0
36
57
Out in the sticks
Visit site
Handlaying Track...

Having tried my hand at O scale, I stand in :eek: :eek: AWE :eek: :eek: at your work. I cannot even imagine the dexterity required for n scale handlaid track...let alone all those turnouts and crossovers.

I wound up with uncentred rail too. I suppose this is why a test section is a great idea. For all the extra work, the end result sure is worth it.

Beautiful, beautiful work! Keep the pictures coming.:)
 

jkristia

Member
Aug 1, 2002
426
0
16
56
Simi Valley, CA,
Visit site
Thanks for all the kind words. I think that it was a mistake to begin with the right turnout and then work from there. If I instead had build the right turnout, and then the LEFT turnout, then at least the ends would have been centered, and then the track between the two would have needed a little adjustment, oh well, that’s why I’m doing this test layout, to learn.

And to answer you question Terry. I don’t know if hand laid turnouts are more reliable than commercial ones, probably not, but what I like about hand laid turnouts is that you are not restricted to a fixed number of turnouts #4, #6, #7 etc, but can build them to fit in where you need them, and also, I like the appearance of hand laid track. First time I saw it was at the club in Pasadena, CA, a huge 1000sqf HO layout with all hand laid track. And then after that I visited the huge layouts in San Diego, both HO and N. When I saw the N layout in San Diego, all hand laid, I decided to try it, just to see if I liked it or not.

But, again, since this is the first hand laid I have done, I have no idea if it’s more reliable than commercial turnouts, maybe some one else can answer that question.

Jesper
 

aartwmich

Member
Nov 30, 2002
383
0
16
65
SW Michigan
www.angelfire.com
Jesper...beautiful work, amazing :eek:

What is the track attached to the ties with? It looks like solder, but...I know nothing, do tell!!

Terry..glad you asked the question about WHY? anyone would hand lay track.

I buy that the turnouts might be smaller(I've never layed track at all..lol) but I've got to believe that the biggest reason is just the pure joy of accomplishment ;)
 

Drew1125

Active Member
Jan 28, 2001
2,975
0
36
My hat is off to you, Jesper!
That is fantastic looking track!
After a botched attempt at laying HOn3 track, I know what an accomplishment you've made there!
Excellent work!
 
Wow! What an incredible piece of work.

If it works as good as it looks you will have a fine running track system.

I can't seem to find the time to do all the OTHER stuff on the layout, let alone start handlaying the track and points!!!
(I think I would require another lifetime).

Gavin
 

jkristia

Member
Aug 1, 2002
426
0
16
56
Simi Valley, CA,
Visit site
Today I finally finished hand laying the code 40 tracks in my small 1x4 test layout. I have pictures here
http://community.webshots.com/album/61130360zIWIIf
Overall I’m pleased with the result, but I do have a few issues. First, I didn’t cut the slot for the wire to throw the switch until after I was done (actually, I had installed 2 throw bars when I realized that I was missing something, so I had to remove them again). Another thing is the ties at the crossover. I should have used PC ties for all the ties instead of only for every other tie. And then of course the misaligned track / tie problem. Next time I will be a little more careful, and start the rail at each end instead of just building from one end. Maybe that will prevent the misalignment.
After building these 7 turnouts, I must say that it’s quite easy and fast, but the crossover clearly shows that it’s the first one, and is not the most “elegant” crossover I have seen, but maybe next time. Now I just need to figure out where to cut the gaps.

Jesper


OK, I tried to attach a picture, but it complains about the size, even though the size of the pictue is only 87kB and 600x800. Maybe it won't allow 600x800 even though it's smaller than 1024x768
 

davidstrains

Active Member
Aug 29, 2002
1,014
0
36
Stafford, VA
Visit site
Jesper,

Well, I'm impressed. Great piece of work. Are you just using the solder on the PC ties to hold the rail or will you be adding spikes along the way?

It looks very professional the way it is now. Keep up the good work.:) :)
 

jkristia

Member
Aug 1, 2002
426
0
16
56
Simi Valley, CA,
Visit site
David, the rail is soldered to the pc ties, and I will not use any spikes. You will notice that every 5th tie is a pc tie, that (according to the masters :)) should be sufficient to keep the track in gauge.

Jesper
 

Matthyro

Will always be re-membered
Dec 28, 2000
4,550
0
36
86
Georgetown, Ontario,Canada
Amazing work Jesper. At one time I tried handlaying N gauge track and even built a double slip switch but that came to an end due to moving and not having time to do more so now just use what's available. Should get back into it now as I need a double track crossing on a curve.
As to photo uploading, the max size is 640 by 480.
If you have images stored on-line somewhere then just click in IMG and you can add the link and the picture can be any size.
 

shaygetz

Active Member
May 2, 2003
3,612
0
36
64
www.freewebs.com
You've done a fine job first time around. It would make a nice portable swiching game ala John Allen's famous "Timesaver". As far as that crossover, some well placed solder and judicious filing and even us old timers would be none the wiser. You're on your own with where the gaps go though:p