structure photos

Gary and Belg, very realistic modelling!!!

Hey Gary, if you think you might lose your message text or if you need to back out of the Reply screen momentarily, just use your left mouse button to highlight your message text (or right click in the Reply window, then "Select All"), then right click on the highlighted text and "Copy".

Thus all your text is on the clipboard and can be retrieved by right clicking in the Reply window and "Paste".

Same procedure works for most any Windows application, it can be a real time saver.:) :)
 

Gary Pfeil

Active Member
May 7, 2001
2,510
0
36
Boonton NJ
Visit site
Thanks Ron and Cid, and thanks for the tip Cid. Belg, yes the weather it comes in just one color. Not a color really, it is clear. It is not a stain. Someone else here may know more about how it works but I will just guess that it chemically alters the wood. When I get home tonight I will post a shot of a walkway on a trestle I colored with the weather it. On this model I built the walkway first, being careful not to get glue on the top surface. I then brushed on the weather it, lightly. You can recoat after an hour or so when applied lightly. You will see very little change. I think different woods will react differently. After several coats, I got impatient and applied very liberally. The change was now apparent. As concerns drying time, as I said an hour is good for light applications, when i apply heavily and weight it down under wax paper, I allow overnight, and the wood will still be damp. So, this is not a fast tecnique!
 

Gary Pfeil

Active Member
May 7, 2001
2,510
0
36
Boonton NJ
Visit site
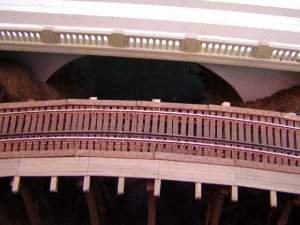
I'm not sure this photo will add any knowledge about weather it but it is another example of its use. I guess its name says it all, it makes wood look aged, not stained. In this photo I use weather it on the planks for the walkway. The ties and guard timbers were not stained, they are painted. Anyway, it shows how you can get the look of untreated lumber which has been in the elements for awhile and how it might look next to lumber which had been creosoted a long time ago. At least that was my intention!
 

Attachments

  • p1010250jpg.jpg
    p1010250jpg.jpg
    60.7 KB · Views: 69

Gary Pfeil

Active Member
May 7, 2001
2,510
0
36
Boonton NJ
Visit site
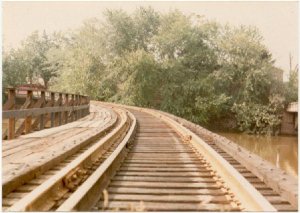
Good point Tyson, I wish I had thought of it earlier. Or, more accurately, I wish I had thought of it! You can tell I'm not a carpenter, huh? The planks in the center of this photo are as I laid them but upon another look I see others are not. This is the bridge I've modeled, just have to add the handrails once I'm done reaching beyond it. I was wondering what the line of lighet color markings on the ties were, when I showed Blake he said they were where the other guard rail used to be. Makes sense but no spike holes that can be seen. Odd.
 

Attachments

  • p1010256jpg.jpg
    p1010256jpg.jpg
    55.5 KB · Views: 59

jimmybeersa

Member
May 14, 2001
508
0
16
92
Alberton . South Africa
Hi Patric Love those timber buildings .....really like that shed next to the house extention, re :size of the timber "what the eye dont see the heart wont grieve ",when its covered who will know. or is it goig to be "under construction" Also the weathering looks great regardless of what is used to attain the desired effect. keep the pictures coming.Good modeling !!!
 

Clerk

Active Member
Nov 6, 2002
1,678
0
36
91
Esparto, California
Visit site
WAW!!! And I can't seem to build anything that looks half decent. When I try to cut out a square window I end up with a triangle and visa a verse. When cutting parts out of cardboard, Instead of two matching parts I end up with one about 1/16 inch off.

Anyway, I am glad several of you guys are capable of building such great structures. I enjoy looking at them.