Star Wars ARC-170 Fighter building

starbuck

Well-Known Member
Aug 15, 2013
898
1,825
93
Austria - Carinthia
Hi toghether,

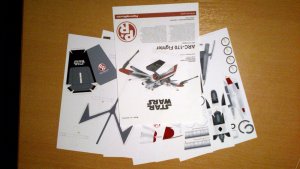
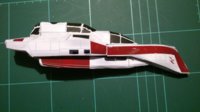
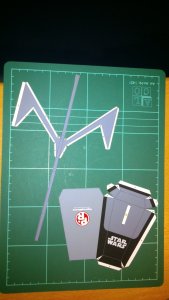
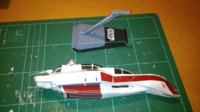
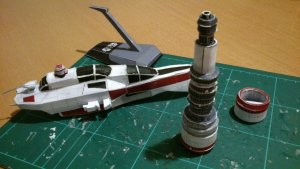
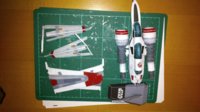
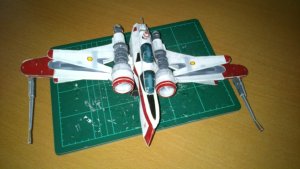
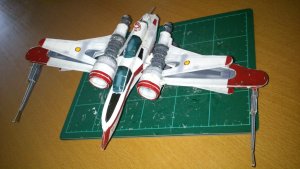
I started to build the ARC-170 Fighter seen first (hope I am right) in EP3. The parts of the fighter are printed on 6 pages and the stand is included.
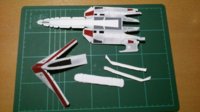
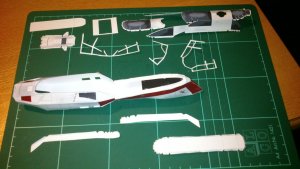
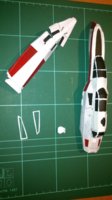
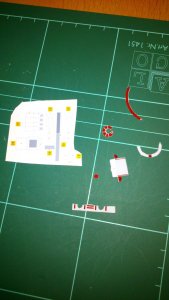
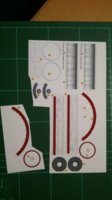
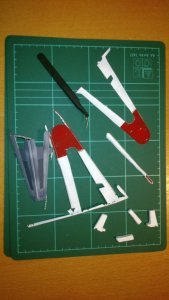
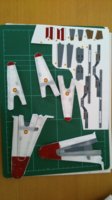
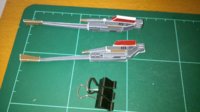
As you can see on picture 5 there are wholes which are needed for fixing the mashines and the wings to the main body.

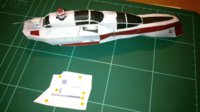
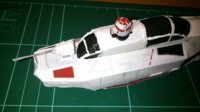
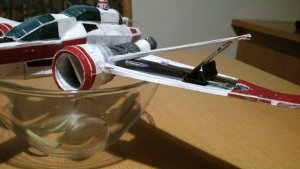
....to be continued ;-))
 

Attachments

  • DSC_6070.jpg
    DSC_6070.jpg
    874 KB · Views: 45
  • DSC_6071.jpg
    DSC_6071.jpg
    1.2 MB · Views: 46
  • DSC_6074.jpg
    DSC_6074.jpg
    1.2 MB · Views: 43
  • DSC_6075.jpg
    DSC_6075.jpg
    738.4 KB · Views: 46
  • DSC_6076.jpg
    DSC_6076.jpg
    1.1 MB · Views: 55
  • Like
Reactions: Revell-Fan

zathros

*****SENIOR ADMINISTRATOR*****
Staff member
Administrator
Moderator
Apr 5, 2013
13,499
9,551
228
Good start, your skills will refine as you go along. Take an honest look, see what you could reprint. You know and could easily fix them, (the windows, need reworking), and in the end, you will have the model you want, and know you are capable of building! Much better than repainting "Hotwheels",. At least 100000% better!! Remember, you don't have to necessarily remove a structure to redo it. The part that needs redoing will make great support for the new part!! That's the best part of paper models, and a hard part to work into the hobby when you are new at it, you can just reprint a part when you need it! This is not an easy model either, so kudos to you for that! :)
 

starbuck

Well-Known Member
Aug 15, 2013
898
1,825
93
Austria - Carinthia
Thank you for the tip with the reprint. I will check when finally assambled and then do the optimisation by reprinting some parts. I will also document this process within this threat. CU
 

Revell-Fan

Co-Administrator
Staff member
Administrator
Moderator
Aug 1, 2009
11,595
12,338
228
Vreden
I often do what Zathros described on my alpha builds :)! Whenever I have a problem with a part or a texture I print it again and simply glue the new part over the existing structure. Easy fix, no need to start the build again and the result looks the way I want. I'm looking forward to your progress, starbuck! :)
 
Last edited:

starbuck

Well-Known Member
Aug 15, 2013
898
1,825
93
Austria - Carinthia
Thanks again for the tip - as I am a beginner I appriciate every hint to make my models looking better.
Found a tip for me myself. By putting parts together in a row it makes sense to have the gluing edge in one line. This helps to hide all gluing edges on the final model. (Will be shown in the next post.)
Unfortunately I found out when it was too late for this build.

Please see next steps:
As the droid and the cannons were so small parts I needed a "rest" and made the stand earlier than in the description.
Tip for the stand - first insert the small part before finalizing the bottom plate.
 

Attachments

  • DSC_6077.jpg
    DSC_6077.jpg
    837.5 KB · Views: 33
  • DSC_6078.jpg
    DSC_6078.jpg
    1.4 MB · Views: 28
  • DSC_6079.jpg
    DSC_6079.jpg
    1.1 MB · Views: 32
  • DSC_6080.jpg
    DSC_6080.jpg
    682.3 KB · Views: 32
  • DSC_6081.jpg
    DSC_6081.jpg
    1.1 MB · Views: 29

starbuck

Well-Known Member
Aug 15, 2013
898
1,825
93
Austria - Carinthia
And this is the result. I still have problems with the very small parts of a model. Maybe I should print double size next time;). Other possiblity would be to reprint the parts as suggested or to recolour - will see. Before assemling I will for sure correct the parts which are not proper right now.

Please note that I am a beginner and I do not post to present perfect work but to give other people hints about building the models.

Next - wings.
 

Attachments

  • DSC_6068.jpg
    DSC_6068.jpg
    1.2 MB · Views: 26
  • DSC_6069.jpg
    DSC_6069.jpg
    1 MB · Views: 24

starbuck

Well-Known Member
Aug 15, 2013
898
1,825
93
Austria - Carinthia
So, next parts. Remembering the wholes in the body? These are the pieces which will fill the wholes and which will also fix the turbines to the body.
Next I discovered a fine tweezer makes life more easy. Also it helps to fold the glueing edges precisely.
 

Attachments

  • DSC_6082.jpg
    DSC_6082.jpg
    568.7 KB · Views: 16
  • DSC_6068.jpg
    DSC_6068.jpg
    631.2 KB · Views: 24

starbuck

Well-Known Member
Aug 15, 2013
898
1,825
93
Austria - Carinthia
Dear Revell-Fan thank you for your motivating words.
Here the main wings assambled. I experianced that the smallest gluing tabs are not necessarily needed to be able to finalize the wings.

And here they are together with the sheets for the secondary wings.
 

Attachments

  • DSC_6068.jpg
    DSC_6068.jpg
    566.8 KB · Views: 13

zathros

*****SENIOR ADMINISTRATOR*****
Staff member
Administrator
Moderator
Apr 5, 2013
13,499
9,551
228
It looks like you may be painting free hand. Get some scotch brand tape, the translucent stuff, and mask off the windows. Remove the tape as soon as you have painted all the surfaces. The lines will be perfectly straight. This tape does not hold on tight, just done put it on tight, and make sure you paint with just enough pressure to get the paint on, multiple layers better than one thick one. You will find you windows perfect. I might suggest that you actually cut the windows out, the glue them back in painted black. They come out perfect that way. It's coming along nicely! Don't let perfection be your enemy. Finishing the model trumps a half built "perfect one". :)
 

starbuck

Well-Known Member
Aug 15, 2013
898
1,825
93
Austria - Carinthia
@ Zathros: you are right I tried to paint freehand, as I had problems with the paper. But freehand painting was not one of the best ideas I ever had;-(
By the way I started also the reprint of the windows part (in glossy paper - hmmm not sure if this was the best idea) and put them on the model. The windows lines I will add later on.

The tip with the windows to cut out and glue back I will keep in mid for my next project as I fear to make a big damage, when I try this on the finalized body. Thanks for the tip - as mentioned will try next time.
----
I started the assambling by adding the mashines to the body. Finalizing of the wings should not be a big problem. But I am very anxious to the attachment of the wings whether I will manage to find the correct angle for them.
 

Attachments

  • DSC_6068.jpg
    DSC_6068.jpg
    779 KB · Views: 24

starbuck

Well-Known Member
Aug 15, 2013
898
1,825
93
Austria - Carinthia
Guns cut - no tricky parts. (picture one)
I had the problem how to glue all secondary wings in the same angle. solved it by fixing the angle with so: picture 2 by using that (picture 3).
Picture 3 also shows the finalized guns.

Picture 5 and 6 show the final build - not perfect (unfortunately), but I hope to improve my skills by practicing.
 

Attachments

  • DSC_6070.jpg
    DSC_6070.jpg
    843.9 KB · Views: 40
  • DSC_6071.jpg
    DSC_6071.jpg
    1.3 MB · Views: 40
  • DSC_6072.jpg
    DSC_6072.jpg
    1.3 MB · Views: 41
  • DSC_6083.jpg
    DSC_6083.jpg
    1.1 MB · Views: 43
  • DSC_6084.jpg
    DSC_6084.jpg
    1.3 MB · Views: 47

starbuck

Well-Known Member
Aug 15, 2013
898
1,825
93
Austria - Carinthia
Summary:
Difficulty: medium (for me)
Tips received:
a.) cut part again to make them look perfect
b.) cut windows out and glue them in place again - makes them more realistic
c.) good tools make life more easy and might help to make the build more perfect
d.) don´t try to paint you model freehand

CU!
 

zathros

*****SENIOR ADMINISTRATOR*****
Staff member
Administrator
Moderator
Apr 5, 2013
13,499
9,551
228
VERY NICE!! There's a roughness to it that adds much to the modeling. You have stumbled on weathering and aging!! Great job! You got through it, and made it very nice .... Very very good!

You left out one thing though, which shows one of the best qualities of a person, you took observations not as criticisms, but help, and to me, that isn't something you can just make it, it is the sign of excellent character. It shows you to have great character, and the best kind of person, exactly what this forum needs! Thank You! :)
 
  • Like
Reactions: Revell-Fan

F131

F131
Mar 27, 2008
420
4
16
Minneapolis, MN
Nice work. I actually gave up on this ship because I found building the engines incredibly tedious. If I choose to try again, I would increase the scale.
 

zathros

*****SENIOR ADMINISTRATOR*****
Staff member
Administrator
Moderator
Apr 5, 2013
13,499
9,551
228
I'm happy no one told him before that. He whipped right through the engines!! :)