Spline subroadbed questions

60103

Pooh Bah
Mar 25, 2002
4,754
0
36
Brampton, Ontario, Canada
Visit site
I'm trying to do something that I've read about but never attempted before.
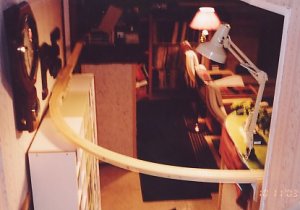
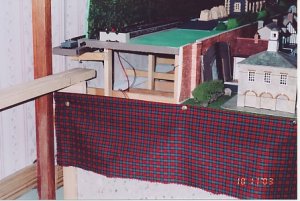
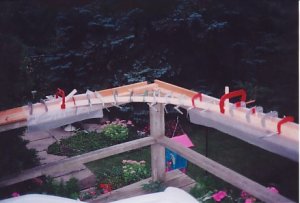
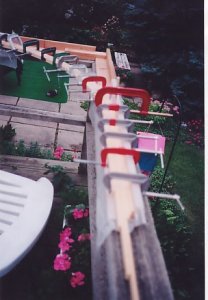
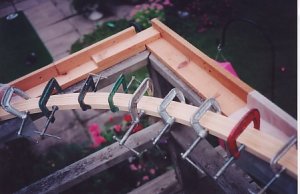
I'm making a removable section of layout using spline roadbed. (Spline is made by ripping a 1x4 into 1/4" wide strips and glueing them together side by side.)
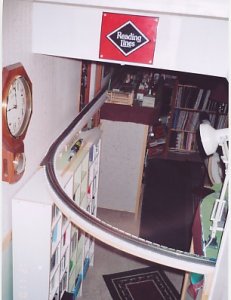
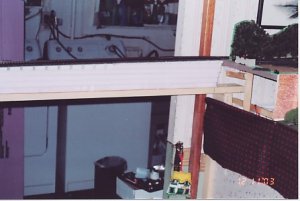
The section is J shaped, a 36" radius 90 degree curve and a 5 foot straight section. There can be no benchwork below; the middle bit sits on a bookcase.
I had 3 strips in place and, I though, glued. When I took them out, they straightened out somewhat and a lot of the length wasn't glued.
1) do I need to do something to the bits of spline to make them more pliable? I'm thinking of water or ??
2) How go I keep the glue from drying out before I can get it together? I'm using yellow carpenter's glue, but I'm willing to switch.
Thanks for any comments.
This section is to be my continuous run. It crosses the basement stairs and the laundry/furnace room door, so it has to be removable.
 

Matthyro

Will always be re-membered
Dec 28, 2000
4,550
0
36
86
Georgetown, Ontario,Canada
David, I used 1/8 inch masonite cut in 1 1/2 inch wide strips . I placed one where I wanted it then glued 7/8 inch wood spacers about every 6 inches then another strip of masonite. Worked well for me. You could probably do it with 1/4 inch masonite. Masonite bends into perfect curves . No grain to worry about. I used white glue and clamped everything and left it overnight . It turned out firm and strong for me.
 

ezdays

Out AZ way
Feb 3, 2003
6,339
0
36
Arizona
bigbluetrains.com
Using 1/4" strips is difficult to bend without the fear of splitting. It all depends on the radius you are trying to bend to. soaking the wood helps, but will obviously take longer for the glue to set. To get an even coat of glue, you should use a roller to apply the glue to both surfaces. Also you should make a clamping fixture and allow a bit for the wood to spring back after it has dried and is released.

I like Robin's idea of using masonite or even plywood, less possibility of it splitting and a more consistant thickness. Use 1/8" for tight radii, 1/4" for more gental curves. Just be sure you get the kind that is smooth on both sides.

Yellow glue is waterproof but doesn't bond any better than the white stuff. "Gorilla Glue" is tough, waterproof and uses water as an accellerant so it would work great if you were soaking the wood. But it is expensive and foams up between the layers and is nasty if you get it on your skin.

I hope this helps a bit.

Don
 

60103

Pooh Bah
Mar 25, 2002
4,754
0
36
Brampton, Ontario, Canada
Visit site
Progress

I have now completed the spline part of my removable section.
I made a jig using some old L girders and clamped it to the back deck railing. Found that one corner of the deck is not at 90 degrees. Covered the bit where the spline would be with wax paper. Marked 36" ponts on the L girders and screwed a board where the end of the straight part would come.
Started with the outside spline and worked from there. Took my time and wet the wood then clamped it. Did that before glueing and let it set a bit. Then took it out and started over. Wet the first piece on both sides where the curve was going; wet the second piece; spread the glue along the join; matched them up and clamped. Left it for a couple of hours and added the next piece. Worked at 2 or 3 pieces a day until I had all 7 pieces.
Photos follow. Sorry about the focus.
 

Attachments

  • spline01.jpg
    spline01.jpg
    34.8 KB · Views: 453

60103

Pooh Bah
Mar 25, 2002
4,754
0
36
Brampton, Ontario, Canada
Visit site
Photo 4:
Clamps every 4".
I should have had more vertical clamps to keep the splines level that way. I seem to have put a natural superelevation in the curve, but I did a LOT of planing and sanding to get the surface right.
 

Attachments

  • spline04.jpg
    spline04.jpg
    38.6 KB · Views: 444

jim currie

Active Member
Jun 29, 2003
1,383
0
36
arizona
Visit site
my first layout was built on homasote splines you have given me an idea to try homasote centers with 1/4 wood on outside for longer spacing of risers and somthing solid to screw to.:)
 

shamus

Registered Member
Dec 17, 2000
3,489
0
36
87
UK
Hi David,
Never used that method, always used (If it was for a bridge) 1/8" ply and cut to the radius needed. The top of this trestle was also made that way first, then the track was added.
ctres.jpg


Shamus
 

Mike R

Member
Jan 18, 2002
221
0
16
81
Meaford Ontario Canada
Visit site
Hello David;
I too, use a method that employs small wood blocks between the splines. I've used both 1/8 Masonite, and ripped pine strips without problem, always on a jig for bridges, and without on the layout itself.
Incidentally, I prefer the standard 'rough-side' Masonite for it's natural "tooth" , and use that side facing out, where the stress is greater.
I thought the smooth-both-sides stuff was actually MDF rather than Masonite, but I could be wrong.
I guess you're all done, but if you're interested, please drop by my tables at the Brampton show next weekend.
I'll have a curved H0 trestle using pine spline roadbed, and an 0-Lionel curved trestle that uses Masonite with pine blocks. Also a few photos showing the under-construction details.
Best regards
Mike Robertson:D
 

60103

Pooh Bah
Mar 25, 2002
4,754
0
36
Brampton, Ontario, Canada
Visit site
Thanks for the comments. I went with the method suggested by my friend who also offered the use of his table saw.
I wasn't sure how well it would stay in curve after my initial problems, but it seems solid enough now. I'm going to have to cut it in two as it won't fit in one piece where I need to put it.
After that, I have to put a 2% grade up it. I'll post photos of that as we try out my wife's new camera (still 35mm).
I didn't mention before that one of the splines is cracked through in the curve, but I put it in anyway. The curve was pretty solid by that point. I also have two other strips that cracked while being bent, but I had a surplus.
I found that, even though they were all cut on a table saw with no change of settings, there is some variation in width -- enough to be visible and to put various gaps and bends in the spline members.
 

60103

Pooh Bah
Mar 25, 2002
4,754
0
36
Brampton, Ontario, Canada
Visit site
In position

This next set of photos has been a long time coming. We took a 3 week holiday in the middle.
Here is the sub-roadbed in position across the bottom of the stairs. The Exeter station is at the front right and Perth is at the left rear.
 

Attachments

  • spline11.jpg
    spline11.jpg
    34 KB · Views: 338

60103

Pooh Bah
Mar 25, 2002
4,754
0
36
Brampton, Ontario, Canada
Visit site
Broadside view. After all my fancy woodwork making staggered joints, I found that I wouldn't be able to get it in position unless I cut it. The joint has the four bolt heads.
 

Attachments

  • spline12.jpg
    spline12.jpg
    46.8 KB · Views: 334

60103

Pooh Bah
Mar 25, 2002
4,754
0
36
Brampton, Ontario, Canada
Visit site
Robin:
I got a very circular, just less than 36" radius curve. The original idea was to have it easmented, but when I wet the boards they went circular.
My wife lets me have it up all all the time! But I took it down because we have a cat sitter coming in next week.
Still a few problems -- the 2% risers are 1/2" thick at the high end. I found the foam boards are a millimeter or two more than that and I hadn't properly allowed for it.