

I first saw this technique on a Japanese site last year some time. I don't recall the site, or even how I ended up there. It was during one of my brain-dead, time-wasting browsing sessions. I ran the page through google translate and was able to decipher that the builder took a 3D model, sliced it with a plane a bunch of times, then cut them out and stacked the pieces.
I just had to try it. I found a head I liked and used the boolean operations in Metasequoia to manually cut it with a plane, cleaned up the resulting cross-sections, then used Pepakura to turn it into a pattern.
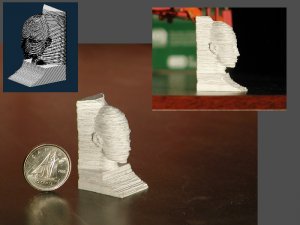
The finished product took many days to develop, but not too long to build. It's only about one inch tall, but consists of 132 layers, each individually cut out and glued. It would be much cleaner in a larger size. One day I'll print two copies at double size and double up each layer to test that theory (or find some paper that's twice as thick).
Comments welcome, and if anyone is really interested I'll be glad to put the pattern in the downloads section.
Steve
I just had to try it. I found a head I liked and used the boolean operations in Metasequoia to manually cut it with a plane, cleaned up the resulting cross-sections, then used Pepakura to turn it into a pattern.
The finished product took many days to develop, but not too long to build. It's only about one inch tall, but consists of 132 layers, each individually cut out and glued. It would be much cleaner in a larger size. One day I'll print two copies at double size and double up each layer to test that theory (or find some paper that's twice as thick).
Comments welcome, and if anyone is really interested I'll be glad to put the pattern in the downloads section.
Steve
")