

When Al Hazlet first introduced the Roman Seas products in this forum (->http://www.cardmodels.net/forum/showthread.php?t=3789) I tasted blood and I simply had to have some on my own. However, I'm not a wargamer and my goal is to built them as display models. I started with an out of the box build, anyway, to get used to the design. And this is the result:
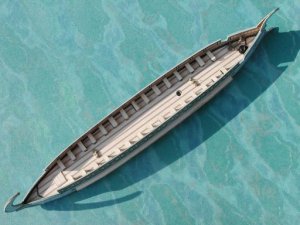
Roman scout ship (Roman Seas, 1:250)
- Thread starter michik
- Start date
You are using an out of date browser. It may not display this or other websites correctly.
You should upgrade or use an alternative browser.
You should upgrade or use an alternative browser.
- Status
- Not open for further replies.
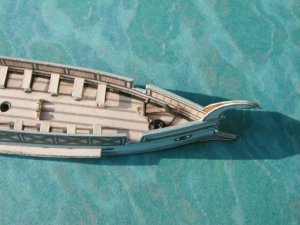
Due to their nature as gaming miniatures these models have some peculiarities that have to be changed for a display model.
The scale nominally is 1/300, but actually all ships are enlarged to provide enough deck space to set up the crew. The actual scale can be estimated from the distance of the oars, the Interscalmium, which, according to the roman engineer Vitruv, was about 92.5 cm in the roman fleet. The model has 15 rudder banks on 51mm length and thus has rather exactly my standard scale of 1:250. Cross check: The ships l.o.a. of 9cm calculates to 22.5m, which is scarcely longer than the Navis Lusoria replica from Regensburg (->http://www.vefag.de/, goto 'Römerschiff') and only a little shorter than the Triacontor, according to H.D.L. Viereck, "Classis Romana - the Roman fleet" (both likewise with 30 oars).
Further the rudders are printed on the hull sides for easy and fast construction. I, of course, want to have them as seperate parts. I couldn't remove the rudders at the computer, because the original files are protected. Therefore, I printed the hull sides one more time on thin paper and pasted over the rudders with small bits of it.
The biggest issue is the stern, where a large hole gapes in the hull. To close this gap I started with providing the hull with an egg crate style interior. The base plate was made from a deck, extended at the bow and shortened at the stern. Then longitudinal and transverse bulkheads were added from cardboard. I also printed the deck on thin paper and glued this onto the undersurface of the deck, so that the protruding parts of the deck get color also on the lower surface.
Attachments
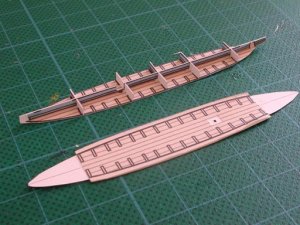
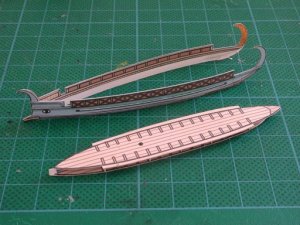
Before glueing the hull sides to the interior structure they are prepared in this way: I pre-formed the hull sides with a rounded tool on an eraser, beginning at about the last field of the railing. Additionally, I repeatedly cut in the edges, but this might be unnecessary. After the hull sides were attached, I cut out a triangular piece out cardboard in the color of the lower hull (taken from a screen shot). The edges were thinned by sanding and the whole piece was pre-formed on the eraser, too. After dry fitting was satisfactory, I glued the triangle to the hull. I especially payed attention that the edges were thoroughly attached. I used diluted PVA glue, well, mainly because I always do, but in this case this glue has the advantage that the humidity softens the cardboard, which makes forming easier.
Attachments

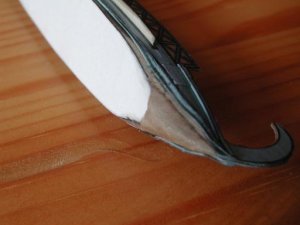
To immitate the keel I glued a strip of cardboard along the centerline. Finally, after sanding the bottom flat and some touching up with Tamiya XF-52 'Flat Earth', the stern is finished!
Due to a hot summer and the BBQ season, the weekend brought little progress.
Bye,
Michi
Due to a hot summer and the BBQ season, the weekend brought little progress.
Bye,
Michi
Attachments

Nice work, michik ! ")
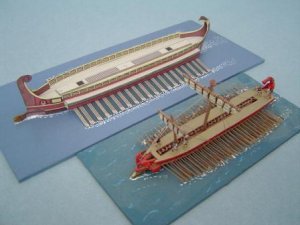
I agree with you about the "scale creep" of the Roman Seas ships. I'm attaching a picture of my Langton 1/300 Greek trireme next to my Roman Seas trireme. The Langton model is dwarfed. 1/250 for Romans Seas seems correct to me. I think that's probably just as well, since the best 6mm soldiers for it are Bacchus which are also oversized. Not to mention it makes the models a little easier to build.
Hats off to you for adding detail. The only thing I did was add the extra deck piece. I think the ships would look better with the decks full of soldiers (although when the heck would I have time to paint 6mm ?). But they can stand alone as card models. Since these are vector graphics, you could conceivably blow them up to 1/72 and fight some great boarding actions with plastic troops. That's where adding the egg crate interior would become essential, I think.
Attachments
Hi Steve,
the idea of blowing the ships up to 1/72 and use plastic figures is tempting, but I'm thoroughly stuck with 1/250. Of course I could use the Bacchus minitures for manninig the decks, and I might give them a try with one of the next ships.
Another option is scratch building the crew from cardboard. The trick is serial production in an industrial manner (just the same as with light AA on WW II ships). Using colouerd card could save some extra time. In particular, I'm thinking about yet another scout with manned oars. However, that's still about 40 men, a pretty lot work!
I'll do this ship as if moored, anyway, no crew at all. It will get seperate oars, thwarts, rudders, the odd extra detail, and rigging, and I guess, when finished, it will look sufficiently detailed.
Bye!
Michi
For wargaming use with these ships I made up some simple standee crew figures based on Patrick Crusiau's 25mm Roman figures (picked some I liked, pasted several together in an overlapping formation, and reduced them to 1/300). I made several types; crewmen to man engines, marines (some stands with sword/shield, some holding javelins), and archers. These are my stand-ins until I can get some of the Baccus figures. I haven't asked Patrick yet for permission to modify/use these, so I will not post them.
I also found a Ballista image online, cleaned it up, scaled it down and made a 2.5D* model for my crewmen to man. I think it looks okay on the deck of these vessels.
Al hazlet
(*2.5D is a term from another group -- it's mock-3D figures made of several flats. In my case, I made the model from a side-view of the whole thing, a front-view of the support and bow frame, and a top view of the bow, slotted together. I'll attach the file so you can see what I mean.)
Attachments
C
cgutzmer
Ohh neat. I love seeing classical period ships and oar-boats. These seem big to me for oar powered boats. Nope I wouldn't want to make that many people. The ship that Telemachos used in the Odyssey had 20 oarsmen.
Hi Michi,
I agree with you, smaller is better, more fun for me anyway.
Micromodels produced a booklet around 1950 called "Microputians" where it describes making "people" for their Micromodels using matches. It is really very helpful. I am trying to find out if it has a copyright holder, but I hit a dead end. If anyone has info on how I can do this please reply. I would like to offer this because it is very helpful. I think it slid through the cracks and not enough people are even aware of it.
Anyway, nice build! I love your work!!!
Lizzie,
I'm glad you like my little boat. It's still a a small boat, compared with the roman ships in the times of marc antony and octavian. A Decereme had a length of about 75meters and several hundred oarsmen! However, such large ships were abandoned pretty soon after the whole mediteranean was controlled by Rome. There were simply no opponents left...
I'm not too keen on building fourty figures, too, but if I wnat to show a ship in action, that's pretty much the minimum. And, somehow, I'd like to have at least one speeding across the azur waters of the mare nostrum... I guess that's what papermodelling is about: Simply masochism!
Phil,
guess what I did recently! I bought ALL Micromodels CDs! (And therefore I know the microputians, of course!) Actually, I don't know what to start with (and sadly when, neither). Maybe I'll go for the floating crane, it's a pretty common thing in bigger harbours, but I'don't know why, there's only one single model of one. However, I'd have to... yuck... enlarge it!
Bye!
Michi
Michi, EXCELLENT!!!
When I build Micromodels for the first time, (close your eyes for a sec Texman) I print at 150% so I can see and understand the build. Then I attempt at origional size. Then, and only then, can I shrink them down to fit a business card.
Please don't think I am ignoring what this thread is about, but may I suggest these sets, set A1(modelcraft), or set S1, and set F2. These are my favorite.
T
Texman
Since the topic seems to be micromodels...
What were the dimensions of the cards Micromodels were originally printed on?
Regards,
Charlie
What were the dimensions of the cards Micromodels were originally printed on?
Regards,
Charlie
Charliec, approximately 3-1/2" X 5" index card size, on "thick" card, I estimate the same thickness as two (maybe three) of standard 110# cardstock.
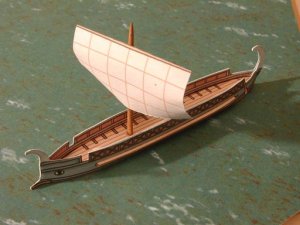
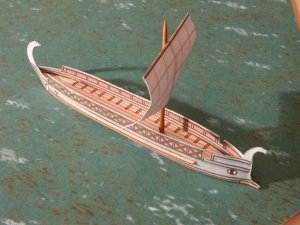
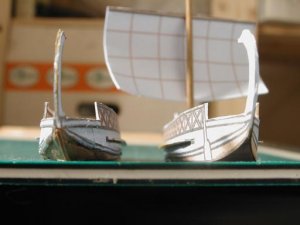
Finally... the scout ship is finished!
For several reasons I've stalled this build for over than half a year, but I wanted to finish it in time for the model show in Oberschleissheim on march the 3rd and 4th, and hey, I did it!
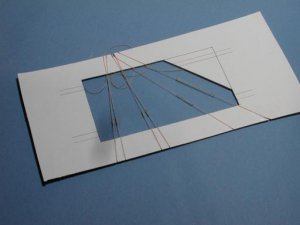
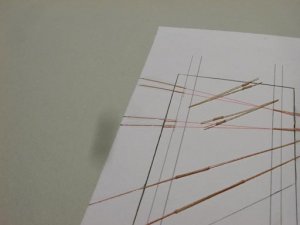
It was mainly the rigging, that was still missing (and please foregive me in advance any wrong terms, I don't do this in my motherlanguage. Actually, this is all based upon the Wikipedia article on rigging: http://en.wikipedia.org/wiki/Rigging). First of all, I had to find out how the roman s rigged their ships. I took my informations on this subject from H.D.L. Viereck: 'Classis Romana, Die Roemische Flotte', Hamburg, 1996. Additionally, I contacted the University of Regensburg, and I got specific information on the rigging of their aformentioned replica of a navis lusoria.
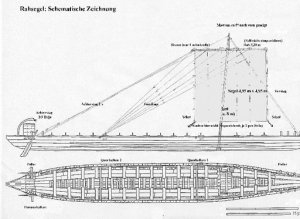
In general, the rigging was relatively simple.
The standing rigging consits of forestay, backstay, and the shrouds. All lines run through blocks and tackles.
The running rigging consists of a double halyard, sheets, braces, and clewlines and buntlines. Furthermore, the romans also used lines running from the mast top to the yard ends, which I unfortunately havn't found the english term for. The braces run through blocks. Very characteristic for the ancient rigging are the clewlines and buntline, which run in a direct line from the yard to their attachmentpoints in the back of the ship (on modern sail ships, in contrary, these lines typically run on the inside of the shrouds and, therefore, are quite unrecognizable).
Based on the rigging plan I got from Regensburg, my model has two shrouds on each side and none of the linesIdonotknowthenameof. I've ommited the halyards (no vale la pena) and I simplified the braces, i.e., I used a single line. This is, because the thread I used for the rigging is far from being as thin as it should be.
(Note, that in the plan shrouds and halyards are ommited, and the sheets are only indicated by arrows. Some quite good pictures that show the shrouds can be obtained from the 'presse' section of Dr Christoph Schaefer's home page http://www.antike-multimedial.de/201.0.html, e.g., at http://www.antike-multimedial.de/761.0.html?&tx_jppageteaser_pi1[backId]=650).
For several reasons I've stalled this build for over than half a year, but I wanted to finish it in time for the model show in Oberschleissheim on march the 3rd and 4th, and hey, I did it!
It was mainly the rigging, that was still missing (and please foregive me in advance any wrong terms, I don't do this in my motherlanguage. Actually, this is all based upon the Wikipedia article on rigging: http://en.wikipedia.org/wiki/Rigging). First of all, I had to find out how the roman s rigged their ships. I took my informations on this subject from H.D.L. Viereck: 'Classis Romana, Die Roemische Flotte', Hamburg, 1996. Additionally, I contacted the University of Regensburg, and I got specific information on the rigging of their aformentioned replica of a navis lusoria.
In general, the rigging was relatively simple.
The standing rigging consits of forestay, backstay, and the shrouds. All lines run through blocks and tackles.
The running rigging consists of a double halyard, sheets, braces, and clewlines and buntlines. Furthermore, the romans also used lines running from the mast top to the yard ends, which I unfortunately havn't found the english term for. The braces run through blocks. Very characteristic for the ancient rigging are the clewlines and buntline, which run in a direct line from the yard to their attachmentpoints in the back of the ship (on modern sail ships, in contrary, these lines typically run on the inside of the shrouds and, therefore, are quite unrecognizable).
Based on the rigging plan I got from Regensburg, my model has two shrouds on each side and none of the linesIdonotknowthenameof. I've ommited the halyards (no vale la pena) and I simplified the braces, i.e., I used a single line. This is, because the thread I used for the rigging is far from being as thin as it should be.
(Note, that in the plan shrouds and halyards are ommited, and the sheets are only indicated by arrows. Some quite good pictures that show the shrouds can be obtained from the 'presse' section of Dr Christoph Schaefer's home page http://www.antike-multimedial.de/201.0.html, e.g., at http://www.antike-multimedial.de/761.0.html?&tx_jppageteaser_pi1[backId]=650).
Attachments
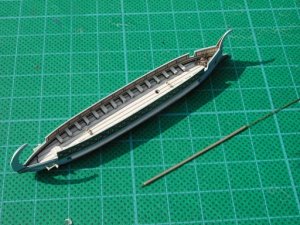
The yard was cut from two layers of card board and the sail was printed on tissue paper. I've folded and precrumpled it a bit, then fastened it to the yard. The corner of the sail hang loosely from the yard, which probably isn't historically correct, but definitely looks good. I used diluted PVA glue to keep the corners in their form.
Attachments
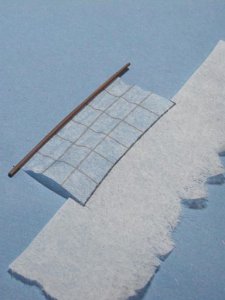
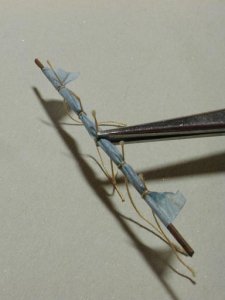
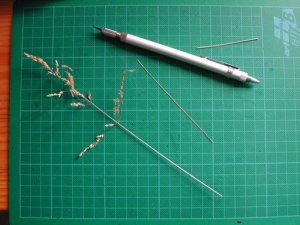
Next came the cordage.
Shrouds, forestay, and backstay were put in a jig and then treated three times with diluted PVA glue. After the glue has dried, the thread is quite stiff and can easily be attached to the model.
Shrouds, forestay, and backstay were put in a jig and then treated three times with diluted PVA glue. After the glue has dried, the thread is quite stiff and can easily be attached to the model.
Attachments
- Status
- Not open for further replies.