Rodger Young Build

Status
Not open for further replies.

mysteroid

Active Member
Hi all,

I didn't start a build thread on this model because I wasn't sure I'd ever finish it. But now that I'm getting close to the end I kind of wish I did. Oh well, live and learn.

So the story. I printed out Ekuth's Rodger Young over 2 years ago but never got around to building it. When I went home to visit this last summer I saw the stack of sheets and decided to bring it back with me.

Well after finishing the Ingram, I decided to go for it. So I'm getting into the rear part of the hull and have a goal of finishing it before we leave for vacation in February.

Still new at this posting thing, so I haven't figured out inline comments yet. So the pictures are as follows:

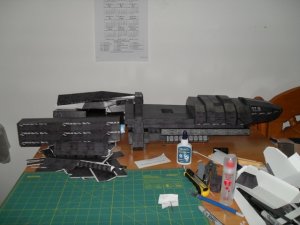
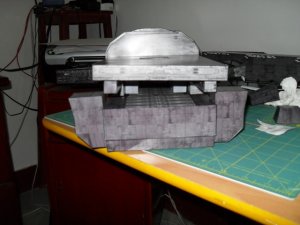
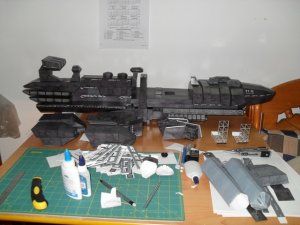
1. Overall view of progress to date
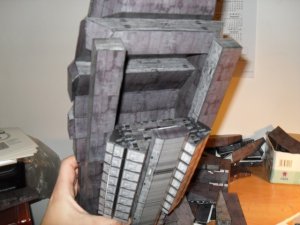
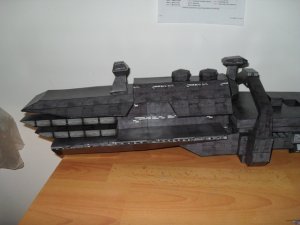
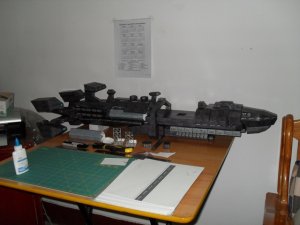
2. Doh! Big mistake, the rails are glued on too far apart, so a large part assembly (lower drive block) which is supposed to rest on the rails cannot do so.
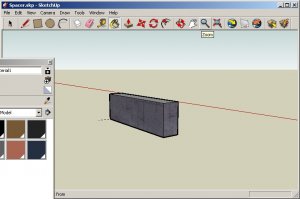
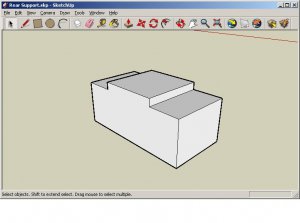
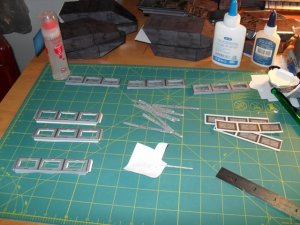
3. Well, this was a blessing in disguise cuz it got me off my butt and actually motivated me to design something in Sketchup! It may be just a spacer block, but hey, gotta start somewhere.
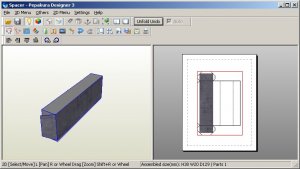
4. Imported into Pepakura
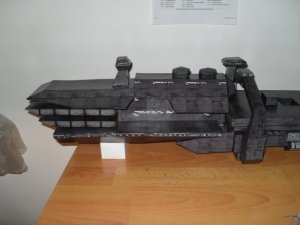
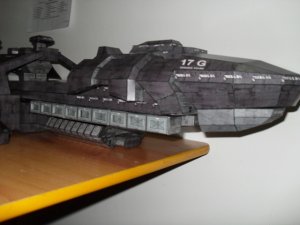
5. Installed. Works as advertised, but as you can see, the lower assembly has a nasty twist in it relative to the mid deck platform. I'm not going to worry about it. From the side it's not noticeable and this view is blocked by the rear hull assembly.

Steve
 

Attachments

  • SAM_0205 (medium).JPG
    SAM_0205 (medium).JPG
    104.1 KB · Views: 48
  • SAM_0203 (medium).JPG
    SAM_0203 (medium).JPG
    108 KB · Views: 23
  • Spacer-Sketchup.jpg
    Spacer-Sketchup.jpg
    71.5 KB · Views: 21
  • Spacer-Pep.jpg
    Spacer-Pep.jpg
    82.3 KB · Views: 23
  • SAM_0204 (medium).JPG
    SAM_0204 (medium).JPG
    110.3 KB · Views: 34

mysteroid

Active Member
Thanks for the encouragement Yogi! This guy is even bigger than I thought! :eek:

Sorry for the delay folks, I've got the rear engine pod done, the scaffold section cut out, the extra dropship bay parts cut and folded, just need to put it all together.

Unfortunately my wife had a serious health problem this week, so had to run around to hospitals getting tests and seeing a specialist. Soaked up all my build time. Still committed to finishing before Monday (leaving on Tuesday, I hope!). She's okay now, but we have to be careful.

One nice thing about China, the health care is cheap. Got a CT scan for $70, an EKG cost $4, and an MRI ran us $180.

Steve
 
E

ekuth

Sorry to hear about your wife. My hopes for a swift recovery.

Told you it was big! :mrgreen:
 

Elliott

Senior Member
Real life always comes first. Come back to the build when things settle down, we'll be here.
 

mysteroid

Active Member
Thanks for the good will guys. She's okay now. She had what's called a TIA. A temporary stroke for those not familiar with the term. It was a big surprise because she's in good health otherwise. A warning sign for all of us I suppose, eat right, exercise, repeat.

That being said I managed to squeeze in a little build time today.

For those that have built this beastie you know the back half droops a little. I made a spacer block to hold it level.

Pictures:
1. Droopy
2. Spacer block in Sketchup
3. Hey, it works!
4. Getting close!

Steve
 

Attachments

  • SAM_0283 (medium).JPG
    SAM_0283 (medium).JPG
    93.5 KB · Views: 14
  • Spacer-skp.jpg
    Spacer-skp.jpg
    39.8 KB · Views: 11
  • SAM_0284 (medium).JPG
    SAM_0284 (medium).JPG
    97.6 KB · Views: 13
  • SAM_0286 (medium).JPG
    SAM_0286 (medium).JPG
    118.1 KB · Views: 17

SEBRET

Member
That's Great news about your Wife, Mysteroid

Looking good. You'll most likely beat me to the finish line on this one. I too had a little detour in sketchup for a backside support block. I decided that it would proly end up on a flat surface so i made it a permanent piece. best pic i have

base.jpg


BTW, What did you print on? Paper almost has a shine to it.
 

mysteroid

Active Member
Hey Sebret, great looking RY, plus I like your support idea way better, mind if I "borrow" it? :twisted:

I had mine printed on a big office-type laser printer/copier. I thought it was a good idea at the time but now that I'm in the build and adding the alternate parts I find the color on the original print job doesn't match. :curse:

The print finish does have a semi-gloss look to it. I don't usually print my models on lasers so don't know if this is normal. The paper is plain ole' OfficeMax 110 lbs stock, so can't be that.

Steve
 

Elliott

Senior Member
Gald your wife is OK Steve. I had a TIA 8 years ago and wasn't so fortunate - lost @25% vision in both eyes and right eye has difficulty focusing. Still consider myself fortunate.

Both RY's look good! I love races to the finish.:mrgreen:
 

mysteroid

Active Member
Wow Elliot, sorry to hear about that. :confused: Sounds like your spirit is in the right place though!

She seems to have regained full use of her faculties/body, but time will tell right? :cry:

Steve
 

Elliott

Senior Member
Glad to hear she's regained full use of her faculties. Did y'all get the ER/doc within the 'Golden Hour'? I just thought I had a sinus headache and went to bed. Didn't go to the doc until the next day. Too late. Oh well. Life goes on. Learn to adapt. I could be blind/paralyzed/vegetative so yeah, I am fortunate. It does take time to recover. Lots of rest is good at first. All the best to both of you.:):):):)

Now......back to modeling! Mush!!:whip1:
 

Kjev

Active Member
Looks awesome! I seriously plan on using your pics for reference if I ever get around to starting mine.
 

mysteroid

Active Member
Elliot: Yes we got to the hospital right away. She actually knew that it could be a TIA. We had just gone into Starbucks and sat down when she suddenly couldn't speak. She wrote "TIA" on a piece of paper and I Googled it (wireless is free at Starbucks in China!). We went straight to the hospital from there. By the time we got there though she was able to speak clearly and after 2-3 hours she was completely back to normal. Her blood pressure was very high which they thought contributed. She's been resting and taking blood pressure meds and is doing good. She is a little snake bit though. Worried about it happening again.

Kjev: Thanks! It does come out to be an impressive model. When you build yours watch out for the lower rails. Make sure the spacing is right. You can do that by building the lower pod assembly first and then using that to space the rails. Also, use a lighter paper for the back half. I used 110 lbs. Too heavy, the back sags a lot as you can see. I think 66 lbs would do just as good a job and keep a nice even profile. Also, be sure to use the alternate parts (see below).

Looking at some stills on the web I see there's many ways to go crazy with the detailing on this model. I was thinking about going that route but I've run out of time. I won't be able to finish as hoped so this is as far as I will get for at least a month.

Pictures:

1. Dropship bay doors add-on parts
2. Overall view. I've got the one side pod just tucked in, it's not finished, in fact I'll have to redo those parts. Also the sharp-eyed will notice I glued part of the upper rail backwards. wall1 You can see where the window texturing does not continue all the way down the rail.
3. Front details. You can really see the color mismatch here. I highly recommend the dropship bay doors. They really add a lot to the model.

Thanks to all who've been watching and giving encouragement and definitely thanks to Ekuth for a job well done designing this great model! :thumb:

Steve
 

Attachments

  • SAM_0303 (640x480).JPG
    SAM_0303 (640x480).JPG
    120.8 KB · Views: 19
  • SAM_0304 (640x480).JPG
    SAM_0304 (640x480).JPG
    97.6 KB · Views: 17
  • SAM_0306 (640x480).JPG
    SAM_0306 (640x480).JPG
    96.6 KB · Views: 18

SEBRET

Member
Looks Great so far! The Bays add a lot to the model.

I see that in both our cases the engines sag a bit. That's expected because of the warp the glue cause on the back of the main hull block. I whipped up a couple of supports to attach to the other block i sent you last night. I'll try those out today and let you know what happens. Keep up the good work.
 
E

ekuth

A good way to stop the sag would be to use an inner support made of foam-core board. I'm doing this on the Giganta Galactica build I'm doing and it makes for a nice stiff support system.

Just build the parts out of foam core first and then cover with the printed "skin" part. :mrgreen:
 

mysteroid

Active Member
Sebret: Thanks for the part and looking forward to seeing how the engine supports work out.

Ekuth, that foam core idea sounds viable. I think if it was used on the mating surfaces of the big parts that would do the trick. Say, the fore and aft surfaces of the mid-hull section and then the forward bulkhead of the engine pod.

Just one problem: How do you say "foam core board" in Chinese? :mrgreen:

Steve
 

SEBRET

Member
Lol. Well my comp had a massive meltdown yesterday. Might be due to the capacitor i poped off last time i was in there. (didnt notice till i hit the power button) good thing ive been stocking up for my next build already. Will have to find another way to finish the build. I wish u better luck.

Sent from my ipod. ;-)
 
Status
Not open for further replies.
Top