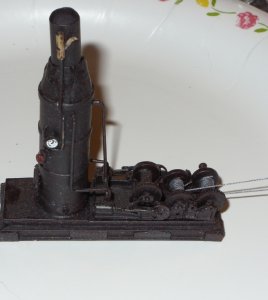
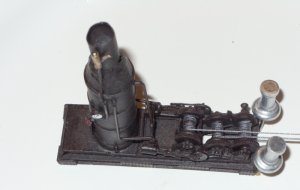
Picture thread of your Logging, Mining, or unique industrial equipment.
- Thread starter NIevo
- Start date
You are using an out of date browser. It may not display this or other websites correctly.
You should upgrade or use an alternative browser.
You should upgrade or use an alternative browser.
Go figure....Button thread. Never knew such a thing existed. Sure could'a used it when putting some guy-wires on a smoke jack.....
I picked up on that trick from Boone Morrison, who writes articles for the Narrow Gauge and Shortline Gazette.
You can also run a regular piece of thread through beeswax to control the fuzz, , that is what ship modelers have done for years to make their rigging look better.
This stuff I got from Handcock fabrics, and it is Button and Carpet thread, and as you can see from the photo, it looks quite good.
I also have some actual steel cable, which I got at the Bass Pro Shop. It is sold in bulk for fishermen who want to make their own line leaders. You can buy scale cable from some model companies, but it is much more expensive.
The cable though, requires a considerable tension to look right, I have used it as guy wires for a spar tree, but It would be extremely difficult to get it to wind around the drums, or make the turn in a pulley convincingly.
On my big donkey at Terrapin. the drums are wound with carpet thread, but the thread running off to the high line is not attached to the donkey, it lays across the top of the drums, passes through a hole in the floor, through a hole in the layout, and a big fishing sinker hanging under the layout keeps the line taught through heat had humidity variations.
Also when clumsy fingers snag the high line while trying to rerail a log car, or install a log load at the landing, nothing is damaged. I had wanted to do something similar with the surry parkers, but the elevated platform, with the need to roll cars under it made the implementation unworkably complicated, I might thry setting up a sinker at the other end of the cable
Bill Nelson
10 x 12 legs
FYI......That loader is featured in the Gazette 1:20 this month and the legs are 10" x 12".
Bill, Your representation looks fine to me.
I guess once it was anchored to prevent lateral movement they were stable. I'd fear being under one with legs of any sort. What a snorting beast of a machine!
HC
FYI......That loader is featured in the Gazette 1:20 this month and the legs are 10" x 12".
Bill, Your representation looks fine to me.
I guess once it was anchored to prevent lateral movement they were stable. I'd fear being under one with legs of any sort. What a snorting beast of a machine!
HC
S-P in the Gazette
The plans in the current Gazette is a reprint of the same plans I used to extrapolate the info I needed to build the skidder loader models.
What seems like the weak point to me on these loaders is the leveling nut on top of the legs. It just barely touches the legs. the leveler nuts on mine are grossly overscale, being plain old nuts from the hardware store (I cut down pieces of all thread to use with them). even being grossly overscale they barely touch the top of the legs.
I'm in complete agreement, I would be very hesitant to go under one of these . Of course there would be log cars under them most of the time they were loading.
Studying bits and pieces, I an short a pair of Rio Grande models 12 inch logging pulleys, for completing unit number 2, and I will probably neet a pair each If I rig the sidder as set up with a haul back line, and some extras would look good laying around on the deck. I'm reconing it will be time to cal Jay @ Jay's trains ( he tries to stock all the rio grand models bits and pieces)
The skidder loders in the prototybe photos show two pullies hanging on top of the tower. They could have been used to operate two skidder lines, using animal power to return the empty cable back to where the logs are comming from, Or they might have been set up as a haul back system, where the cables run through the pullies were hooked together so one could be used to return the line to the woods without having to hook it up to horses, mules or oxen. So far I have not been able to figure out how they were set up. the one in Terrapin will almost certainly be set up as a haulback system, as the pull is too steep to allow animal power to return the line. what we do @ the club, may be for Dr. Tom to determine.
The use of animal power in the woods, even if it is just to return a cable to the woods from a donkey, gives more operational oportunities for a logging line. Suddenly you need stock cars for moving the critters, and food and possibly water for animals would need to be transporterd into the woods. I have a stock pen, with a loading ramp, and a barn in Crooked creek, but I havn't fully exploilted this idea yet, but it could easily call for a farrier (blacksmith that shoes horses ect.) stock cars ect.
I don't have room to model it on my current RR, but I think it would be cool to model a landing where logs were brought in with an oxen team, and the logs were loaded by parbuckling them up ramps onto log cars with animal power.
Bill Nelson
Looks good. Got her all taut with the pins in place.
Typically how high off the deck were those loaders positioned above the flatcars/bogies?
Philip
Typically how high off the deck were those loaders positioned above the flatcars/bogies?
Philip
Looks good. Got her all taut with the pins in place.
Typically how high off the deck were those loaders positioned above the flatcars/bogies?
Philip
that's right, the pins keep the machinery in place I tuck the threads under a big bottle of paint to hold them tight, and apply a dot of super glue to the thread at the back of the drum.
I'm not sure how far the actual units were set up off the flat car, but there wouldn't be much advantage to being more than just high enough to clear the deck. The plans I used were for On3 , witch I had to shrink to Ho, widen for standard gauge. I just set mine up enough to clear the three types of log cars used on my outfit. Those are Keystone log buggies, MDC shorty flats, and old AHM truss rod flat cars; most of which have been fitted with rails for a barnhardt
Bill Nelson
In use they would be delivered to location on a flat car, and then jacked up enough to clear the cars
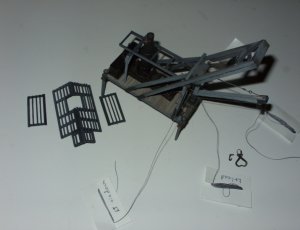
 unit #2 progress
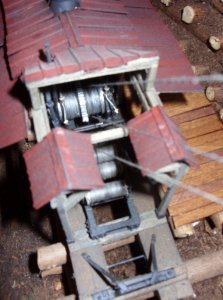
I have installed the machinery to the platform on Unit #2 and have begun to rig it. I have the cross stays in, the boom threaded, and the lead lines run through the right place between the boom frame and the cross stays ( guy wires).
The rigging on #2 is at the same place as the rigging on unit #1 now; they both need two pulleys mounted on to the tower, and the leads threaded through them, and then the rigging will be about as far as I can go until they are placed in location.
The rigging on #2 is better organized than that on #1. I wrapped each thread around a card with two slits in it, and labeled it. that helped considerably in keeping them straight. Unit #1's cables are a mess, I'm going to have to untangle them, and make cards for it also.
I also got the beginnings of the roof frame installed on unit # 2 I need to make four hinges for the movable roof wings, and get them painted and installed before I can put the roof on the loader/skider. Unit number two also needs four turnbuckles for the frame made, blackened, and installed to get it caught up with #1.
they both need to have two pulleys affixed to the boom and threaded, and then they will be essentially finished, and just need installing (after they get a group photo for me to submit to the Gazette.
Bill Nelson
Last edited:
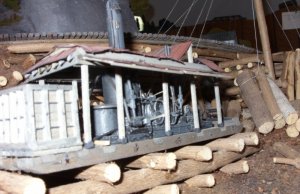
 @ the spar tree
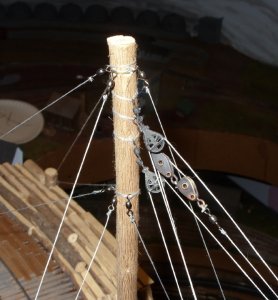
At the spar tree I really recommend Rio Grande Models pulleys, traveling carriages ect. really good stuff. in the photo of my spar tree @ terrapin the good looking pulleys are Rio grade models products. I also have some brass working pulleys from Hobby-Expo
In front of the pulleys I use fishing line swing swivels. I picked up this habit from logging modeler Lyle Noah. I'm not exactly sure what they represent, but Lyle Knew his stuff, and so I copy him fearlessly.
since I was photographing the spar pole I had to get some photo's of my Big donkey, Scratch bashed out of a huge pile of rio Grande Models bits and pieces
Bill Nelson
Last edited:
 almost there!
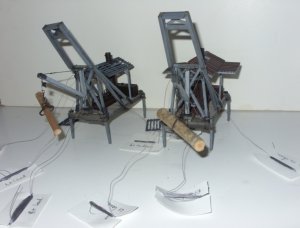
after having figured out how to control the loose cables on unit # 2 I went back and untangled the cables on unit #1, and put them on labeled cards like #2 has. I took this opportunity to photograph them together.
Unit number one just needs two pulleys attached to the boom, and it is done. Unit number two needs those same pulleys, the hinges for the roof wings, the roof and wings installed , little locator pins on the legs (to fit on matching holes on the layout to help stabilize the model, and keep it from moving and messing up the scant clearance needed for the log cars under the model), those things and roofing , and this long project is done.
Here comes the important part! the construction of these Surry parkers has thourougly hijacked this thread, and I apologise for that, but they are almost done, which will leave this thread wide open, so your mission, should you choose to accept it, is to show us your unique logging and minning equipment. you ain't got none? then build some and show us how you did it,
Come o in, the water is fine. got a idea, but don't nkow how to proceed, bring that up and we will work on it. I like showing off, but I'd like to see other folks showing off too. Can't do this good? I've been doin this stuff for 43 years, and three years ago I wasn't this good, you learn by doing, and sharing; so do and share
thanks for the soapbox
Bill Nelson
Last edited:
after having figured out how to control the loose cables on unit # 2 I went back and untangled the cables on unit #1, and put them on labeled cards like #2 has. I took this opportunity to photograph them together.
Unit number one just needs two pulleys attached to the boom, and it is done. Unit number two needs those same pulleys, the hinges for the roof wings, the roof and wings installed , little locator pins on the legs (to fit on matching holes on the layout to help stabilize the model, and keep it from moving and messing up the scant clearance needed for the log cars under the model), those things and roofing , and this long project is done.
Here comes the important part! the construction of these Surry parkers has thourougly hijacked this thread, and I apologise for that, but they are almost done, which will leave this thread wide open, so your mission, should you choose to accept it, is to show us your unique logging and minning equipment. you ain't got none? then build some and show us how you did it,
Come o in, the water is fine. got a idea, but don't nkow how to proceed, bring that up and we will work on it. I like showing off, but I'd like to see other folks showing off too. Can't do this good? I've been doin this stuff for 43 years, and three years ago I wasn't this good, you learn by doing, and sharing; so do and share
thanks for the soapbox
Bill Nelson
Hey Bill no need to apologize for your Surrey Parker builds. That project was a real good ride even if they are missing their middle legs:-D I had to say that, again a great project from a great builder.:thumb:
Hey Bill no need to apologize for your Surrey Parker builds. That project was a real good ride even if they are missing their middle legs:-D .:thumb:
As God intended!
 roof wing hinges
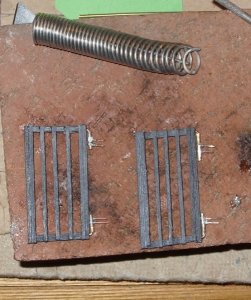
I have bade roof wing hinges for unit #2.
Since 1, you can't see them, and 2 I don't know what they look like, I opted for strength utility, and ease of construction over any scale consideration.
the hinges consist of a brass tube, and brass wire that will fit in the tube opening. I bend a piece of the wire to an L shape and stick the short end in the tube. I drill two holes through the other end of the tube , I stick two pieces of brass wire through the holes and solder them in place ( the L part is elsewhere when this happens so it is not soldered into place also).
The long end of the L is then ACCed into holes drilled into the roof wing frame. and the tube is inserted on the short end of the L. Next I will drill holes for the brass rods sticking out of the other end of the tube in the roof frame, and they will be inserted and Acced. then I can paint the hinges black, and the roof will be ready to be sheathed with tin and installed. I'm getting close!
Note: in the picture you can see the texture I put on the strip wood by dragging a fine tooth razor saw over it to give it some grain. such "grain, is grossly overscale, but it makes the model look better, Your brain knows there ought to be some grain; if it was scale size you couldn't see it, but your brain is happier when you can see it.
Bill Nelson
Last edited:


