

This looks good. I can see how layering the leather components and stitching could add additional depth and realism to the project.
Orc village
- Thread starter Papierschnitzel
- Start date
You are using an out of date browser. It may not display this or other websites correctly.
You should upgrade or use an alternative browser.
You should upgrade or use an alternative browser.
I'm going to give some observations. Please don't think I'm being very critical of you because I think you are doing great work on this. I want you to succeed. We all understand basically how things work. If an image, sketch, or drawing shows something that doesn't work, it causes us tension. They have found this to be true with crows. Show them a sketch of a bird standing improperly on a branch that is not connected to a tree and they get really confused. I happen to know that also affects our parakeets but that is another story. So, it doesn't look quite right to you because there are some construction problems.
Think about how this is being built. For starters, the material would be on the outside of the poles. IF one actually wanted to put the material on the inside of the poles, the material would sag at the tie points. Especially on the lower half, there would be a significant gap between the material and the poles. Take a look at pics of Mongolian tents and teepees. Even better, go on youtube and watch a video on how to erect a teepee. Survival Lilly has one of her working herself silly with a friend trying to erect one of these things. If the material is tied from inside the poles, the holes where the ropes tie are stress points. In a short period of time it will rip. Also, it would be extremely hard to erect inside the poles. Much easier and more durable outside the holes.
Next up, the stick bindings. Good idea but something is not quite right. On a teepee, the bindings are at the top, but beneath them is a flap that also secures to the tent. Again, watch how one is erected and it will make sense why things are the way they are.
I would think a single piece of material with the skins sewed together would be appropriate. You want all your parts connected so you can erect this thing quickly in the field. Make sure everything is stitched except for the flap. Keep all your openings on the same side. The stick bindings and the flaps should all be in the same panel on the tent. That is where you know you will get leaks and you can deal with it by positioning or a separate piece to shield the holes from the weather.
There needs to be a support structure for those poles. There is no way they can be freestanding. You would need a hoop inside halfway up to keep the poles extended and not pulled down by the tent and a hoop at the top to keep the spread there. That is why the teepee only has a binding at the top, the poles are resting on each other. You start by binding three poles on the ground, erect those, then add more poles and bind again. Again, watch the videos erecting teepees. Maybe having those poles mesh together at the top and bound will fix it, but it would still need a hoop in the middle. You don't need to make the hoop, just show its impression on the fabric of the tent.
Of course, it's fantasyland and you can do whatever you want to see. Artistic license is used all the time. Look at Warhammer. There just ain't no way. But it looks cool. Artistic license is fine, but if something is too far off, it will nag at you that something is not right. Get the engineering right and the art will shine through. Get the engineering wrong and nobody sees the art. Just my opinion. I've been told I'm an over-analytical jerk anyways.
I've been sick for 2 1/2 weeks barely able to view posts then post this long thing. I think I need to lay down because I wore myself out.
I hope I have been helpful. This is looking good and I really want to see this succeed.
Just thought of something else. Maybe put pockets in the tent for the poles to slide in and suspend the tent inside the poles. I wouldn't put lashings between the pockets. Might just use some of the poles for the pockets in the tent and the rest to support the tent. Of course, the pockets can be rendered on the poles.
- Apr 5, 2013
- 13,499
- 9,551
- 228
Not sure of the poles not being on the outside as an error. Just look at the Yak skin boats. The frame that gives support is on the outside of the skin. This protects the skin. It would be easy to lash leather skins to outside poles by many many methods. The poles on the outside would make for quick disassembly, and transportation of the lodge. I understand how Teepees are made, but remember, in the Summer, the outer coverings were not used, exposing the wooden frame. The Winter would see the outer layer added, this gave the classic look, but more importantly, made a dead air space between the two layers, and it got quite warm in there. These domiciles breathed, but in the way they wished them too. Rarely were they single layer , but were structures that changed with the weather. They were made by different tribes different ways. It's easy to find Black and White photos of that era depicting the real thing. They weren't Orcs though. They were a civilize nations in their own right, and no need to go into the story that everyone knows.
They weren't ORCS, Orcs are fantasy, and with that in mind..................")
Study the picture of the Sioux Teepee, a very well thought out efficient design by any standard. This shows the inner layer, without the Cold Weather cover.

Ojibwe Bark covered lodge:

Wetu Bark Teepee

They weren't ORCS, Orcs are fantasy, and with that in mind..................
Study the picture of the Sioux Teepee, a very well thought out efficient design by any standard. This shows the inner layer, without the Cold Weather cover.
Ojibwe Bark covered lodge:
Wetu Bark Teepee
Thanks for the great feedback guys! It's all true and makes sense. I think the outside sticks versions still need an inner structure to hold the whole thing in place. Maybe they are on both side sometimes
The only reason I have added the strange outside poles with weird ropes tied is the Warcraft franchise where I have seen such design. I agree, no way it can hold like this architecturally. Esp with the bigger hut roof I also imagine some substructure as I cannot imagine it staying in place without it. But as you said, it looks kind of cool ... maybe just because it looks to strange.
If you look at one of my first pics of the larger roof, the basic option is to have just the leather roof version and if you want you can then glue some logs under it extending just a little to show. They do not even have to be pointed. On the small huts, I have hinted with some shading that there is some underconstruction (at the heights of the ropes). And I have also thought about making "sag" shadows where they would be if you would put the posts on the outside but for sake of ease I have just made the one texture version.
Right now my file has all these color and shading options with layers, that when I start with different base textures it will become unusable because of hundreds of layers to switch on or off. So I am hoping I can get away with the base texture sometime not being perfect.
And, subnuke, get some rest! I will get prepared for your feedback when you are at full strength Just keep your critique coming. I love to hear different angles, ideas, views. Even if I don't incorporate them into the current work, they still get stored in my brain for later use!!!
The only reason I have added the strange outside poles with weird ropes tied is the Warcraft franchise where I have seen such design. I agree, no way it can hold like this architecturally. Esp with the bigger hut roof I also imagine some substructure as I cannot imagine it staying in place without it. But as you said, it looks kind of cool ... maybe just because it looks to strange.
If you look at one of my first pics of the larger roof, the basic option is to have just the leather roof version and if you want you can then glue some logs under it extending just a little to show. They do not even have to be pointed. On the small huts, I have hinted with some shading that there is some underconstruction (at the heights of the ropes). And I have also thought about making "sag" shadows where they would be if you would put the posts on the outside but for sake of ease I have just made the one texture version.
Right now my file has all these color and shading options with layers, that when I start with different base textures it will become unusable because of hundreds of layers to switch on or off. So I am hoping I can get away with the base texture sometime not being perfect.
And, subnuke, get some rest! I will get prepared for your feedback when you are at full strength
Just keep your critique coming. I love to hear different angles, ideas, views. Even if I don't incorporate them into the current work, they still get stored in my brain for later use!!!I have looked at tipi entrances in more detail and found that they have a cloth/patch that they hang on the front over the entrance so I tried this on my hut and love it much better. It is fixed with sabertooth fangs or dinosaur teeth I will make a removable version too. And a hut without the outside poles, so you see how that would look. Back to building ...

I will make a removable version too. And a hut without the outside poles, so you see how that would look. Back to building ...Ladies and gentlement, I present ... the removeable flap door!
And this time I build the hut tent-style, so the poles are on the inside and not spiked. Should look more like a reasonable version than the crazy outside fantasy build

And this time I build the hut tent-style, so the poles are on the inside and not spiked. Should look more like a reasonable version than the crazy outside fantasy build
This looks really good! I have to agree with @subnuke, this still has the "fantasy (Tuskin Raider hut like) look" (which I like as well).
Keep up the great work!
Keep up the great work!
Yeah, the whole bent poles thing looks surrealThis looks really good! I have to agree with @subnuke, this still has the "fantasy (Tuskin Raider hut like) look" (which I like as well).
Keep up the great work!
But I am happy that you like it. Working on the ground texture now. Want it to be a good mix between "real" and working well with the hut textures. I replicated a deserty ground texture from a picture but as good as it looks on its own, it's just too noisy with the hut.After a crazy weekend learning tons of new stuff in Blender I can show you first results for the ground texture. I have developed a workflow where I can generate virtually endless terrain texture and then render the parts that I need. Could be a huge 48x48" gaming mat or some 6x6" print out tiles.
Here I have printed a more final test (I have a table full with lots of different tests!) with the huts and a mini. I am quite satisfied now with the color and balance of detail amount. You don't want too much detail or else it becomes too noisy visually and is more distracting than pleasing.
The ground tile has little different left and right. Which one do you like better?

- Apr 5, 2013
- 13,499
- 9,551
- 228
After a crazy weekend learning tons of new stuff in Blender I can show you first results for the ground texture. I have developed a workflow where I can generate virtually endless terrain texture and then render the parts that I need. Could be a huge 48x48" gaming mat or some 6x6" print out tiles.
Here I have printed a more final test (I have a table full with lots of different tests!) with the huts and a mini. I am quite satisfied now with the color and balance of detail amount. You don't want too much detail or else it becomes too noisy visually and is more distracting than pleasing.
The ground tile has little different left and right. Which one do you like better?
View attachment 157846
I like the right side more.
Working on the ground base for the small hut. Had to rearrange the rock distribution layers and made some "interior". I want to add some sleeping rugs and a little fireplace in the next days.
This is the ground tile with the hut on it ...

... and if you need to game inside, just the take hut off!

This is the ground tile with the hut on it ...
... and if you need to game inside, just the take hut off!
Thought I show my progress on the camp fire before I leave to meet the folks for the easter weekend.
I seem to have a problem with uploading a pic today, so here is the link to my site:
I seem to have a problem with uploading a pic today, so here is the link to my site:
There is a problem with the photo upload system. CG Administration has been notified of the issue.
I am sorry for the inconvenience this is causing.
I am sorry for the inconvenience this is causing.
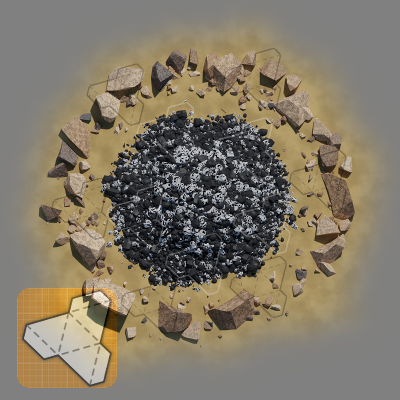
I think I have settled on the final camp fire textures. Have a look at the evolution

The bottom row is the final one. Left is the cold fire and on the right the glowing version. I had a short look into making fire but it never looks that good so I think the glowing coals version sells the lit fire better.
The bottom row is the final one. Left is the cold fire and on the right the glowing version. I had a short look into making fire but it never looks that good so I think the glowing coals version sells the lit fire better.